Admin Overview
The administration tab is divided into multiple sections covering a variety of administrative actions, as detailed below.
Account Information
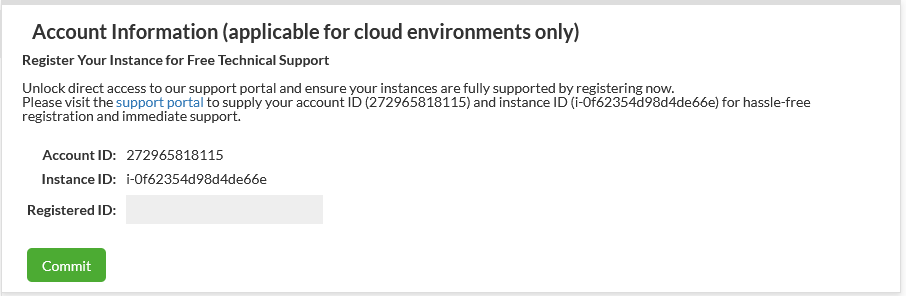 This section is to view installation metadata to help customers work with Heimdall Support in enrolling for complimentary support. Account ID is an GUID of the installation, while Registered ID is provided from Customer Support to verify enrollment. Enrollment can be confirmed by a checkmark next to the field (as well as the removal of the UNSUPPORTED banner) see below:

License Configuration
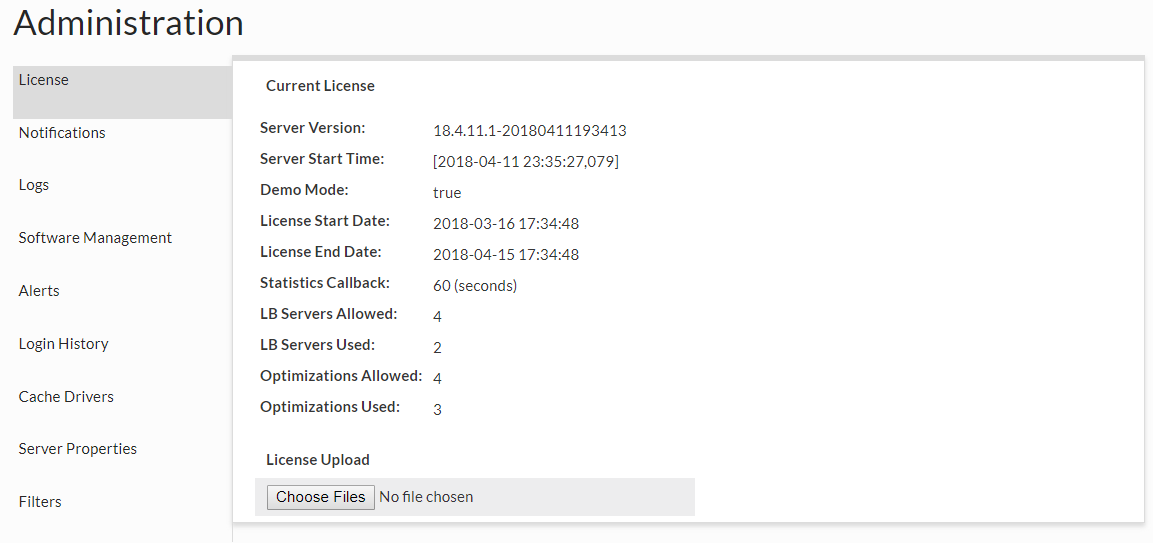 In this section, a new license file can be uploaded when provided by Heimdall, and the current settings and license use can be observed. In Demo mode, up to 4 LB servers can be used, and up to four VDBs with rules (optimizations) can be enabled for 30 days. The used count is only based on VDBs that have received traffic in the last 30 seconds, so will dynamically account for activity. If the used values surpass the allowed values, then a warning will be displayed on the console, but no restriction in features will be enforced. License handling is strictly advisory, i.e. while the system may complain about a license being invalid, it will not restrict what is done, to insure no outages occur as a result of licensing.
Note: When using an AWS paid-for instance, the proxy use on the instance will not count toward license use. Additionally, added paid-for instances can be reconfigured to be a pure proxy instance and will also not count to license use on another management server.
Log Management
Log Management
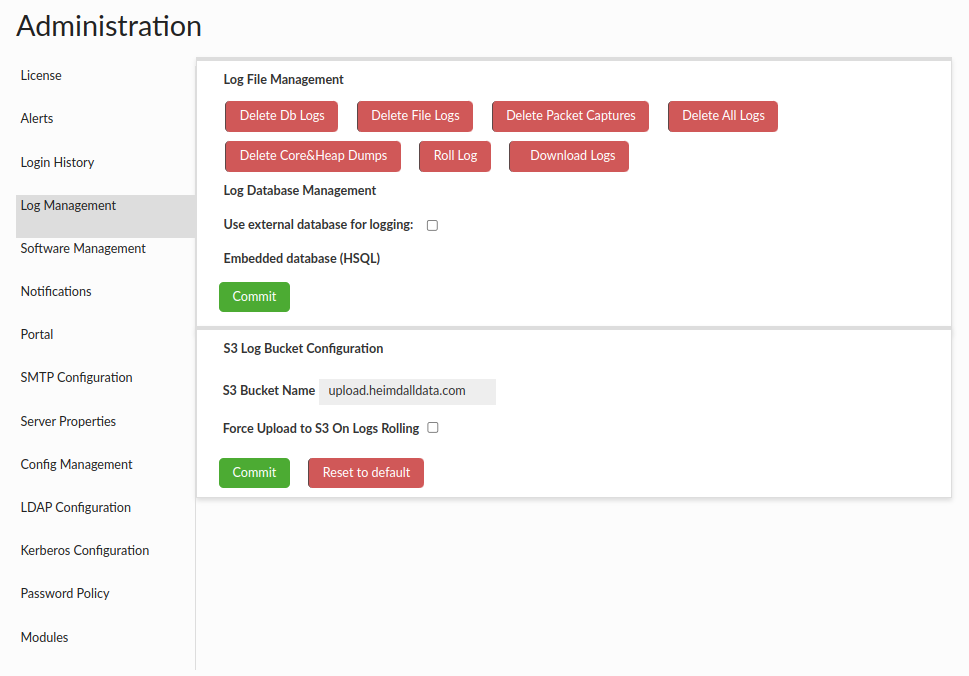
This section is provided to assist in managing log files and configuring data source used for logging. Core dumps are files that are generated by the operating system when a program terminates abnormally, such as by crashing or encountering an error. Heap dumps are files that contain a snapshot of the Java Virtual Machine (JVM) heap at a specific point in time. This functionality is removing all core files from /var/lib/systemd/coredump folder and also core files and heap dumps files from the project directory.
Using the Download Logs button will download a zip archive, with optional encryption password for log files. For details see Logs.
Log Database Management
By default, an embedded database supplied with Heimdall is used to store logs and statistics, however there is an option to select user configured data source (MySQL, PostgreSQL, Oracle and SQL Server supported). If Heimdall is unable to establish connection to selected source at any point it will fall back to using embedded one. User configured in selected data source has to have database root privileges.
Cloud Logs
This section allows you to configure Heimdall to send user/proxy login events to AWS CloudTrail for centralized logging and audit trail purposes. When enabled, the exact same logs as those which can be found on the Logging History tab, will be sent to AWS CloudTrail Lake.
Configuration Requirements: Send login entries to CloudTrail and Cloud Trail Lake Channel ARN
Configuration options can be found in: Log Management Options
- Important: Use the Channel ARN, not the Event data store ARN. Proper IAM role has to be configured.
CloudTrail Lake's supports lake query federation with Amazon Athena, which allows you to run SQL queries directly against your event data store for advanced analytics and reporting.
Log Server Properties
These are properties that can control overall Log server behavior, and will be added to over time. Current properties supported: Log Server Properties
For casual Server Properties, see Server Properties.
Security Tags
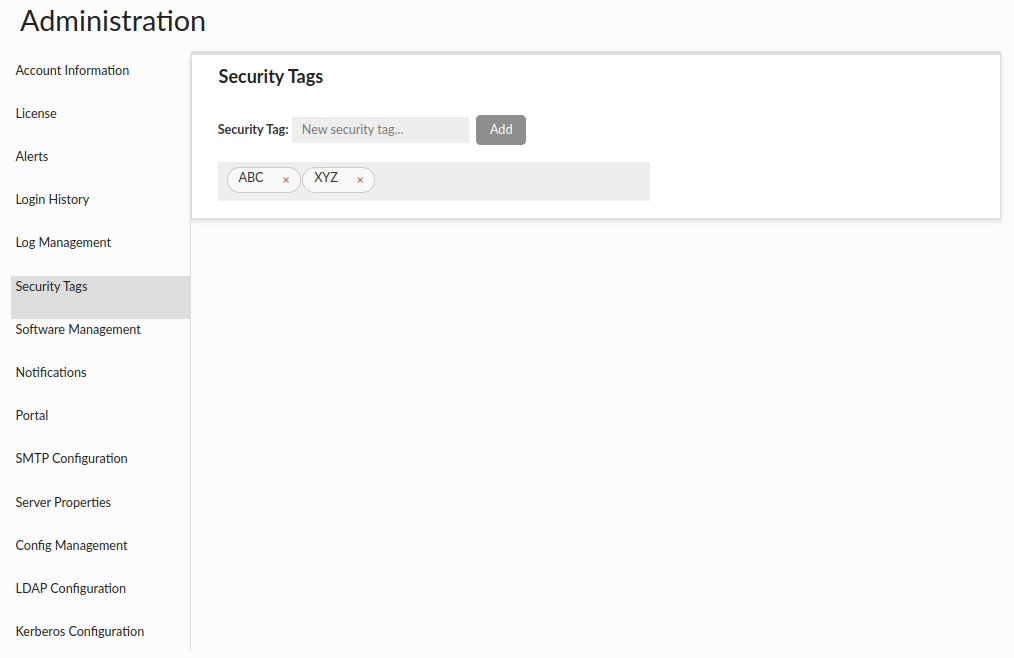 This section allows for the management of security tags, which can be applicable in the database browser section of Source tab. Each resource (i.e. databases, schemas, tables, views, columns) in the database browser can be tagged with one or more tags. The admin can select a specific tag from the dropdown and filter out the tagged resources.
Warnings:
- If you delete a resource in your database that had assigned security tags and later decide to recreate it, it will inherit those tags.
- If you change the name of a given resource in your database, the security tags assigned to it will be lost.
Software Management
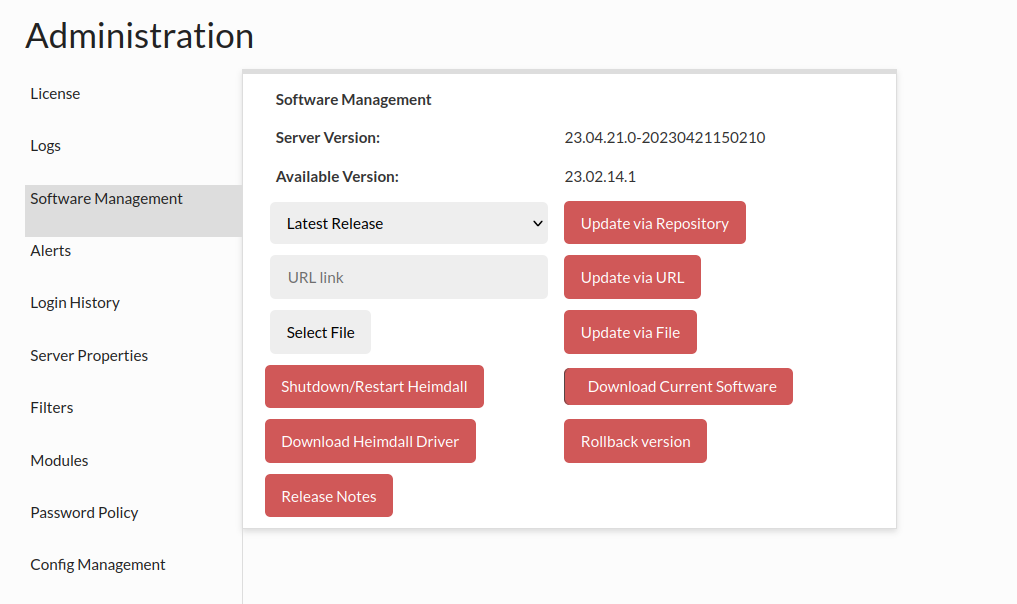
This section allows for management of the software. In the first dropdown, you can select a version of code to update to. Release is the normal release train of code, test versions are generally just before a new release, and development are the often daily updates that have completed regression testing. Customers will often be asked to update to the development build if they have encountered a problem and want to apply the fix for it. To apply a particular version, select the version in the dropdown, then click "Update via Repository". Please note, if you have independent proxies running (vla NLB or as a service), you will need to restart them independently as well. To check the version of code each proxy is running, please refer to the status tab.
Note: Any build pushed as a development build have passed all regression testing that any previous version has passed. What may not yet be complete are regression tests for the new changes, which often are developed in parallel with customer testing of the changes. This can result in frequent development builds, but allows for rapid test/fix/deploy cycles during customer POC processes. Once a POC is completed, we will work with customers to schedule a full release build for use in production that has completed full and updated regression testing.
You can also update the version of Heimdall by providing the url link to the zip file, complete this action using Update via URL button.
In the event that you want to update to a particular version of Heimdall that was provided to you as a zip file, you can use the third section for a manual update. Simply select the heimdall zip file, then update via File.
The next option is the Shutdown/Restart Heimdall button, which will not explicitly trigger a restart, but will rely on any restart mechanisms on the server to trigger the actual execution of the server after it terminates.
In the event you need to download the Heimdall driver (say to use as a jdbc driver) the next option "Download Heimdall Driver" can be used.
If you need to roll back to a previous version of the system, the quickest way is to use the "Rollback Version" button. Heimdall stores two versions of the system - the current and the previous - and you can swiftly switch between them.
Following is the release notes link, for the most current release notes.
Note, for command line manual update, please do the following:
1) copy the file into the install directory as heimdall-new.zip 2) cd to install directory 3) execute the following commands:
* sed -i "s/\s*\"modules\/.*\",*//g" config/heimdall.conf
* unzip -j heimdall-new.zip
4) kill and restart the heimdallserver.jar process: ps auxw | grep heimdallserver.jar root 4198 0.0 0.0 6100 624 pts/0 S+ 18:03 0:00 grep --color=auto heimdallserver.jar root 26005 30.8 4.0 9679444 638504 ? Sl 17:58 1:25 java -server -XX:+ExitOnOutOfMemoryError -jar /opt/heimdall/heimdallserver.jar
kill 26005
The next option is the Migration button, which initiates the download and execution of the 'heimdall-migration.sh' script. The script carries out all necessary actions to meet the requirements for the upcoming release.
Current migration steps:
-
Install Java 17 and set it default
-
Update heimdall-entrypoint.sh script
If there will be an issue with download file, you will receive an error with link to the script:
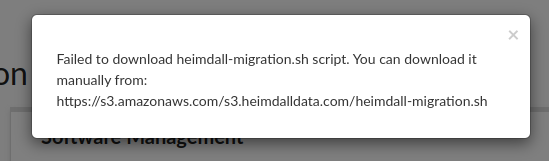
If you encounter this issue, proceed to download the migration script manually here. Before executing the script, ensure it has the necessary execute permissions:
chmod +x heimdall-migration.sh
To manually run the migration script on the Heimdall Manager host, use the following command:
bash heimdall-migration.sh
If an error occurs during migration with retrieving the latest file heimdall-entrypoint.sh, it should be downloaded from here, placed on the host where migration is being conducted, and the path to it should be provided as an argument to the script:
For example: bash heimdall-migration.sh /tmp/heimdall-entrypoint.sh
Alerts
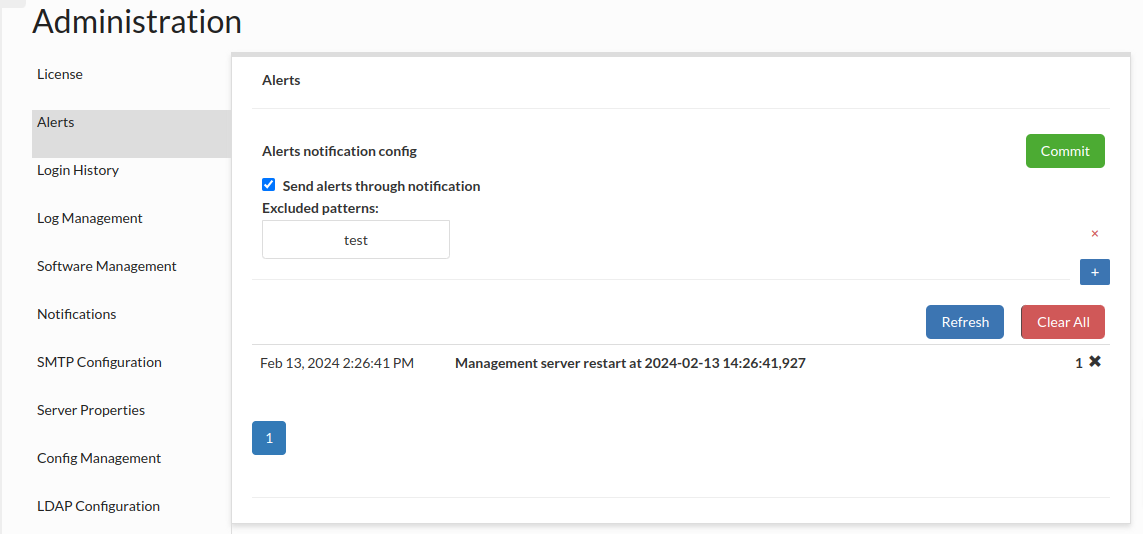 This section provides a list of any alerts that have been dismissed with the check. Any alerts in this list will not be shown in the top of the GUI until cleared.
Sending alerts through notification: If this option is checked, every alert which message doesn't match any added pattern, will be sent through notification. If no pattern is added, all alerts will be sent through notification. The System Notification has to be specified to make it work and to see below options.
Preconfigured excluded filters: Every alert which message contains a phrase from a checked filter will not be sent through notification.
Excluded patterns: Alerts not matching this patterns will be sent via notification.
Notifications
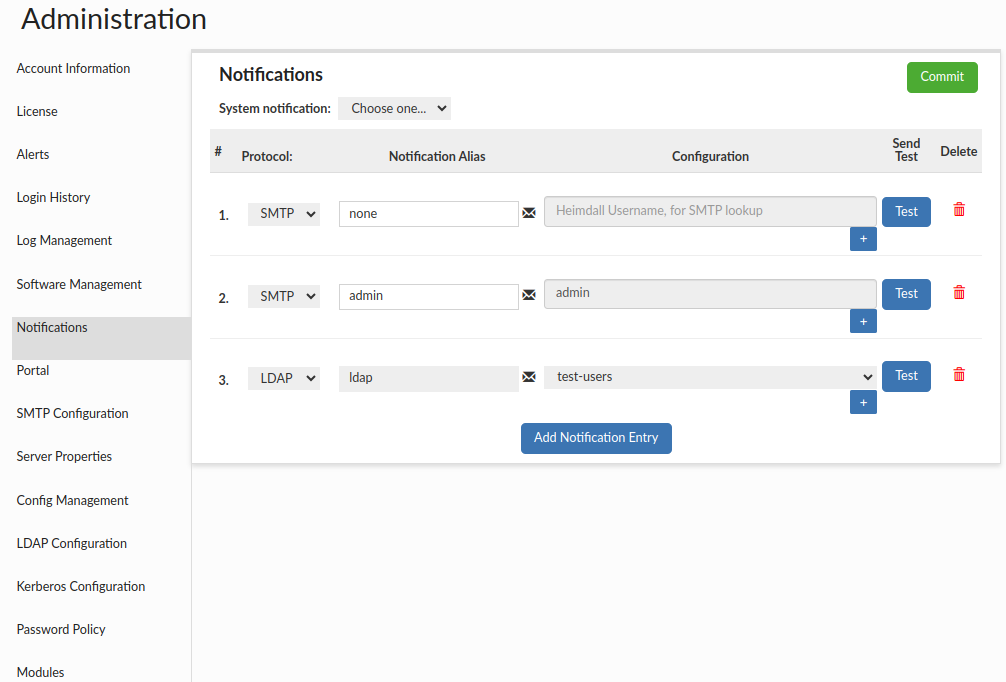
This section provides the capability to create group notifications. Users can choose from five supported protocols: AWS SNS, LDAP, SQL, SMTP or SIMPLE. Additionally, there is an option to view the list of emails associated with a particular entry by clicking the envelope icon (except SIMPLE). This will display a popup showing the email addresses.
System notification: This option allows to choose which notification config is used as system notification and will be used to send various system messages, such as alerts by default.
When choosing AWS SNS for email (and potential SMS) notifications, it will require Heimdall to be hosted on the AWS platform, having appropriate AWS IAM roles and permissions configured to interact with AWS SNS.
When selecting SQL, the user needs to specify the target source and provide a query that will fetch email addresses from the database for that particular config.
When choosing SMTP, user will be able to define his mailing list (from existing Heimdall defined users in Users tab). Also, please remember to configure SMTP client in the Admin tab -> Smtp Configuration.
When choosing SIMPLE, user will be able to define his mailing list, similar as in SMTP but without the need for defined users in Users tab. Smtp Configuration is still needed.
When choosing LDAP, user needs to have LDAP configuration set up, as it requires connection to the LDAP server to retrieve the groups.
Additionally, it's possible to create a "none" type notification, meaning without specifying any group or recipients. This is used in portal mode, where it can be assigned to a Role Config that should be auto-approved. Such empty notifications without recipients can only be created with the SMTP protocol.
The External Approvals option is only available when Portal Mode is enabled. If this option is selected for a given entry, and that notification is then assigned to a role in Roles Management, then when a session is requested for that role via the portal, each recipient of that entry will receive a special link with a token. By opening that link, they’ll be able to approve or deny the session. Importantly, such a user does not need to be a Heimdall user. In this case, each user receives a unique token. The emails are sent via the SMTP protocol. Therefore, make sure you have this properly configured in the Smtp Configuration section.
After making any changes, they must be submitted using the Commit button.
Portal
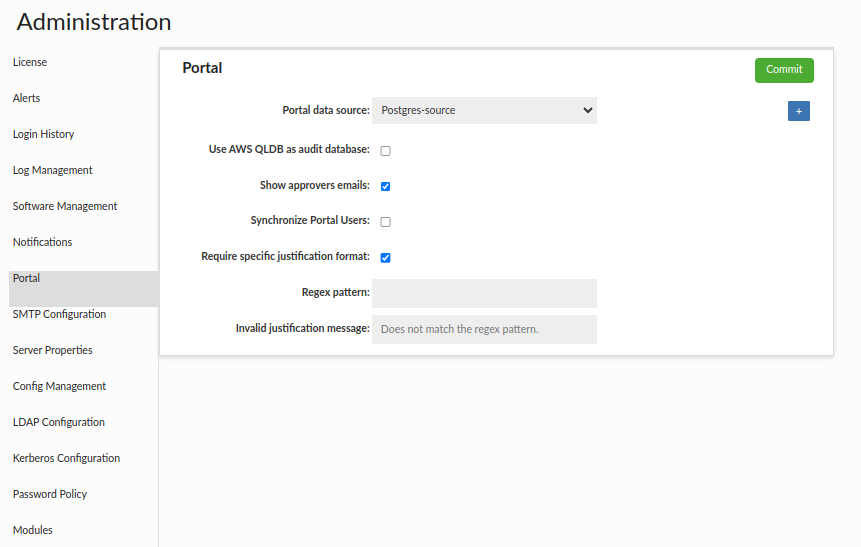
The "Portal Basic" section is generally used to configure settings related to the portal. Within it, we can define the LDAP configuration, from which portal users will be sourced, the data source where portal data will be stored, and several checkboxes.
- Portal data source - Data source where portal data will be stored.
- Portal Host – the URL where the Central Manager is hosted. Approvers use this URL to access the portal.
- JWT Signature Key - used to sign and validate the token signature for External Approvals. The signatureKey must be provided in Base64Url format, and once decoded it must have a minimum length of 256 bytes. In its encoded form, only the characters A–Z, a–z, 0–9, -, _. Note: The "signatureKey" can be stored in the Secrets Manager. Note: The signature key does not support secret rotation at this time.
Alternatively, you can generate the key by clicking the corresponding button.
- Show approvers emails - If selected, it will be possible for all users to view approvers' emails for a specific role. Admins can always see these emails, even without the checkbox being checked.
- Send audit logs to CloudWatch - Indicates whether the audit trail logs should also be saved in the AWS CloudWatch.
- CloudWatch namespace - The namespace specified in this field will be used as the log group name in the AWS CloudWatch. If left empty, audit logs will be sent to the default namespace: HEIMDALL-mgmt, provided that logging is enabled in Server Properties.
- Send audit logs to CloudTrail - Indicates whether the audit trail logs (Session Audit tab records) should also be saved in the AWS CloudTrail Lake
- Send audit queries logs to CloudTrail - Indicates whether the audit trail session queries logs (The SQL queries which have been executed during portal session - when done via Heimdall proxy VDB) should also be saved in the AWS CloudTrail Lake. This option will work only when "Log All Portal Sessions SQL" (VDB → Logging → Log All Portal Sessions SQL) option is enabled on the VDB.
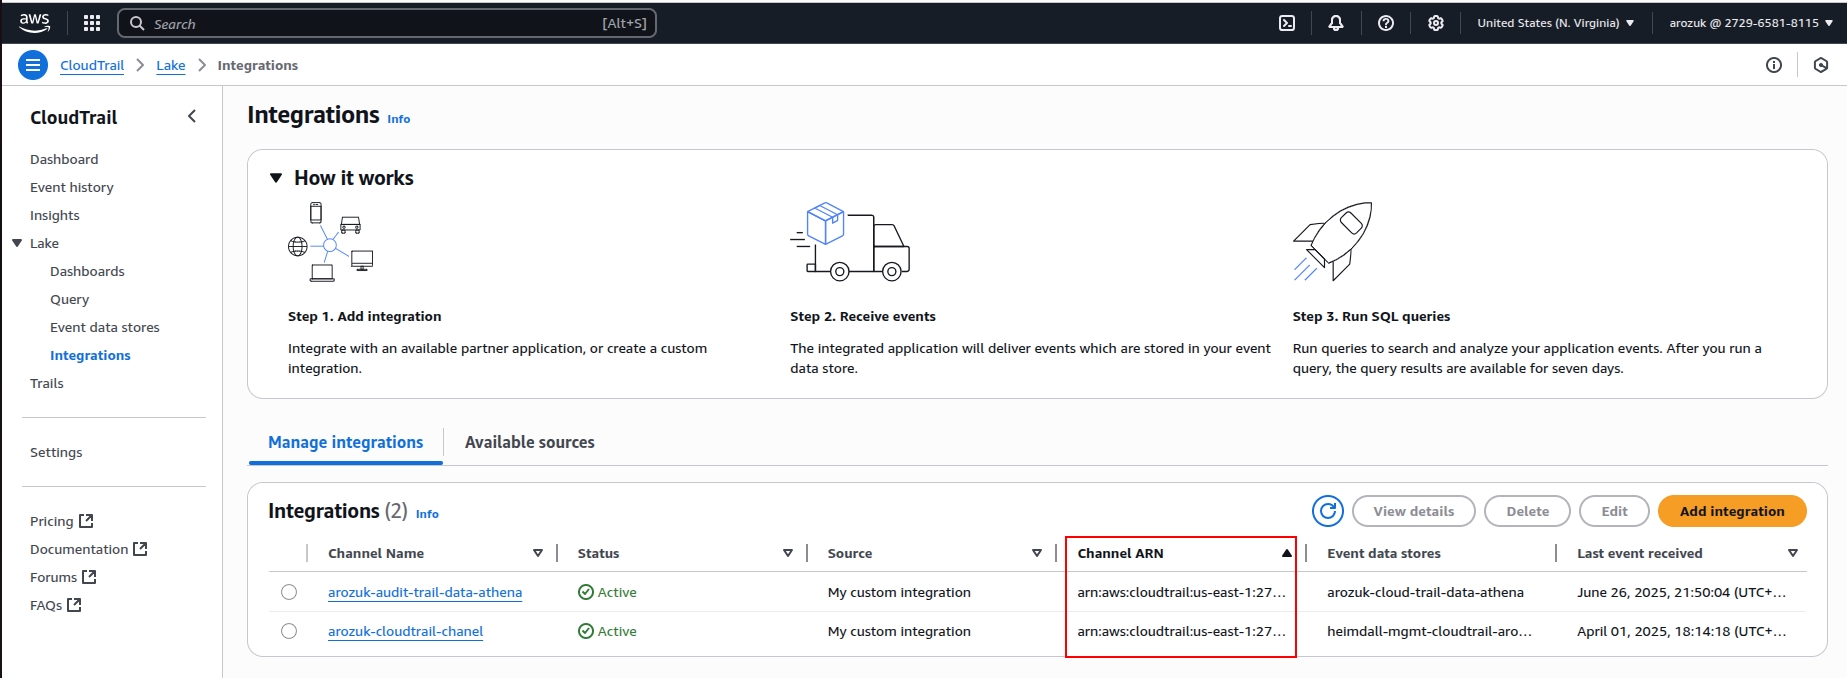
- Cloud Trail Lake Channel ARN - CloudTrail Lake Channel ARN, in the format:
arn:aws:cloudtrail:<region>:<account-id>:channel/<channel-id>. Can be found on AWS with path CloudTrail → Lake → Integrations (more information can be found on CloudTrail Lake Integration for Login Events) - Synchronize Portal Users - Indicates that if the LDAP Group Filter matches, Heimdall (GUI) users will be created automatically.
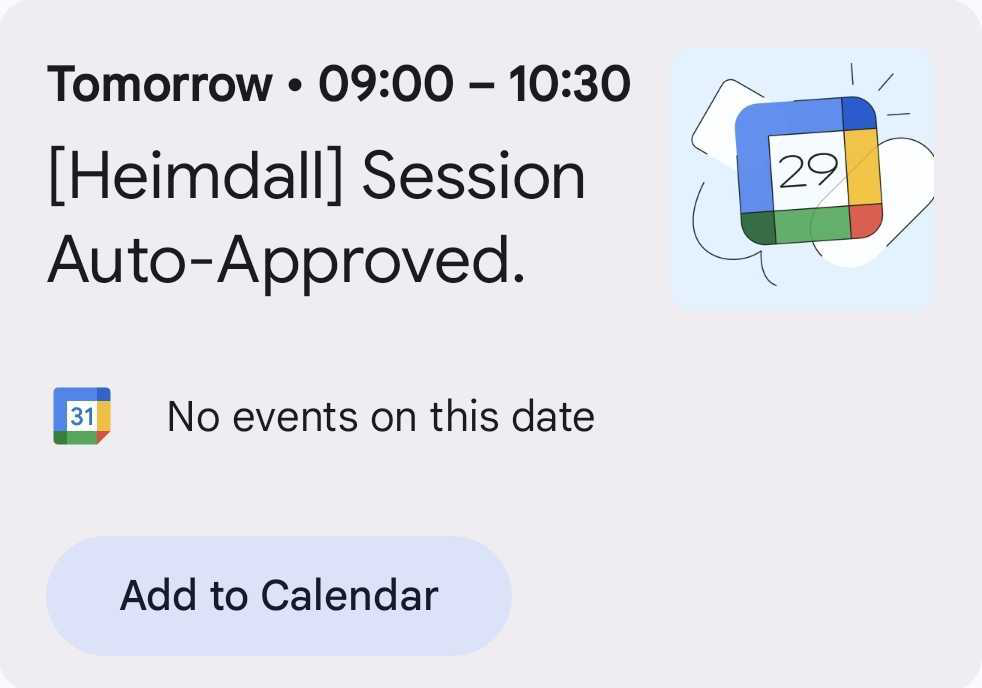
- Send Calendar Item - Indicates whether a calendar item should also be sent along with the emails about an approved session, but only if the session start time is more than one hour ahead. A lot also depends on the email client — not all clients display the .ics file as a graphical calendar event as below.
- Require specific justification format - If selected, there is an option to specify the regex that the justification must match when requesting a session.
- Regex pattern - Specifies the regex that must be matched in the justification field.
- Invalid justification message - Specifies the message to appear when requesting a session if the justification content does not match the configured regex.
To simplify portal configuration, three additional sections are available below: one for Notifications, the second for Data Source, where you can configure Group Mapping and Roles Management, and the third (Users) for setting portal users and manually assigning them groups.
For more complex configurations, it is recommended to configure them in the dedicated tabs intended for each specific setting.
If you are interested, please see the Portal Guide page.
SMTP Configuration
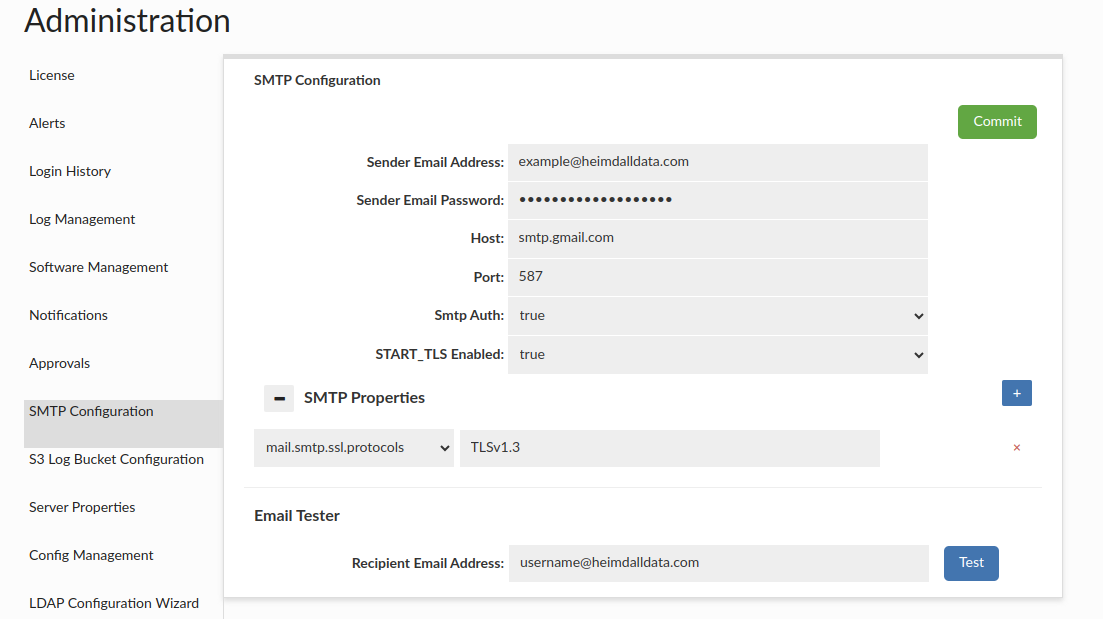
This section provides the functionality to establish SMTP configurations for email dispatch. Users can adjust the configuration to their preferences, by incorporating relevant properties in the SMTP Properties section. The Heimdall team recommends users set the ssl protocol to TLSv1.2 or TLSv1.3, otherwise TLSv1 might be used.
Available configurable items can be found there: SMTP Configuration
⚠️ Note: While using e.g. Google smtp, user should consider using application password rather than their personal password - especially if the account has 2fa enabled, then without app password functionality might have problem to operate. Note: The username and password can be stored in the Secrets Manager. The "username" field is optional.
The Email Tester component, allows users to validate configuration before committing changes by sending a test email. If changes are not committed, all entered configuration will be lost.
Login History
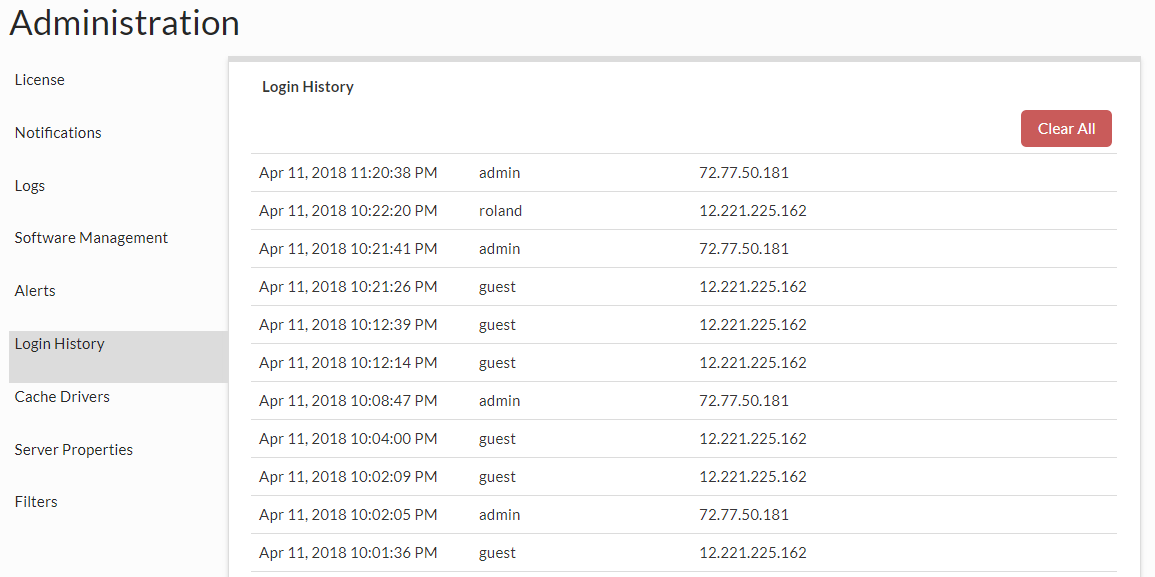 This provides the login times, account ID and source IP of the recently recorded GUI logins, with their privileges, and auth type.
Unchecking 'Exclude proxy logins' will result with adding proxy logins to the list. Heimdall can put these login entries to AWS CloudTrail as well. For more information, see here: Admin -> CloudTrail integration section
Server Properties
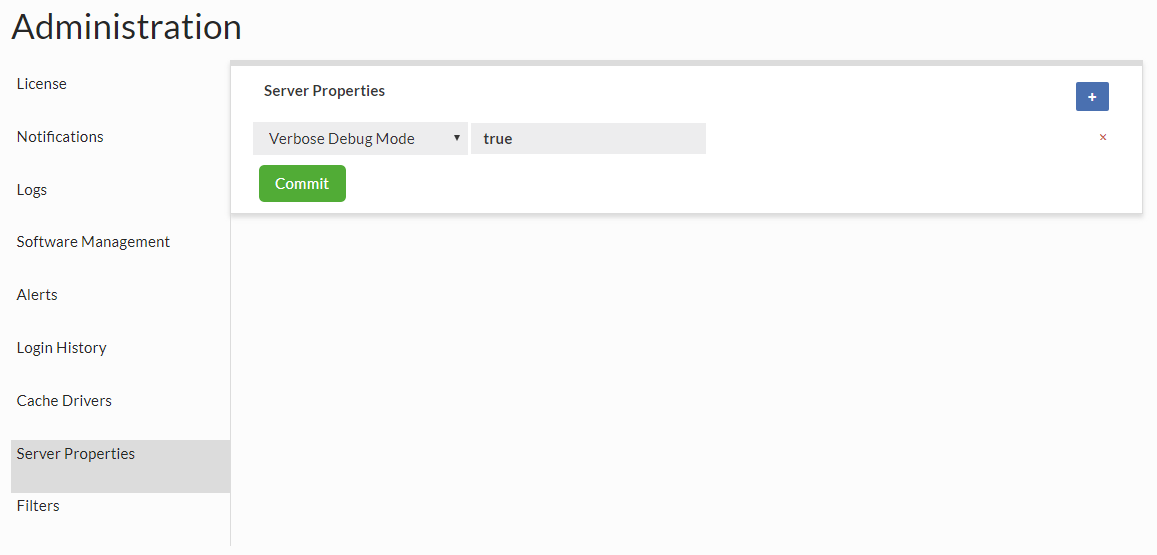 These are properties that can control overall Management server behavior, and will be added to over time.
Currently supported properties can be found here: Server Configurable items
There are also HTTP Proxy Settings in the same section which allow the application to connect to the internet through an HTTP proxy. This is especially useful in environments where direct internet access is restricted, such as corporate networks. The proxy settings are used for operations like code update notifications, software downloads, and other outbound HTTP requests.
In case of Proxy related properties, if any is set, all has to be set.
For log related Server Properties, see Log Server Properties in Log Management tab.
Modules
Allows modules to be added or removed as needed. The fewer the modules, the faster a Heimdall node can startup. In particular cache modules that are unused should be deleted as some can add significant load time.
Password Policy
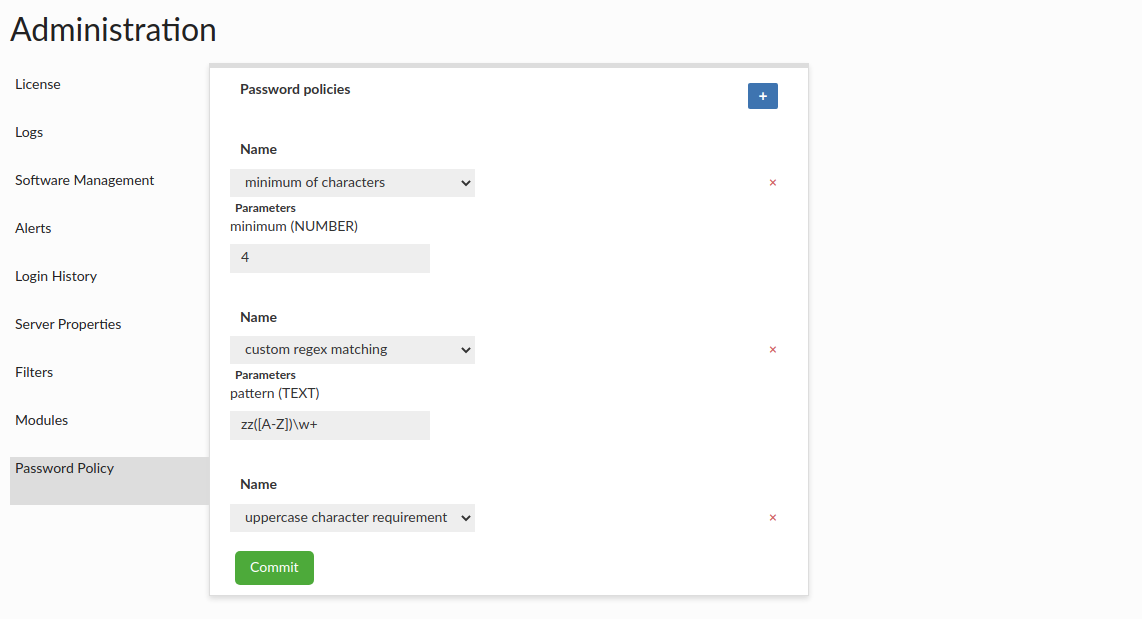 This section allows user to set up requirements that specific user password must meet to be created/updated. Current rules supported:
- minimum/maximum of characters - minimum/maximum number of characters that password must contain (with minimum/maximum parameter tht defines the limit).
- digits requirement - rule defining that password must contain at least one digit
- special marks requirement - rule defining that password must contain at least one special mark
- uppercase character requirement - rule defining that password must contain at least one uppercase character
- custom regex matching - rule that provides a pattern parameter with the regular expression to which password must match
The Password Policies apply to GUI Heimdall users but do not extend to users with external passwords, such as those using LDAP, Kerberos, or Secrets Manager.
Config Management
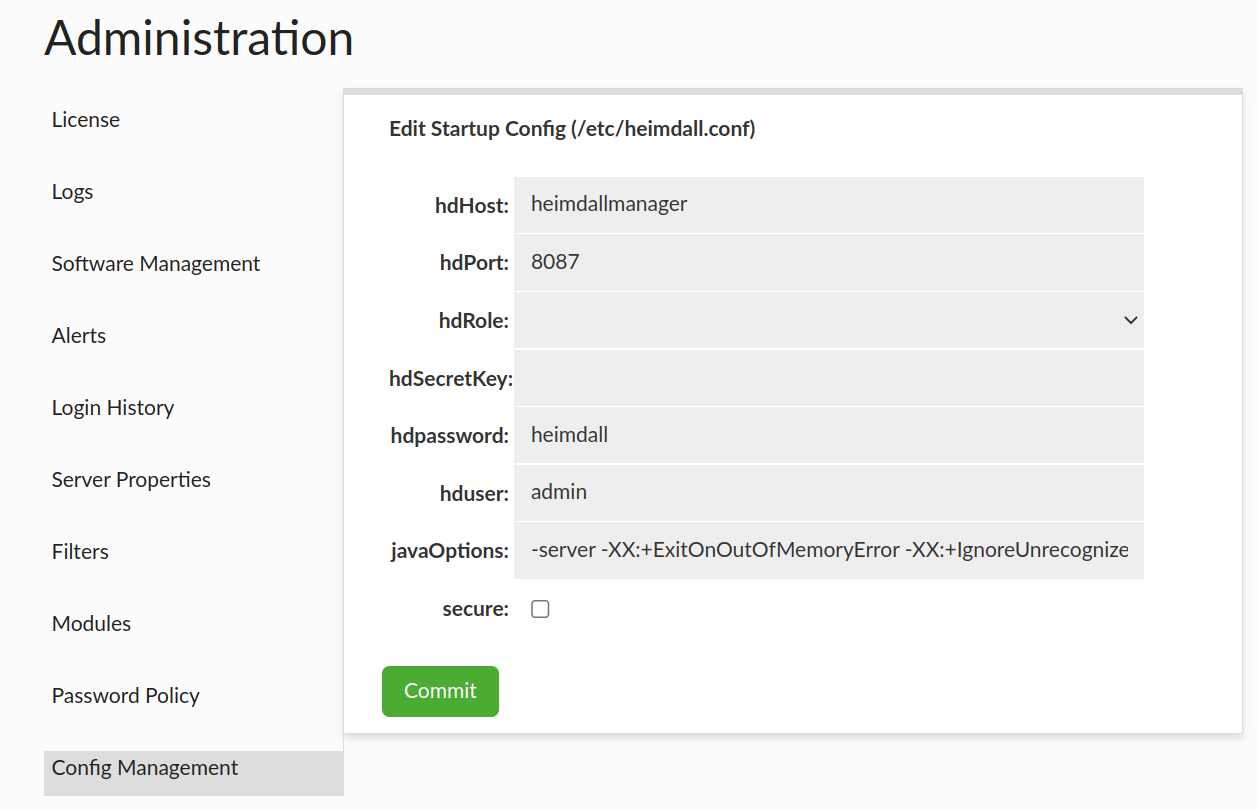
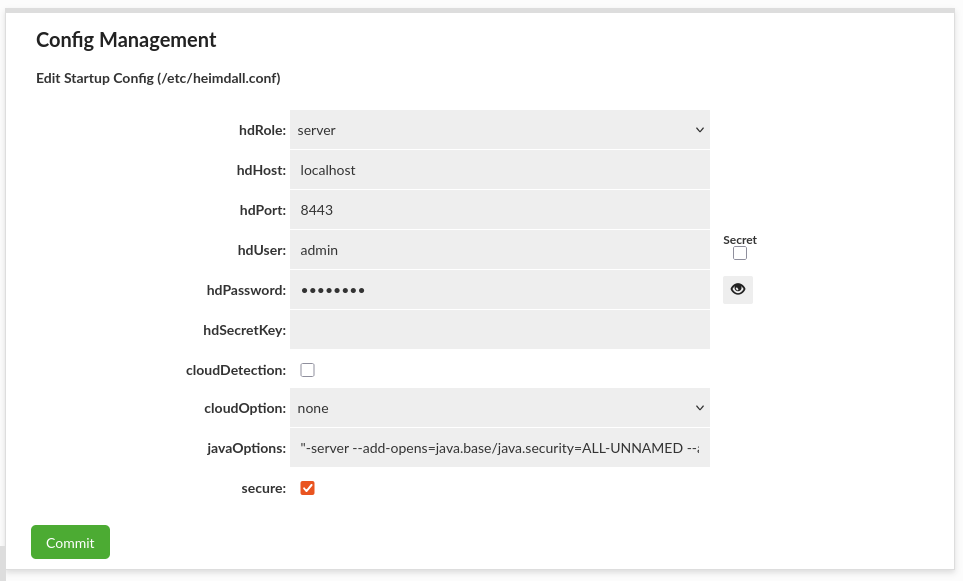
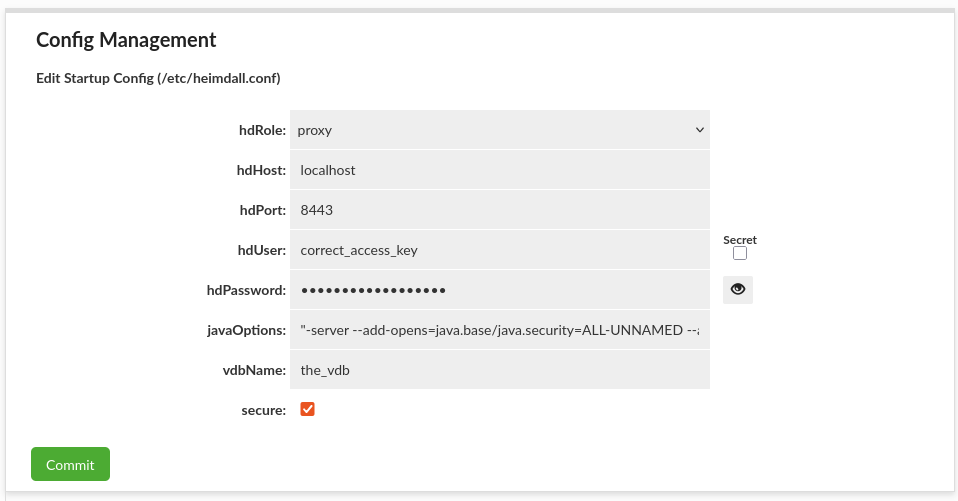
This section allows editing startup /etc/heimdall.conf configuration file, which can be used to populate environmental variables or cloud environments. More details in Heimdall Environmental Variables.
Note: The username and password can be stored in the Secrets Manager.
The additional environmental variables that are necessary for secrets are described here Secrets Environmental Variables.
AWS Endpoints
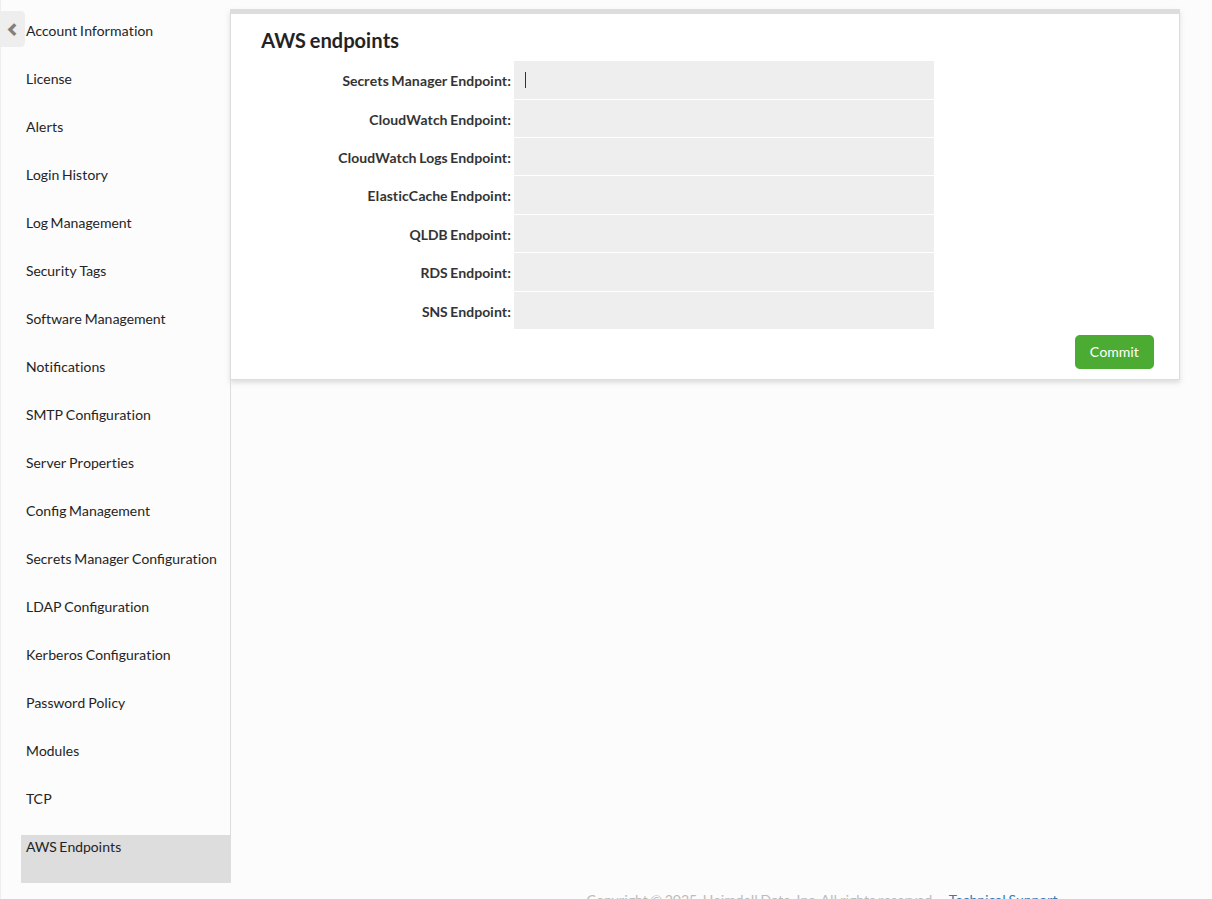
This section: AWS Alternate Endpoints allow to configure alternate endpoints for AWS services. For alternate endpoint for Secrets Manager see AWS Secrets Manager.
- Secrets Manager Endpoint
- CloudWatch Endpoint
- CloudWatch Logs Endpoint
- ElasticCache Endpoint
- RDS Endpoint
- SNS Endpoint
- CloudTrail Endpoint
- Identity Store Endpoint
⚠️ Note: If alternate secrets manager endpoint is passed, secrets will be used even if cloud option is not set to AWS.
Identity Providers
Heimdall supports a variety of identity providers to authenticate users for various situations. This includes:
- Secrets Managers (AWS Secrets Manager, CyberArk Conjur and Hashicorp Vault)
- Kerberos Domains
- LDAP (AD, Jumpcloud, Okta, Redhat ID Manager, OpenLDAP, and others)
- SAML (AWS Identity Center, Okta, and others)
To begin to configure any of these, in the admin tab, please go to proper tab and follow the steps in the instruction.
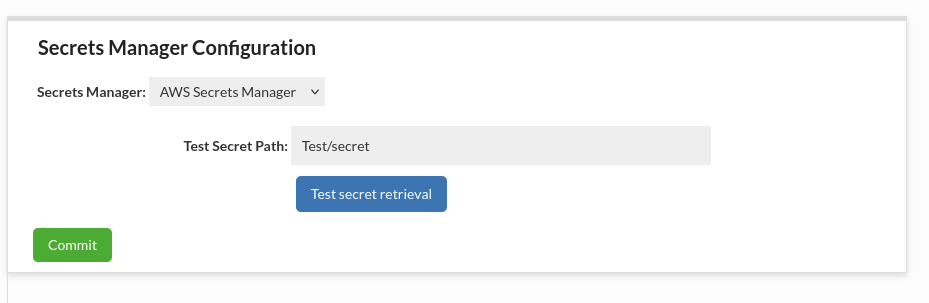
Secrets Manager Configuration
This section allows to configure Secrets Manager that will be used across Heimdall services.
Remember that if you want to use the secrets manager, it has to be enabled.
Currently supported settings:
Default

By default, 0 Secrets Managers are configured. Secret options will be disabled.
All of the following Secrets Managers can be configured using Secrets Environment Variables.
AWS Secrets Manager
When running in AWS environment it will be added by default if no other configurations exists of this type. Does not require additional configuration. When specifying a secret path both secret name and ARN can be used. Multiple AWS secrets managers can be configured.
Following optional properties are available for AWS Secrets Manager connection configuration to set in: AWS Secrets Configuration
Default Configuration
By default, Heimdall uses the AWS Secrets Manager service in the same region as the Heimdall instance (e.g., us-east-1). No additional configuration is required.
Cross-Region Configuration
To use a secret stored in a different region, you must specify that region explicitly. Providing the ARN alone is insufficient—even if it contains region information—because the AWS API defaults to the local region.
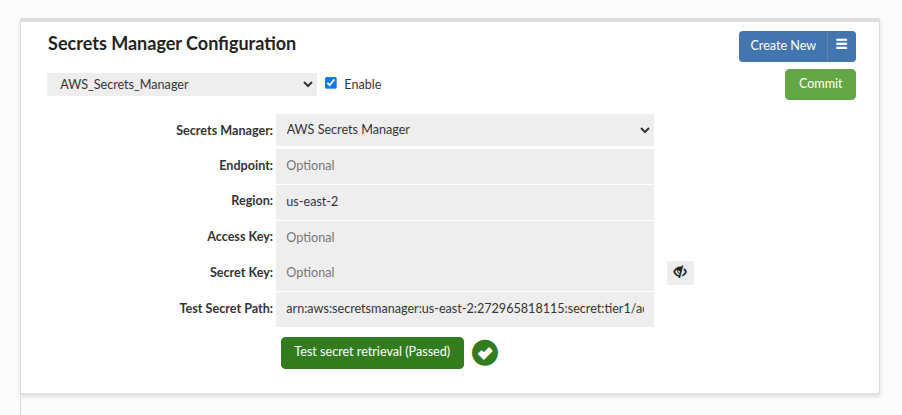
Example: If the Heimdall instance is in us-east-1 but the secret is in us-east-2, the connection will fail unless the region is explicitly defined.
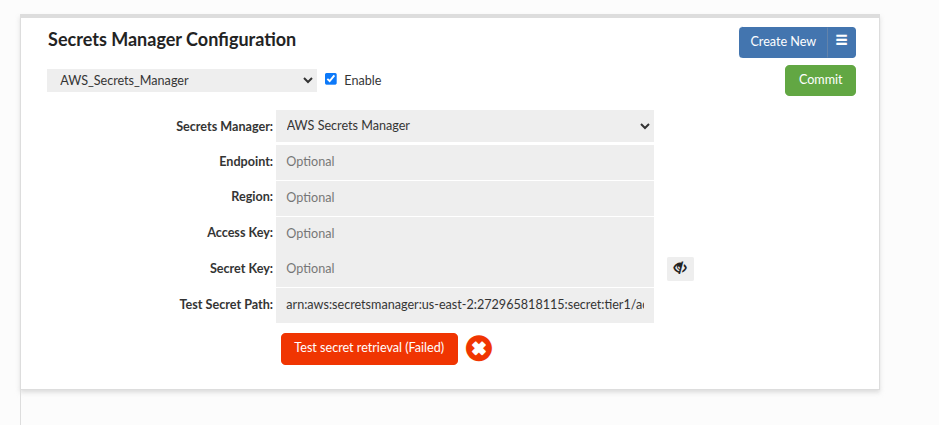
In such a case, the client needs to specify the Region explicitly. To achieve a multi-region setup, you can create different AWS Secrets Manager Configurations in this tab, each targeting a specific region or account combination:
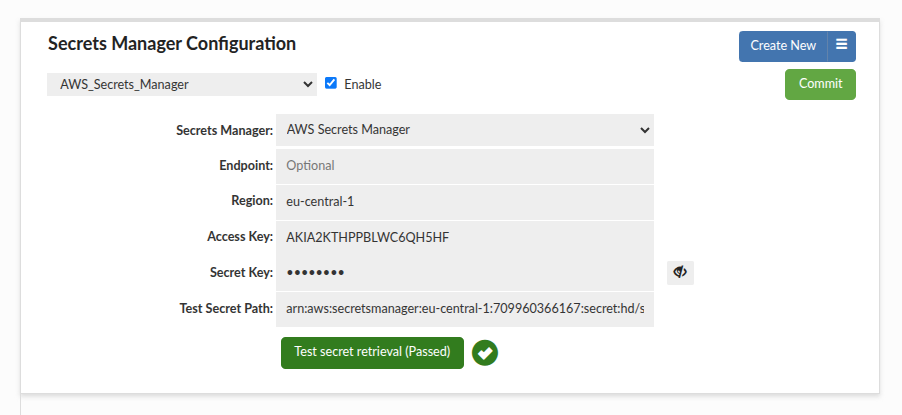
Cross-Account Configuration (Access/Secret Keys)
To access a secret stored in a different AWS account using access keys, you must provide both the Access Key and the Secret Key of the AWS account you intend to use. This approach is deprecated but still supported. The example below demonstrates a configuration for a separate account using a secret from the eu-central-1 region.
Cross-Account Configuration (IAM Policies + KMS Key Sharing)
Uses IAM policies and KMS key sharing.
Example accounts
- Source account (Heimdall runtime and KMS key owner):
272965818115 - Target account (secret owner):
709960366167
Steps
1. Create a customer-managed KMS key in the source account. The key must be in the same region as the secret. For cross-region setups, use a multi-Region KMS key and create a replica in the target region (for example eu-central-1). In this example the source account is in us-east-1, but the KMS key is replicated to eu-central-1.
2. KMS key creation options used in this example: Key type "Symmetric", Key usage "Encrypt and decrypt". In Advanced options, choose Key material origin "KMS" and Regionality "Multi-Region key" to allow replicas in other regions.

3. In the AWS KMS wizard, specify the AWS accounts that can use this key. In our example, this is the target account (709960366167).

4. Update the KMS key policy to allow the target account to use the key for decryption. This policy is automatically generated by the AWS KMS wizard and should be adjusted to your needs. Example with a working, simplified version:
{
  "Version": "2012-10-17",
  "Id": "key-consolepolicy-3",
  "Statement": [
    {
      "Sid": "Enable IAM User Permissions",
      "Effect": "Allow",
      "Principal": {
        "AWS": [
          "arn:aws:iam::272965818115:root",
          "arn:aws:iam::272965818115:user/arozuk"
        ]
      },
      "Action": "kms:*",
      "Resource": "*"
    },
    {
      "Sid": "Allow attachment of persistent resources",
      "Effect": "Allow",
      "Principal": {
        "AWS": "arn:aws:iam::709960366167:root"
      },
      "Action": [
        "kms:CreateGrant",
        "kms:ListGrants",
        "kms:RevokeGrant",
        "kms:GenerateDataKey",
        "kms:Decrypt",
        "kms:DescribeKey"
      ],
      "Resource": "*"
    }
  ]
}
5. If you want to use the secret in a different region, open the KMS key and select "Create new replica keys". Here we create a replica in the target region (eu-central-1).

6. In the target account, create the secret using the customer-managed KMS key from the source account. The AWS Console/GUI does not allow selecting a KMS key from a different account, so use AWS CLI (CloudShell works well). Use the correct KMS key ARN (multi-Region key ARNs differ by region in ARN). Example:
aws secretsmanager create-secret \
    --name "heimdall/crossaccount-eu-central-1" \
    --description "Secret encrypted with Account 272965818115 Key" \
    --secret-string '{"username":"root-eu-central","password":"passwordeu"}' \
    --kms-key-id arn:aws:kms:eu-central-1:272965818115:key/mrk-385bacad281f4eaab797f0f0f6c26829 \
    --region eu-central-1
This creates a secret in the target account, encrypted with the source account's KMS key. This example assumes the source account is in us-east-1 and the secret is in eu-central-1, resulting in a cross-account and cross-region setup.
7. Add a resource policy to just created secret that allows the source account to retrieve it. Below is an example policy, which allows the IAM user arozuk (can be a role) from AWS account 272965818115 to read (GetSecretValue) secrets starting with heimdall/ in account 709960366167, region eu-central-1:
{
  "Version" : "2012-10-17",
  "Statement" : [ {
    "Effect" : "Allow",
    "Principal" : {
      "AWS": "arn:aws:iam::272965818115:user/arozuk"
    },
    "Action" : "secretsmanager:GetSecretValue",
    "Resource" : "arn:aws:secretsmanager:eu-central-1:709960366167:secret:heimdall/*"
  } ]
}
8. Configure Heimdall to use the secret:
- Use the full secret ARN (not just the name).
- Set the Region explicitly when the secret is in a different region than the Heimdall instance.
At this point the cross-account secret can be retrieved. The example below shows successful retrieval from the target account.

Cross-Account Configuration (STS AssumeRole + External ID)
This method uses an IAM Role with a Trust Policy and an External ID. This is the recommended security best practice for cross-account access, as it prevents the "Confused Deputy" problem and avoids sharing long-term user credentials. See AWS Docs for more information.
This example reuses the configuration made in the Cross-Account Configuration (IAM Policies + KMS Key Sharing) section, with adjustments for STS AssumeRole and External ID.
Example Cross-Account Configuration
- Source account (Heimdall runtime and KMS key owner):
272965818115 - Target account (secret owner):
709960366167 - Role Name used for STS:
HeimdallCrossAccountAccess - External ID:
heimdall-external-id-99
Steps
1. Create an IAM Role in the Source Account (272965818115) named HeimdallCrossAccountAccess using a "Custom trust policy". This role will be assumed by the Heimdall application.
2. Configure the Trust Relationship (Trust Policy) to allow your principal (User or Service) to assume it, but only if the correct External ID is provided.

Example Trust Policy enforcing External ID:
{
  "Version": "2012-10-17",
  "Statement": [
    {
      "Sid": "HeimdallCrossAccountAccess",
      "Effect": "Allow",
      "Principal": {
        "AWS": "arn:aws:iam::272965818115:user/arozuk"
      },
      "Action": "sts:AssumeRole",
      "Condition": {
        "StringEquals": {
          "sts:ExternalId": "heimdall-external-id-99"
        }
      }
    }
  ]
}
3. We need to create a secret in the target account (709960366167), and grant the role access to it. The instruction is pretty much the same as in the Cross-Account Configuration (IAM Policies + KMS Key Sharing) section (use that instruction if you do not have created secret with a customer manged kms key), then we only need to adjust the aws policy to allow our role to retrieve the secret.
{
  "Version" : "2012-10-17",
  "Statement" : [ {
    "Effect" : "Allow",
    "Principal" : {
      "AWS" : "arn:aws:iam::709960366167:role/HeimdallCrossAccountAccess"
    },
    "Action" : "secretsmanager:GetSecretValue",
    "Resource" : "arn:aws:secretsmanager:eu-central-1:709960366167:secret:heimdall/*"
  } ]
}
4. Update the KMS key policy to allow this role to decrypt. If you use a multi-Region key, update each replica's policy as well (policy changes are not auto-replicated). Example:
{
  "Version": "2012-10-17",
  "Id": "key-consolepolicy-3",
  "Statement": [
    {
      "Sid": "Enable IAM User Permissions",
      "Effect": "Allow",
      "Principal": {
        "AWS": [
          "arn:aws:iam::709960366167:role/HeimdallCrossAccountAccess",
          "arn:aws:iam::272965818115:user/arozuk"
        ]
      },
      "Action": "kms:*",
      "Resource": "*"
    },
    {
      "Sid": "Allow attachment of persistent resources",
      "Effect": "Allow",
      "Principal": {
        "AWS": "arn:aws:iam::709960366167:root"
      },
      "Action": [
        "kms:CreateGrant",
        "kms:ListGrants",
        "kms:RevokeGrant",
        "kms:GenerateDataKey",
        "kms:Decrypt",
        "kms:DescribeKey"
      ],
      "Resource": "*"
    }
  ]
}
5. Attach a permissions policy to the HeimdallCrossAccountAccess role (in the target account). Adjust ARNs to your secret and KMS key. This grants access to the Secrets Manager resource and the KMS key created in the Cross-Account Configuration (IAM Policies + KMS Key Sharing) section:
{
    "Version": "2012-10-17",
    "Statement": [
        {
            "Sid": "AllowAccessToSecretAndKMSKey",
            "Effect": "Allow",
            "Action": [
                "secretsmanager:GetSecretValue",
                "secretsmanager:DescribeSecret",
                "kms:Decrypt",
                "kms:DescribeKey",
                "kms:GenerateDataKey"
            ],
            "Resource": [
                "arn:aws:secretsmanager:eu-central-1:709960366167:secret:heimdall/*",
                "arn:aws:kms:eu-central-1:272965818115:key/mrk-385bacad281f4eaab797f0f0f6c26829"
            ]
        }
    ]
}
6. Configure Heimdall:
- Enable Use STS Role.
- Set STS Role ARN to the target account role (
HeimdallCrossAccountAccess), in my case it isarn:aws:iam::272965818115:role/HeimdallCrossAccountAccess. - Set STS Role External ID to
heimdall-external-id-99(must match the Trust Policy). - Set Region if the secret is in a different region than the Heimdall instance.
7. Test the setup in Heimdall. Ensure the External ID matches the value configured in the role.

CyberArk Conjur
Following properties are available for CyberArk's Conjur connection configuration can be found in: CyberArk Conjur Configuration
Currently, it is possible to have only one secrets manager of this type.
Note: An Authn API Key and a whole configuration can be stored in the AWS Secrets Manager. This option is supported only by the default Secrets Manager from the same Region/Account as the instance.
An example secret with an Authn API Key:
{
  "authnApiKey": "t740r1tmwhsa22yv0692d89fv12ft48c72j6mfs9hdm343vmcxyn"
}
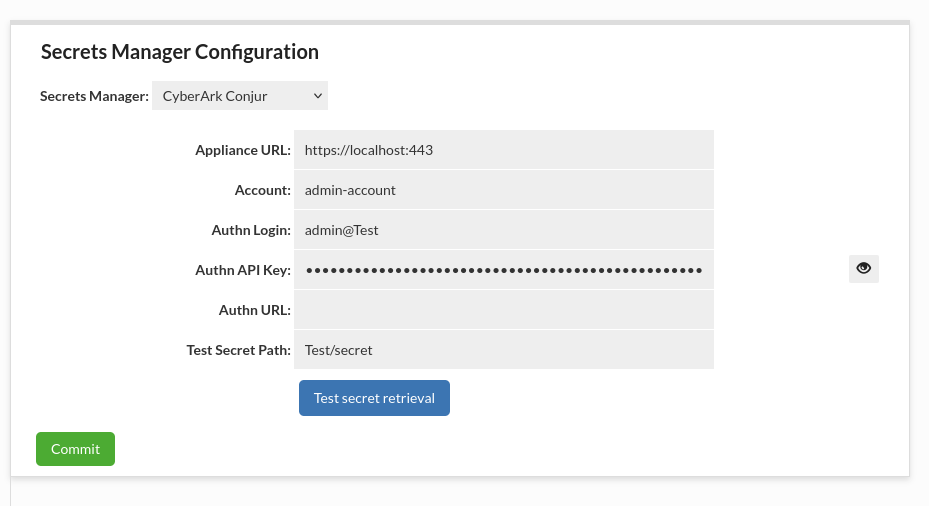
An example secret with a whole config:
{
  "applianceUrl": "https://localhost:443",
  "account": "admin-account",
  "authnLogin": "admin@Test",
  "authnApiKey": "t740r1tmwhsa22yv0692d89fv12ft48c72j6mfs9hdm343vmcxyn"
}
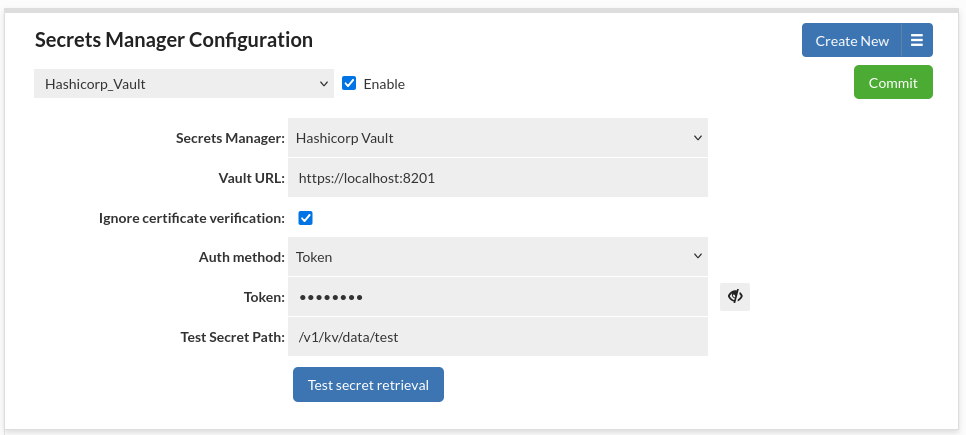
Hashicorp Vault
Following properties are available for HashiCorp Vault server connection configuration: HashiCorp Vault Configuration
Note: A whole configuration can be stored in the AWS Secrets Manager. This option is supported only by the default Secrets Manager from the same Region/Account as the instance.
An example secret with a whole config:
{
  "url": "https://localhost:8201",
  "ignoreCertificateVerification": "true",
  "authConfig": {
    "token": "hvs.hTHvXRRqi154KKGgFldQuhqq",
    "authMethod": "TOKEN"
  }
}
Hashicorp Vault Token Authentication
This authentication method allows to authenticate with Hashicorp Vault using a token directly.
- Token: Token used for authentication.
This token should have permissions appropriate to access deserved secret values.
Note: A token can be stored in the AWS Secrets Manager. This option is supported only by the default Secrets Manager from the same Region/Account as the instance.
An example secret with a token:
{
  "token": "hvs.hTHvXRRqi154KKGgFldQuhqq"
}
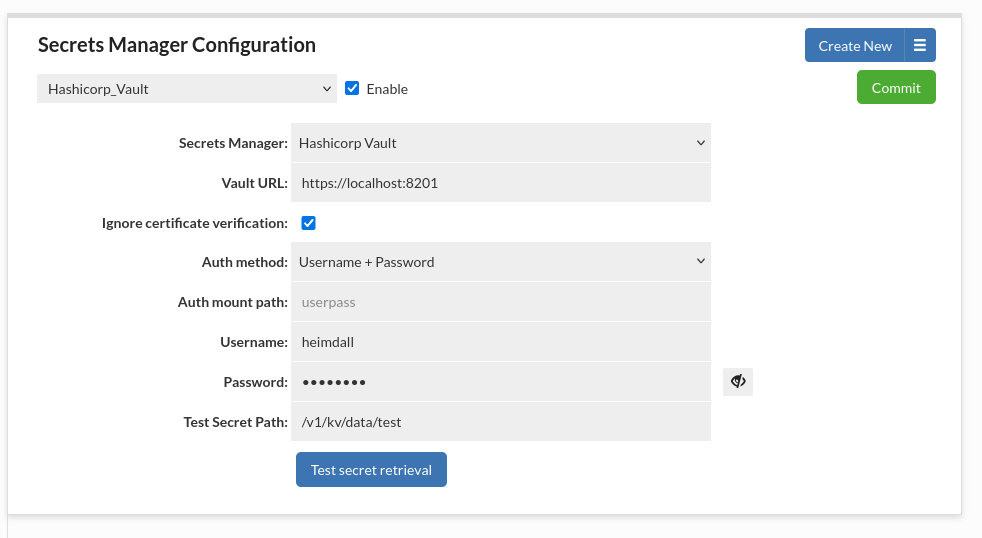
Hashicorp Vault Username and Password Authentication
This authentication method allows to authenticate with Hashicorp Vault using a username and password combination.
- Auth mount path: (Optional) Alternate authentication method mount path to be used. By default set to userpass.
- Username: Username used for authentication.
- Password: Password used for authentication.
The user connected to these credentials should have permissions appropriate to access deserved secret values.
Note: The username and password can be stored in the AWS Secrets Manager. This option is supported only by the default Secrets Manager from the same Region/Account as the instance.
An example secret with username and password:
{
  "username": "user1",
  "password": "password1"
}
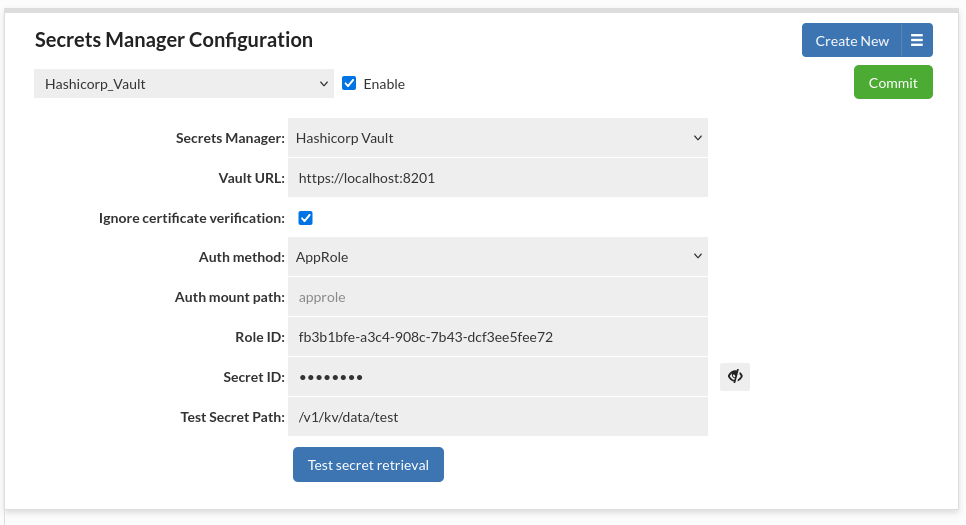
Hashicorp Vault AppRole Authentication
This authentication method allows to authenticate with Hashicorp Vault using a defined role. It is a recommended method to use with Heimdall since it is designed to be used by machines and applications rather than human operators.
- Auth mount path: (Optional) Alternate authentication method mount path to be used. By default set to approle.
- Role ID: The semi-secret identifier for the role that will authenticate to Vault. Think of this as the username portion of an authentication pair.
- Secret ID: The secret identifier for the role that will authenticate to Vault. Think of this as the password portion of an authentication pair.
The role should have permissions appropriate to access deserved secret values.
Note: The Role ID and Secret ID can be stored in the AWS Secrets Manager. This option is supported only by the default Secrets Manager from the same Region/Account as the instance.
An example secret with an app role:
{
  "roleId": "fb3b1bfe-a3c4-908c-7b43-dcf3ee5fee72",
  "secretId": "544228c0-9940-6aed-7575-a8a6209ae294"
}
It is possible to have multiple secrets managers of this type.
Secret path for KV engine should follow the specification for vault kv get command as described here (notice the difference between engine version 1 and 2) - KV - Secrets Engines | Vault | HashiCorp Developer
You can see what path to use for given secret in Hashicorp Vault GUI under Paths tab (API path).
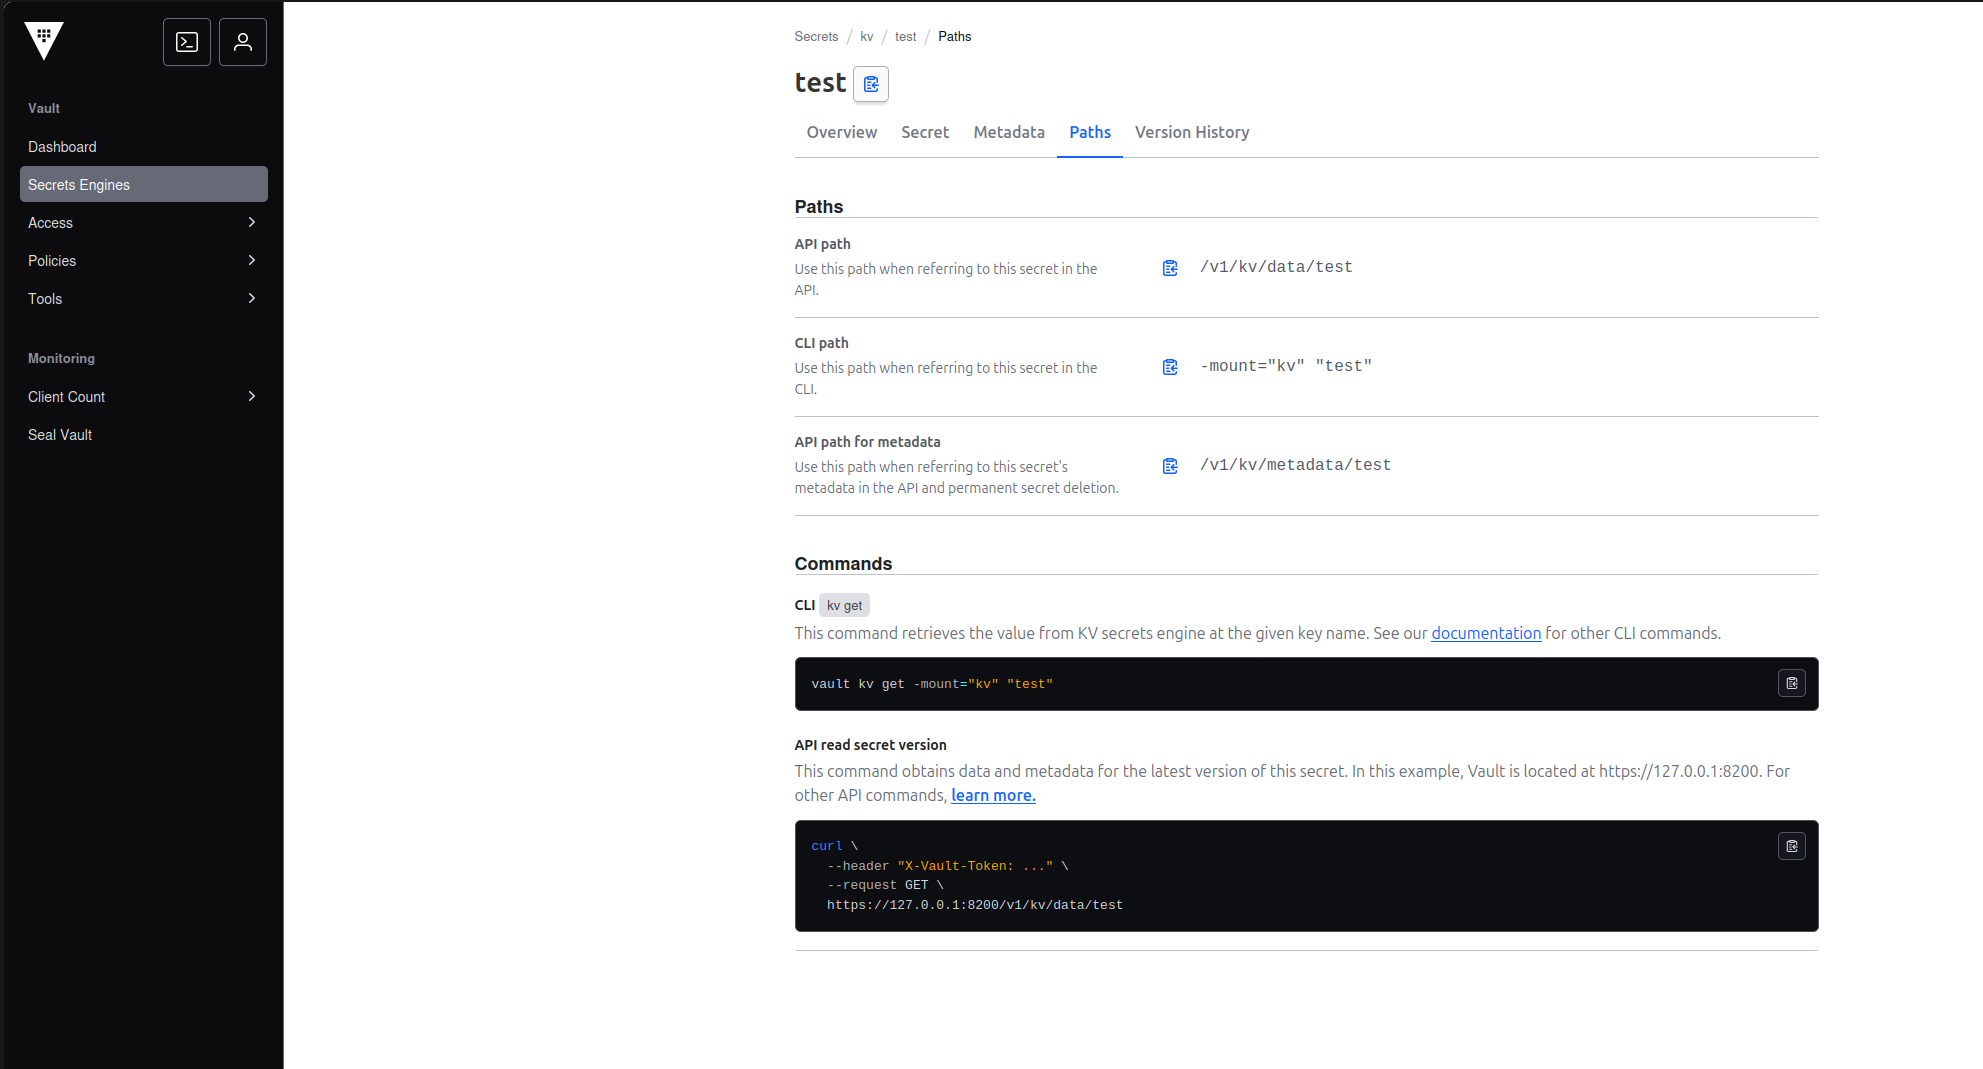
In such case the secret path that You should put into our GUI is /v1/kv/data/test.
Hashicorp Vault Enterprise Namespaces
To use namespaces feature available in Hashicorp Vault Enterprise, see the documentation here - Namespace and SMT support in Vault | Vault | HashiCorp Developer.
First approach should be used, the name of the namespace should be put before the normal secret path, for example for namespace named ns1 the secret path should be ns1/kv/data/test, with the assumption that the token configured in Heimdall Hashicorp Vault Configuration has access to this namespace and secret.
Testing secret manager
Before clicking the "Test secret retrieval" button, please make sure that you click the "Commit" button to test the newest configuration.
Secrets can be used for:
Wizard:
VDB:
Datasource:
Users:
SMTP Configuration:
Config Management
Hashicorp Secrets Manager Configuration (AWS):
CyberArk Conjur Secrets Manager Configuration (AWS):
LDAP Configuration:
Certificates:
Portal:
Example:
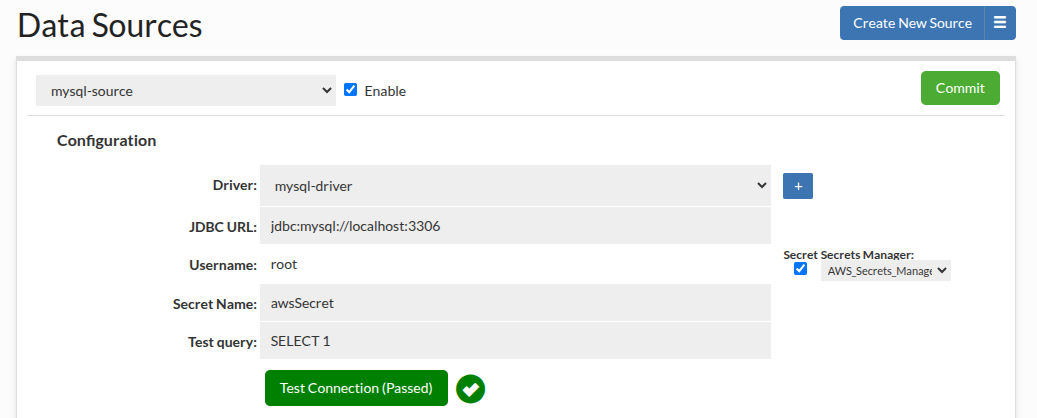
At least one Secrets Manager is required to be configured and enabled to see the secret checkbox. The selector will be shown if there is more than one Secrets Manager. When checking a checkbox, you have to specify a secret name to retrieve from the Secrets Manager.
In all credentials supported by Heimdall a secret must have one of the following formats:
{
  "username": "yourUsername",
  "password": "yourPassword"
}
{
  "user_name": "yourUsername",
  "password": "yourPassword"
}
{
  "user": "yourUsername",
  "password": "yourPassword"
}
The exception to this rule is Certificate private key encryption password (only password field is required) and Server configuration through "hdSecretKey" property where whole server configuration is stored in JSON format automatically by Heimdall.
Kerberos Configuration
This authentication type allows configuring Kerberos to authenticate users in the Heimdall Manager.
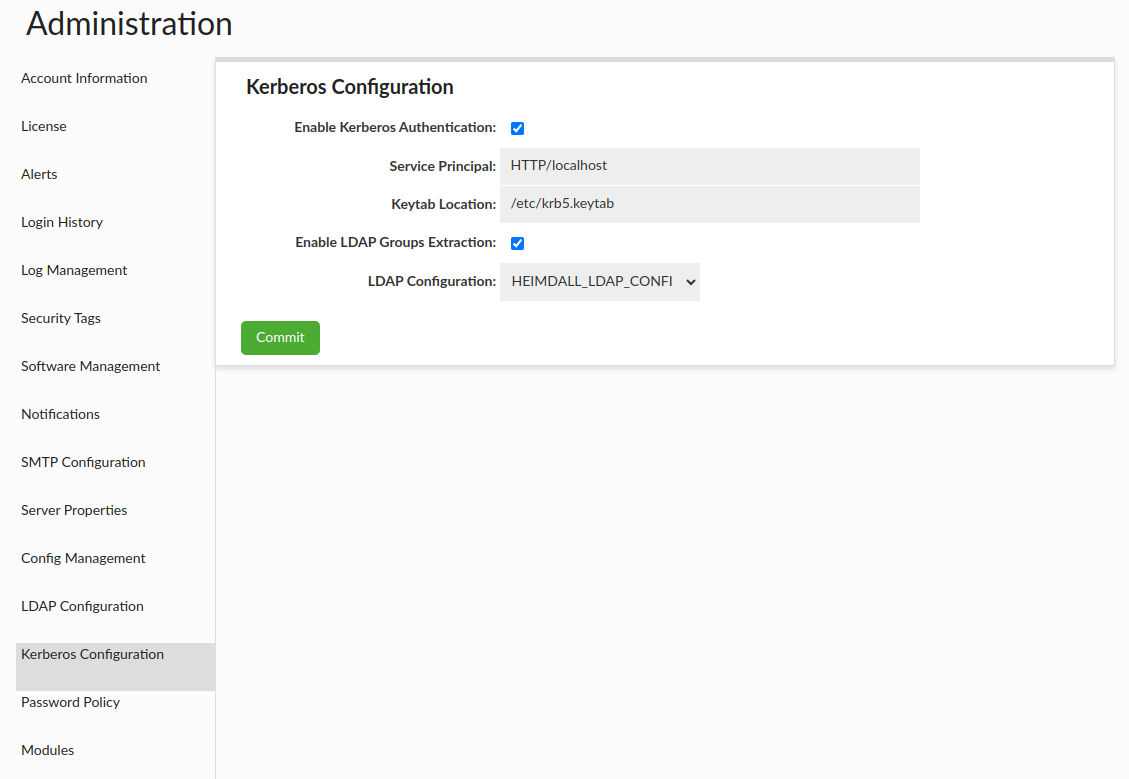
Kerberos configuration options can be found in: Kerberos
LDAP Configuration (Proxy and Central Manager)
LDAP Authentication provides authentication with using of LDAP server. LDAP Authentication provides two modes of authentication:
- Bind + Search Mode - authentication is made by binding to server as admin and searching information about authenticated user;
- Simple Mode - authentication is made by binding to server as authenticated user.
Bind and Search Mode
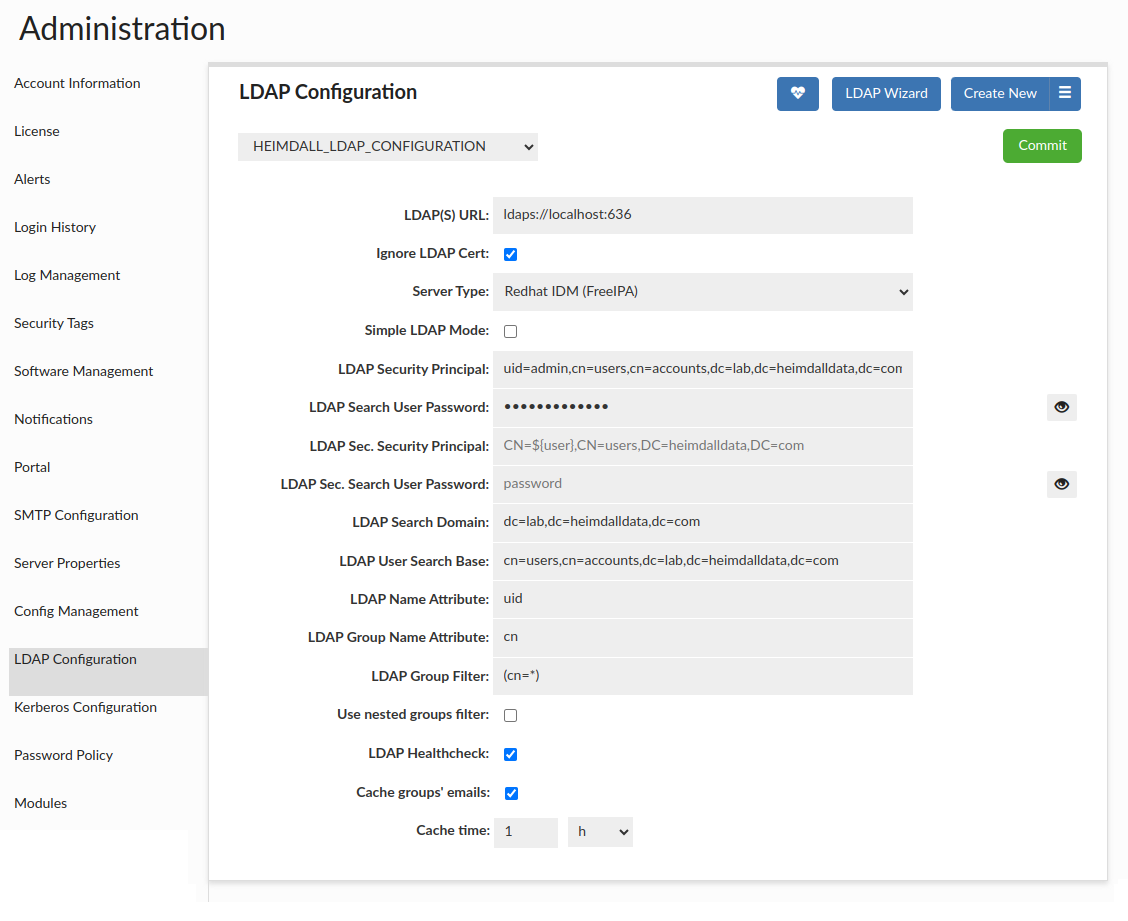
All the ldap configuration options can be found in LDAP Options
By choosing option Simple LDAP Mode, you can switch to Simple Mode.
Note: This configuration supports rotating passwords, which means that in case of connection failure (due to credential rotation most likely) the system will silently pull the newest values and try to establish the connection again.
Advanced group filter
LDAP group filter is used to limit number of groups for look up for authenticated user. Example value describes filter limiting number of groups to only one particular group, but this option value is added as written, what enables writing more complex filters. Please look on below example.
Let's assume that we want our user be from groups group1 or group2. By knowing the syntax of search filter used in LDAP server we can set LDAP Group Filter as:
(|(DistinguishedName=CN=group1,CN=Users,DC=example,DC=com)(DistinguishedName=CN=group2,CN=Users,DC=example,DC=com))
Important: If there is an LDAP Group Filter specified at least one group has to be extracted to authenticate the user.
Use Raw Group Filter
By default, the application automatically constructs LDAP group queries by appending standard group constraints (such as objectCategory=group or objectclass=posixgroup) and user membership clauses to your configured LDAP Group Filter. This automated approach ensures that the correct groups are extracted for the authenticated user in most standard environments. However, certain directory structures require highly specific filtering logic that may conflict with these default additions. The Use Raw Group Filter option allows administrators to bypass the default behavior and take full control over the group extraction query.
A common scenario where this feature is beneficial involves managing groups in Active Directory. Active Directory typically contains both Security Groups (often used for access control) and Distribution Groups (used for email distribution lists). Depending on an organization's requirements, administrators may prefer to streamline access management and optimize performance by importing only Security Groups, as Distribution Groups are generally not used for resource access. Because the default application query automatically extracts all group types, the Raw Group Filter provides the exact level of control needed to exclude Distribution Groups entirely.
By enabling this option, the system stops appending default constraints and executes your LDAP Group Filter value exactly as provided. This means the filter must be complete and self-contained, including the user membership clause for your directory.
For this purpose, the following aliases are available:
${user}- The username used to authenticate (for example,admin).${dn}- The authenticated user's distinguished name (for example,uid=admin,cn=users,cn=accounts,dc=lab,dc=heimdalldata,dc=com).
Example for Active Directory:
(&(objectCategory=group)(groupType:1.2.840.113556.1.4.803:=2147483648)(member=${dn}))
The filter above expands to the following at runtime:
(&(objectCategory=group)(groupType:1.2.840.113556.1.4.803:=2147483648)(member=CN=admin,CN=Users,DC=ad,DC=heimdalldata,DC=com))
You can also build the DN yourself with ${user} and get the same result:
(&(objectCategory=group)(groupType:1.2.840.113556.1.4.803:=2147483648)(member=CN=${user},CN=Users,DC=ad,DC=heimdalldata,DC=com))
Explanation:
(objectCategory=group)- Searches only for groups.(groupType:1.2.840.113556.1.4.803:=2147483648)- Filters only Security Groups.(member=...)- Limits results to groups that include the authenticated user (use${dn}or build the DN with${user}).
Note: You can enable Verbose Debug Mode to see the exact filter being used, then adjust it as needed.

LDAP Healthcheck
If enabled, performs in the background automatically every minute and may result in two alerts: once the server is down, and once the server is back online.

Nevertheless, it can be performed on demand by using the button with hearth - if used, the JSON with the details of LDAP Healthcheck result will be opened in the new tab.

Important: LDAP Healthcheck on demand will be performed on ALL configurations with LDAP Healthcheck checkbox enabled.
Simple Mode
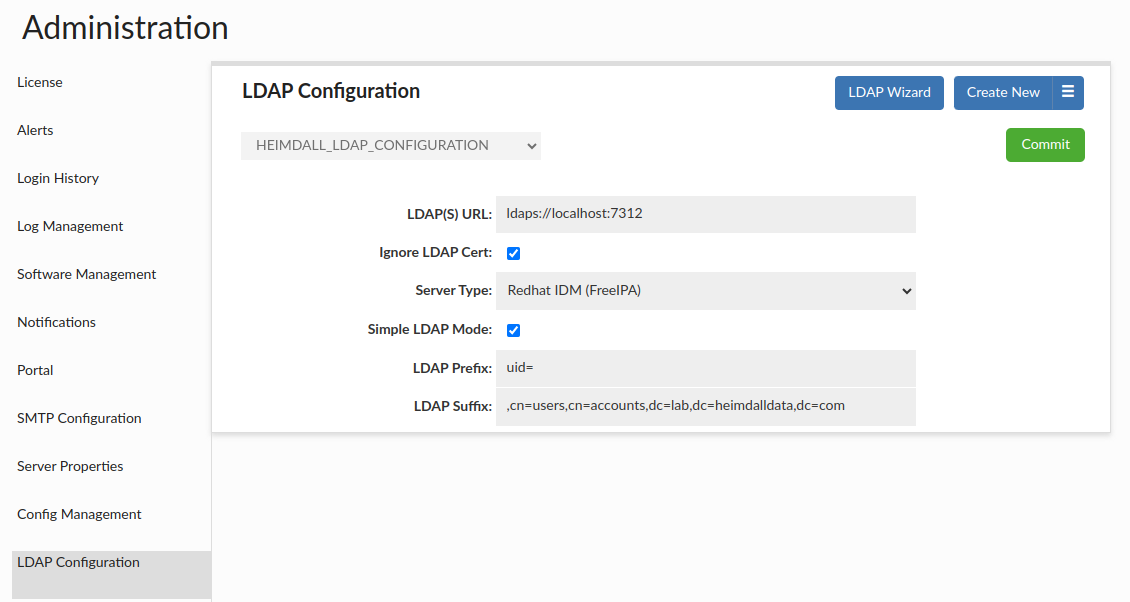
Simple Mode is simpler mode than Bind + Search mode, because uses only one request (which is binding request) to LDAP server.
Simple Mode can be turned on by choosing Active Directory (LDAP) Auth Enabled checkbox, and then choosing Simple LDAP Mode checkbox.
Simple Mode requires to set below options to work properly.
All the ldap configuration options can be found in LDAP Options
To understand working of this mode, should be known that send request is binding composed of three parts:
prefix + username + suffix. For given example values and user exampleuser, binding request would look like
CN=exampleuser,CN=Users, DC=example, DC=com.
Authentication Checker

The Authentication Checker is a simple tool that allows you to test LDAP authentication against a specific configuration. In case of successful authentication extracted groups will be listed, as long as LDAP Group Filter is specified.
Central Manager Information
If you want to authenticate CM user, in the Users tab you should create new user(-s) with the same name as in your active directory. During creating new user don't forget to mark the "Authenticate By LDAP" option.
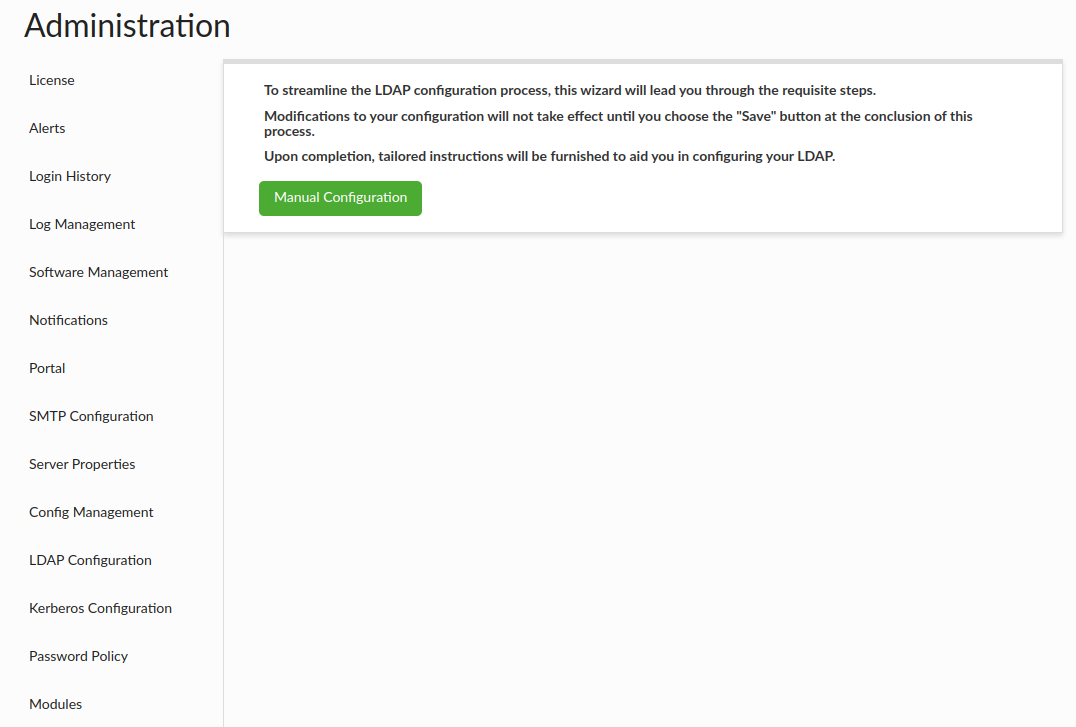
LDAP Configuration Wizard
The LDAP Configuration Wizard is provided to simplify configuration process as much as possible. It's a walk-through tool preventing from going forward if provided configuration is not valid. It can be accessed by clicking the "LDAP Wizard" button in the LDAP Configuration section.
Bind and Search Mode
There is the list of information necessary to finalize the Wizard Configuration:
- LDAP(S) URL - Specifies URL of LDAP server.
- Ignore LDAP Cert - Specifies if TLS validation of LDAP server certificate should be performed.
- LDAP Security Principal - Specifies name of user used to search for authenticated user.
- LDAP Sec. Security Principal - Specifies name of user used to search for authenticated user if the primary search fails.
- LDAP Search User Password - Specifies password for LDAP Security Principal user used to search for authenticated user.
- LDAP Sec. Search User Password - Specifies password for LDAP Sec. Security Principal user used to search for authenticated user.
- LDAP Security Principal Secret Name - Specifies the name of a Secret containing the credentials (user/username and password) of the LDAP Security Principal. Available only if 'Secret' is enabled.
- LDAP Sec. Security Principal Secret Name - Specifies the name of a Secret containing the credentials (user/username and password) of the LDAP Sec. Security Principal. Available only if 'Secret' is enabled.
- LDAP Search Domain - Specifies the domain in which authenticated user's groups will be searched.
- LDAP User Search Base - Specifies user search base in which authenticated user will be searched.
- LDAP Name Attribute - Specifies attribute which should be used to identify a user.
- LDAP Group Name Attribute - Specifies attribute, which should be used to extract information about a group (Optional).
- LDAP Group Filter - Specifies group filter, which will be added during a search for a user's groups (Optional).
- Use Raw Group Filter - Uses the LDAP Group Filter value as provided, without appending any default filters or implicit constraints (Optional).
- Use nested groups filter - Specifies if parent groups should be included, when searching for user's groups.
- LDAP Healthcheck - Performs LDAP Healthcheck automatically every minute. An appropriate alert will be shown if the server goes down (Similarly, once the server is back online).
- Cache groups' emails - Specifies whether emails for LDAP groups should be cached (applies only if LDAP configuration is linked to the portal configuration).
- Cache time - Specifies the interval at which emails in the cache should be updated.
- Management privileges - Determines whether it entitles a user to use admin/read only privileges by requiring membership in a specific group.
- Admin privilege group - To be authorized to use the Management Privilege: Admin, the user must be a member of the selected group.
- Read Only privilege group - To be authorized to use the Management Privilege: Read Only, the user must be a member of the selected group.
Service Account Validation
At the very beginning, the absolute basis of the correct and valid configuration:
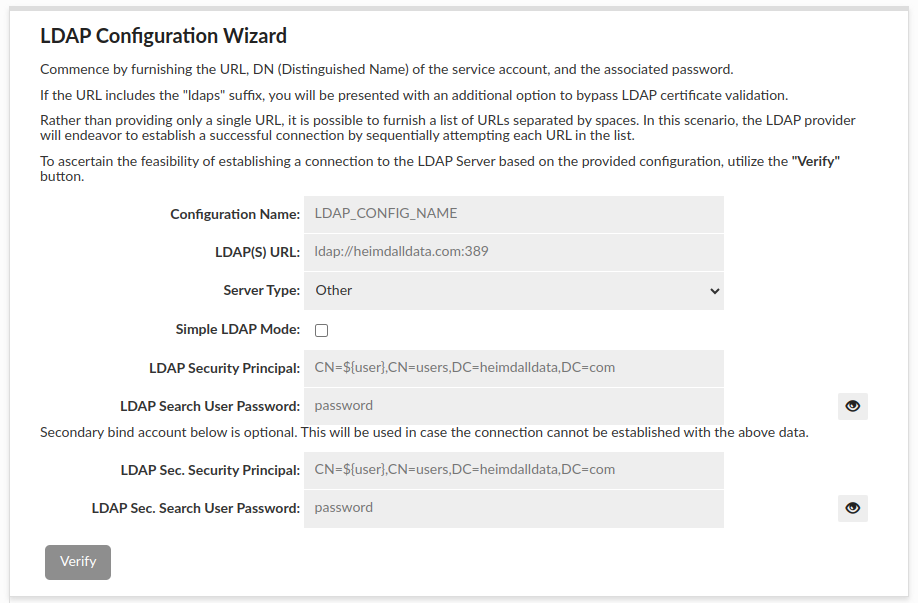
- The fields above are required as the authentication is made by binding to server as admin and searching information about authenticated user.
- The grayed-out "Verify" button will remain gray until all required fields are filled in.
- When all the required fields are filled in, the button will turn green and when pressed, the connection to AD will be attempted.
- If it fails, a corresponding message with the reason for the error will be displayed.
- if it succeeds, the next Wizard stage will be unlocked.
If one of the available Secrets Managers is configured, then it can be used to provide credentials for LDAP (Sec.) Security Principal.
In such case it is obligatory to provide either '${username}' or '${user}' placeholder where the actual username (retrieved from Secrets Manager, based on LDAP (Sec.) Security Principal Secret Name) has to be injected in the distinguished name (DN).
Wrong way:
 Good way:

Users and Groups Search Details
The next step is necessary to properly look for information about the user being authenticated and the groups he belongs to + set whether nested groups should be searched for.
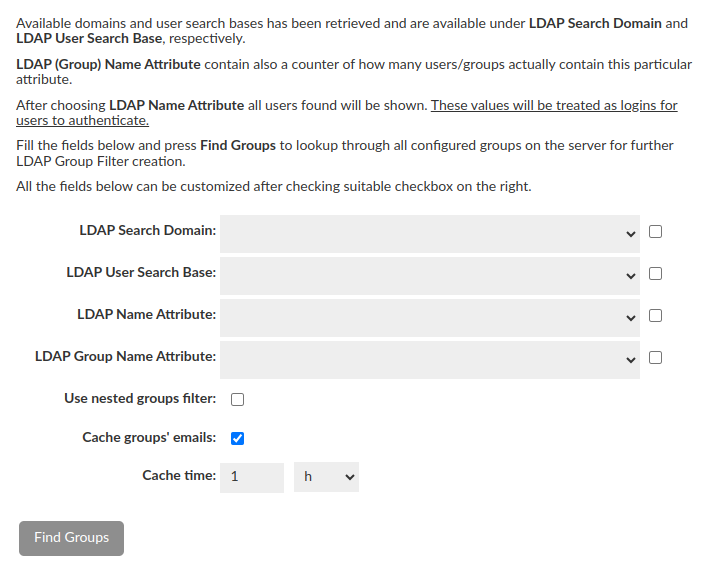
- In order to simplify configuration some of the fields can be filled using dropdowns (LDAP Search Domain and LDAP Search Base contains all possible options straight from LDAP Server).
- LDAP (Group) Name Attribute contains all attributes which are actually used among all configured users / groups with additional counter of how many users / groups actually contain particular attribute.
- Additional "Example users found" row will be shown after LDAP Name Attribute selection. This row is just a preview and has no affect on the final configuration, but what is important - these values will be treated as logins for users to authenticate.
- Caching emails for LDAP groups is enabled by default, with a cache update time of 1 hour. This can be customized to fit your needs or disabled altogether. However, the minimum update time must be at least 5 minutes.
- All of these fields can be customized after checking suitable checkbox on the right.
- When all the fields are filled in, the button will turn green and when pressed, the attempt to find Groups configured on the server will be performed.
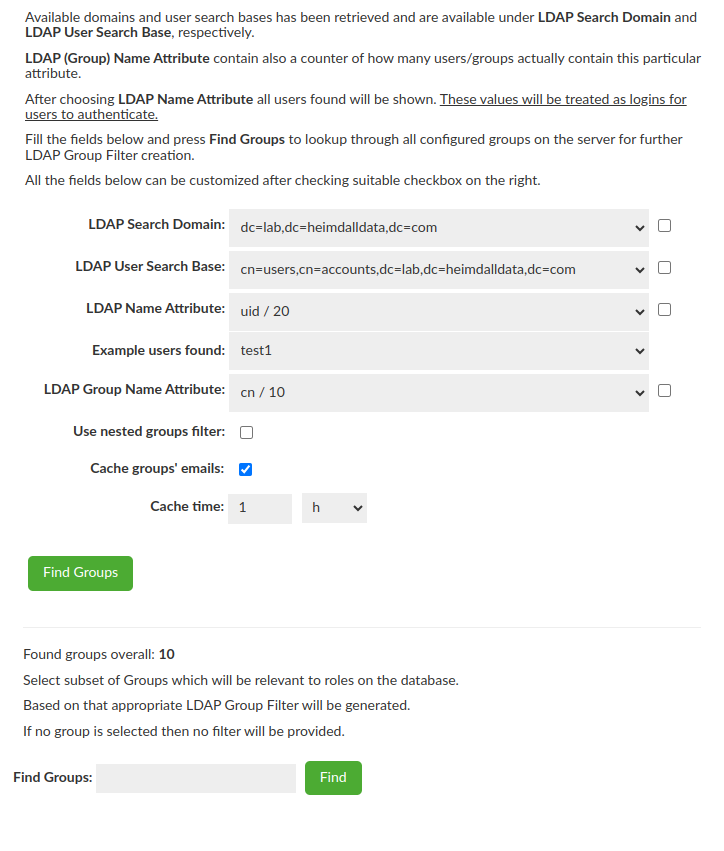
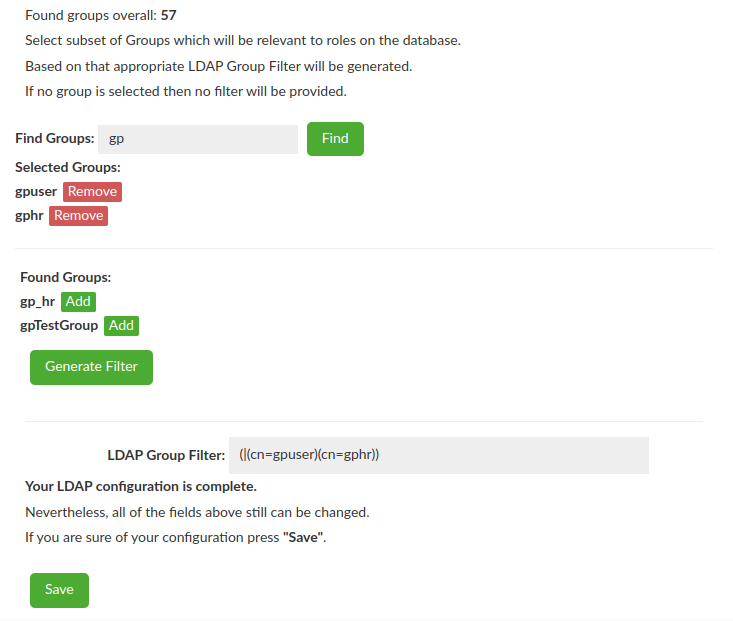
LDAP Group Filter Creation
The almost last step of the Wizard is to select Groups of interest for the DB i.e. Groups which will be relevant to database roles. Based on the selected Group the LDAP Group Filter will be generated when you click "Generate Filter" button. If no group is selected then no filter will be provided and this is ok - LDAP Group Filter is optional.
Management Privileges
As an option, Management Privileges can be enabled to enhance security. When activated, only members of the specified groups will have access to the assigned in the Users tab Admin or Read-Only privileges.

Authentication Checker
Provided configuration can be verified with the last part of the LDAP Configuration Wizard - Authentication Checker.

Simple Mode
In Simple Mode, unlike Bind + Search Mode, only the url suffice to start the configuration. Nevertheless what is important, the LDAP Configuration Wizard does not work with Active Directory, as this one has a strong security authentication and requires a successful bind before any data can be retrieved. Regardless of the success of the scan the next part of the Wizard wll be unlocked.
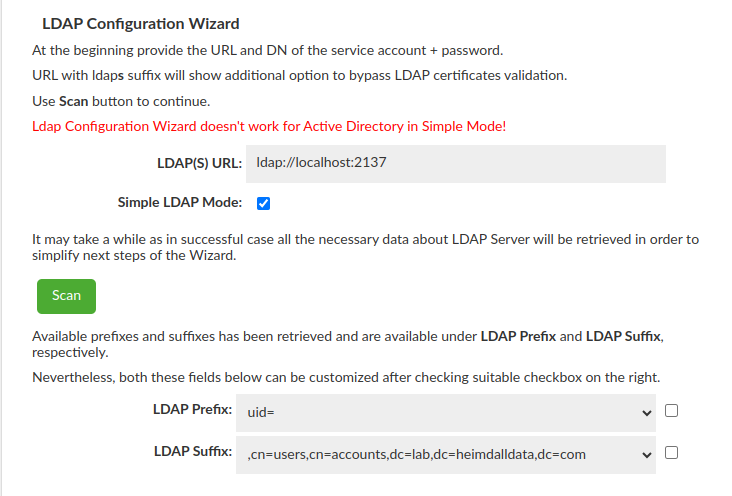
After successful scan all possible LDAP Prefixes and LDAP Suffixes will be available in a drop-down list. After failed scan drop-down lists will be empty, nevertheless both these fields can be customized after checking suitable checkbox on the right.
At this point your Simple LDAP Configuration is complete and after saving it can be found under "LDAP Configuration".
SAML 2.0 Configuration Guide
Heimdall supports Single Sign-On (SSO) through SAML 2.0, allowing authentication via external Identity Providers (IdPs) such as AWS IAM Identity Center, Okta, and others.
To enable SAML communication with Heimdall, the Identity Provider (IdP) must be configured to send data to the correct Heimdall endpoints. Below are the key configurations required (choose one either http or https protocol):
Application ACS URL: (endpoint where an Identity Provider (IdP) sends a SAML response)
- http://<heimdall_hostname>:8087/login/saml2/sso/heimdall
- https://<heimdall_hostname>:8443/login/saml2/sso/heimdall
Application SAML Audience: (recipient URL of a SAML assertion)
- http://<heimdall_hostname>:8087/saml2/service-provider-metadata/heimdall
- https://<heimdall_hostname>:8443/saml2/service-provider-metadata/heimdall
🔧 Configuration Parameters
| Parameter | Description |
|---|---|
| Auth Provider | Identity provider (AWS IAM Identity Center, Okta, Other) |
| IdP Metadata URL | The URL pointing to the Identity Provider’s metadata. |
| AWS Identity Store Id | This option is available only when using AWS IAM Identity Center. Since AWS provides groups as UUIDs, this setting enables mapping those UUIDs to their display names by connecting to the appropriate Identity Store. The mappings are stored in a temporary internal cache for up to 1 hours. If a group is renamed in AWS, click the Commit button to refresh the configuration and clear the cache. If you leave this field blank, group UUIDs will be shown instead of names. Users can manually map UUIDs to the corresponding names in the Datasource tab using the Group Mapping feature for proper role-base session requesting in the portal. For more details, see the Group Mapping section. |
To disable SAML authentication, clear the IdP Metadata URL field in the configuration. Without this URL, the SAML authentication option will be disabled.
Setting Up SAML with AWS IAM Identity Center
This guide explains how to configure SAML authentication with AWS IAM Identity Center using SAML 2.0 to enable Single Sign-On (SSO).
Create a New Application in AWS
- Go to IAM Identity Center → Applications
- Choose: Customer managed → Add application
- Select:
- Setup preference: I have an application I want to set up
- Application type: SAML 2.0
- Fill in the Display Name and Description
- Application properties are optional and may be left unspecified.
Obtain Metadata URL
On the IAM Identity Center metadata section, AWS will provide a SAML metadata file URL.
This will be used in Heimdall during the SAML setup.

Configure Application Metadata in AWS
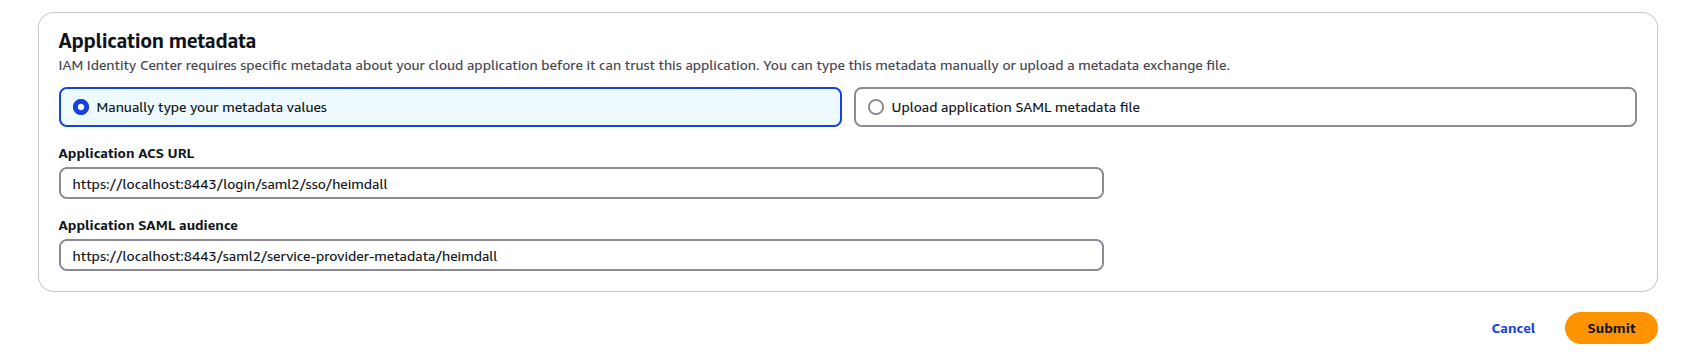
You have two options to configure metadata in AWS:
Option 1: Manually type your metadata values
Application ACS URL: (Replace <heimdall_hostname> with your actual hostname)
- http://<heimdall_hostname>:8087/login/saml2/sso/heimdall
- https://<heimdall_hostname>:8443/login/saml2/sso/heimdall
Application SAML Audience: (Replace <heimdall_hostname> with your actual hostname)
- http://<heimdall_hostname>:8087/saml2/service-provider-metadata/heimdall
- https://<heimdall_hostname>:8443/saml2/service-provider-metadata/heimdall
⚠️ Important:
These URL paths (/login/saml2/sso/heimdalland/saml2/service-provider-metadata/heimdall) must not be changed.
Altering them may result in SAML not working properly.
Option 2: Upload application SAML metadata file
-
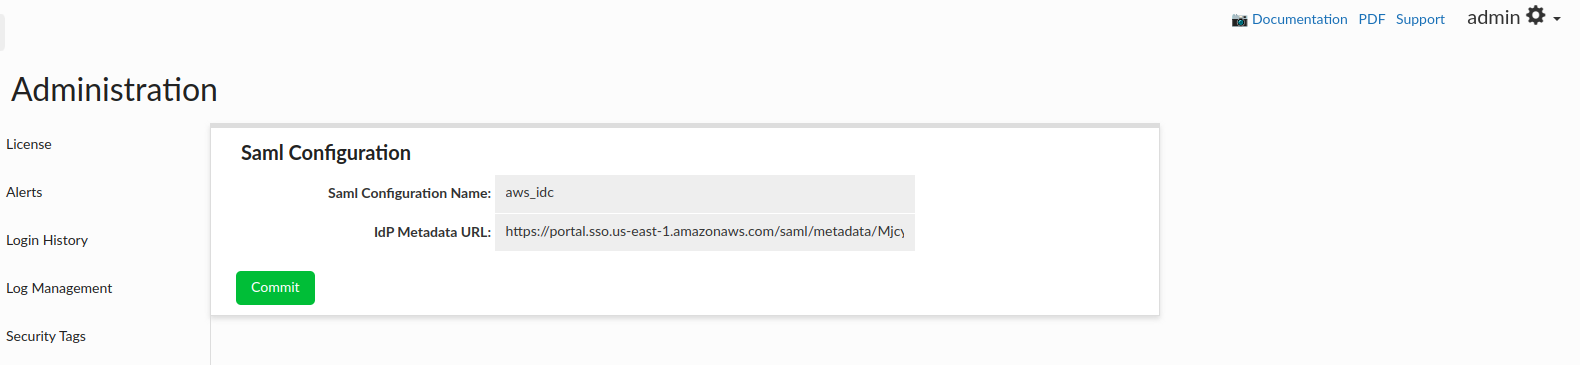
In Heimdall Central Manager:
- Log in with admin privileges
- Navigate to:
Admin → SAML Configuration -
Fill in:
- Auth provider as AWS IAM Identity Center
- IdP Metadata URL (e.g.
https://portal.sso.us-east-1.amazonaws.com/saml/metadata/<random_string>) - AWS Identity Store ID to automatically retrieve AWS groups associated with users
-
Click Commit
- Restart Heimdall Central Manager
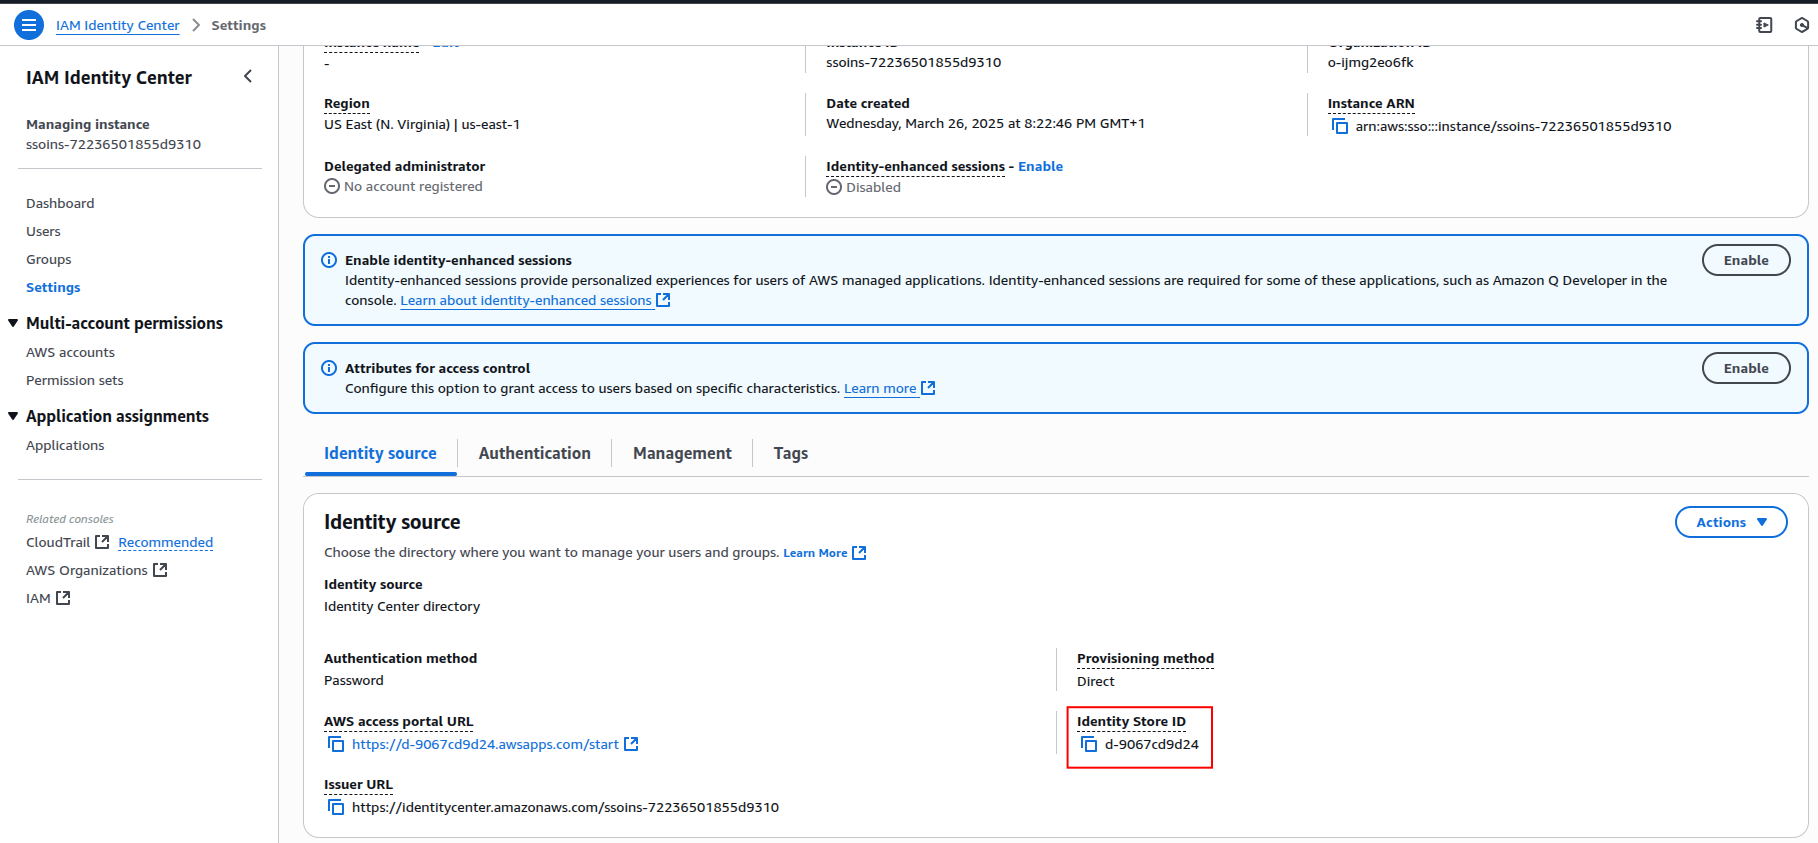
The AWS Identity Store Id can be found on aws in the IAM Identity Center → Settings → Identity source → Identity Store ID
At the end, the configuration will resemble the following:
-
After the restart, download the metadata file from heimdall endpoints:
http://<heimdall_hostname>:8087/saml2/metadatahttps://<heimdall_hostname>:8443/saml2/metadata
ℹ️ Note:
The SAML configuration XML is retrieved from a metadata URL (/saml2/metadata endpoint) via HTTP or HTTPS. The retrieved XML contains URLs that reflect the same protocol used during retrieval. AWS will subsequently use the same protocol (HTTP or HTTPS) found within the retrieved XML for communication. Users should therefore be mindful of the protocol used when accessing the metadata URL, as this will dictate the protocol AWS employs. -
In AWS IAM Identity Center:
- Choose: Upload application SAML metadata file
- Upload the file downloaded from Heimdall
AWS will auto-fill the ACS URL and Audience based on the uploaded file. The values should look like that:
Assign Users to the Application
Don't forget to assign users to the SAML application in AWS IAM Identity Center.
Without this step, users will not be able to authenticate via SAML.
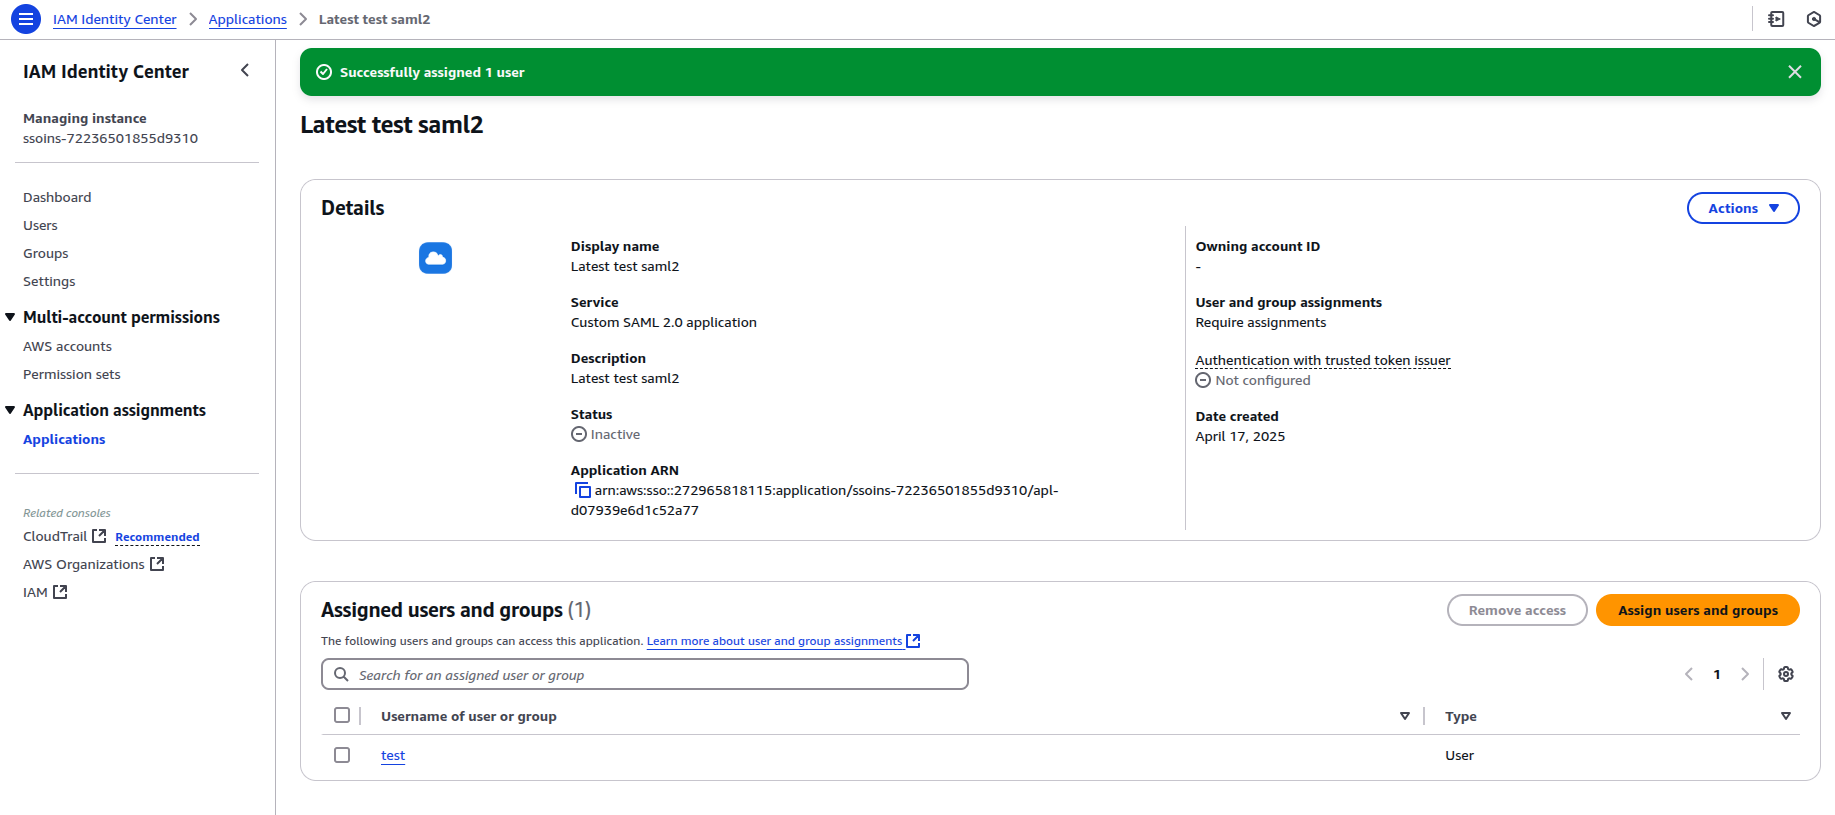
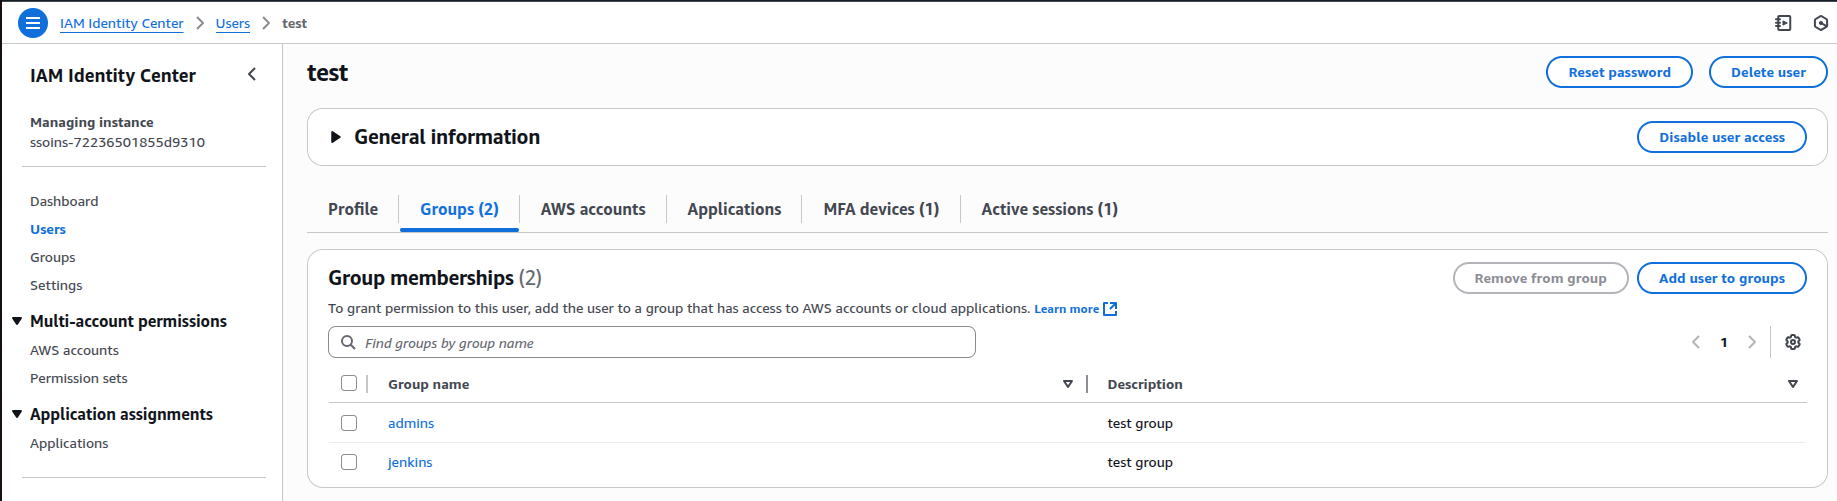
You can assign groups for a particular user, which will be extracted during user login.
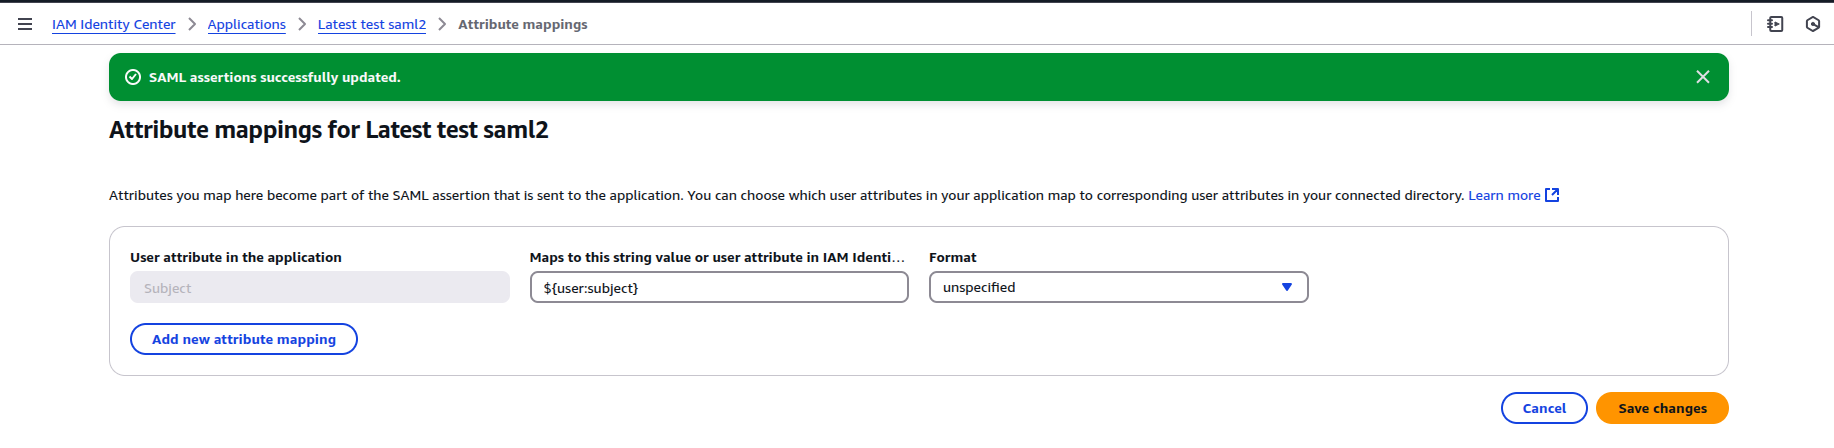
To configure the attribute mappings in AWS Identity Center, navigate to the application settings and select "Edit attributes mappings".
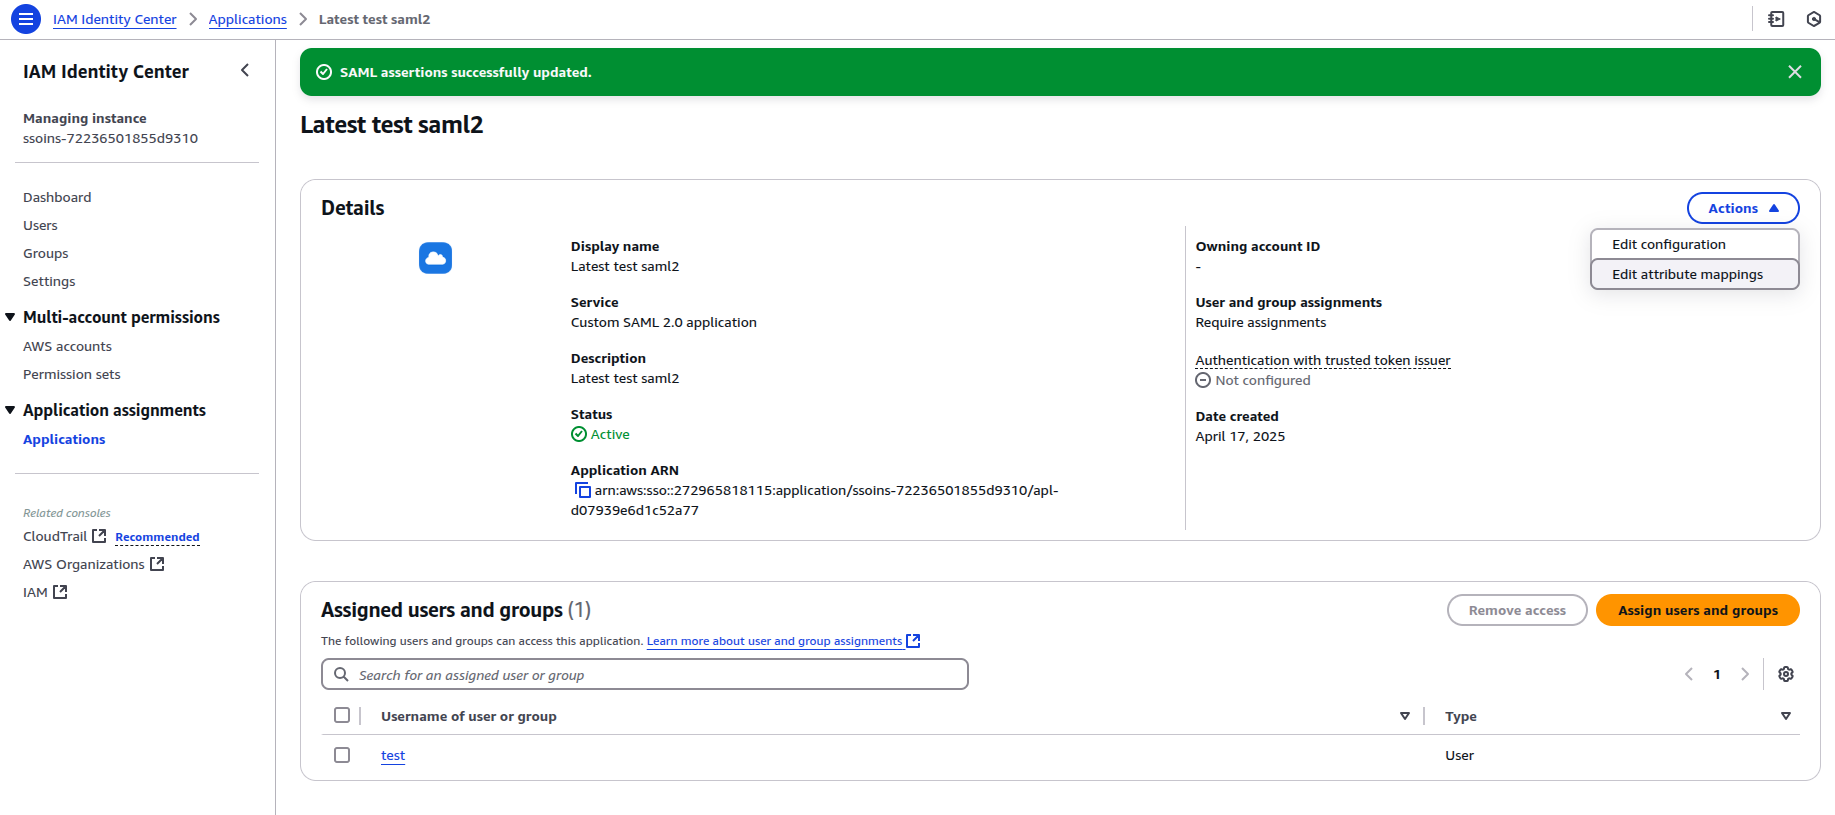
Ensure that the Subject attribute is correctly mapped to ${user:subject}.
To retrieve groups from AWS Identity Center, map the corresponding attribute to ${user:groups}.
⚠️ Important:
If you intend to use groups, make sure that every user has at least one group assigned.
AWS will fail SAML assertion validation for any user without groups, resulting in authentication errors.
Enabling SAML Authentication for Heimdall Users
- In Heimdall, go to the Users tab
- Click Create New User
- Check: Authenticate By SAML2
- Save the user
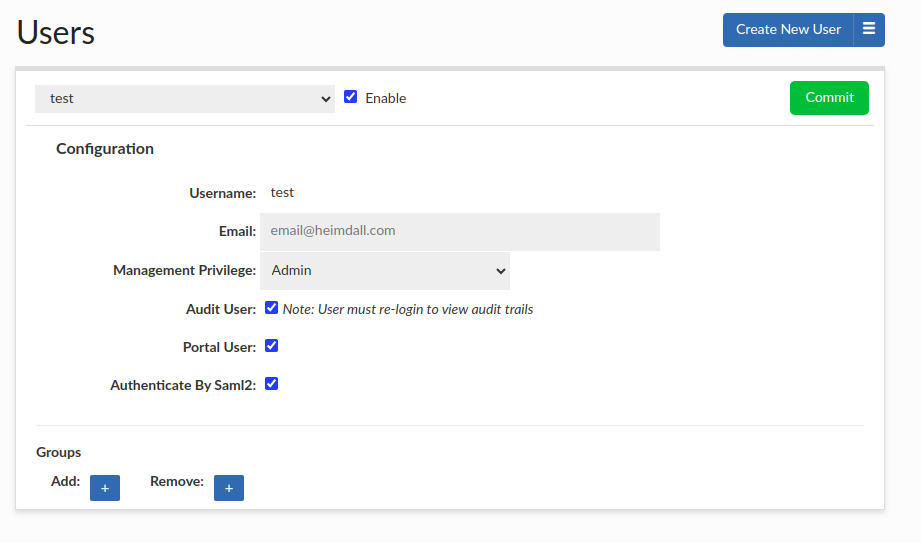
In the Users tab, administrators can manually assign groups to a user for portal use cases.
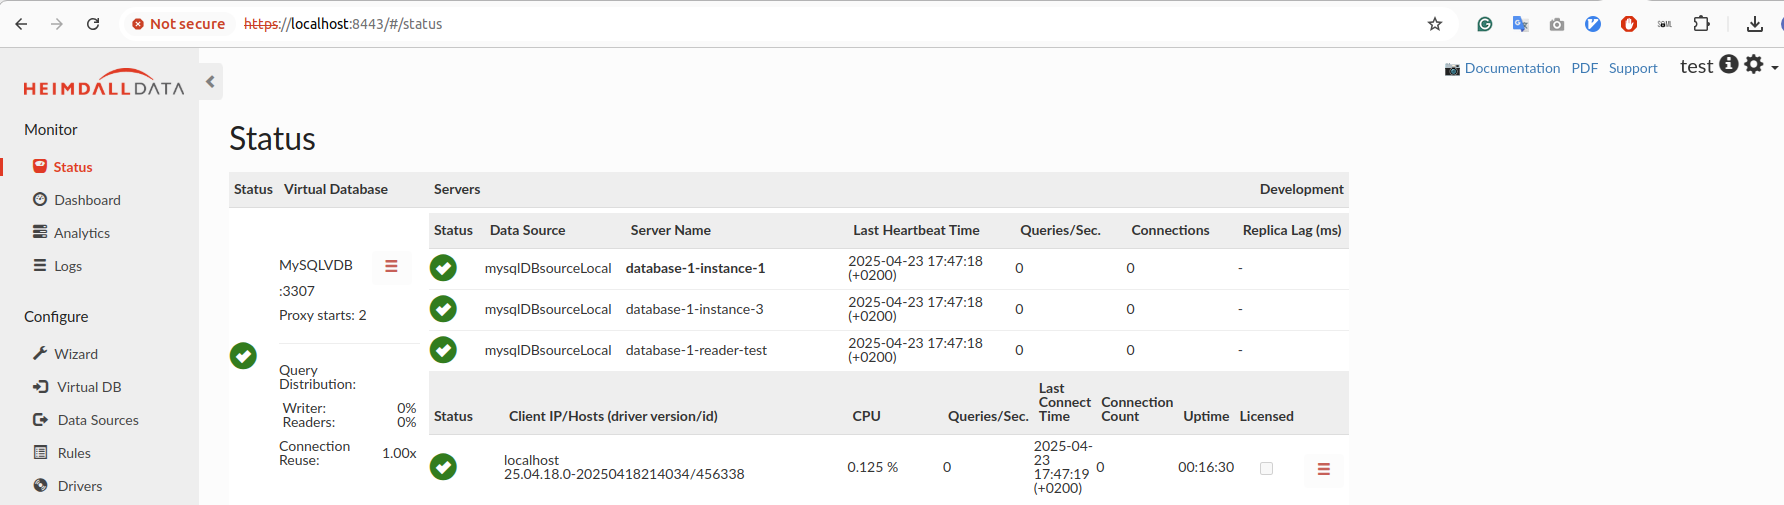
Now, when the user clicks Login with SAML (!use proper protocol of HTTP/HTTPS as configured on the aws), they will be redirected to AWS for authentication and then back to Heimdall as a logged-in user.
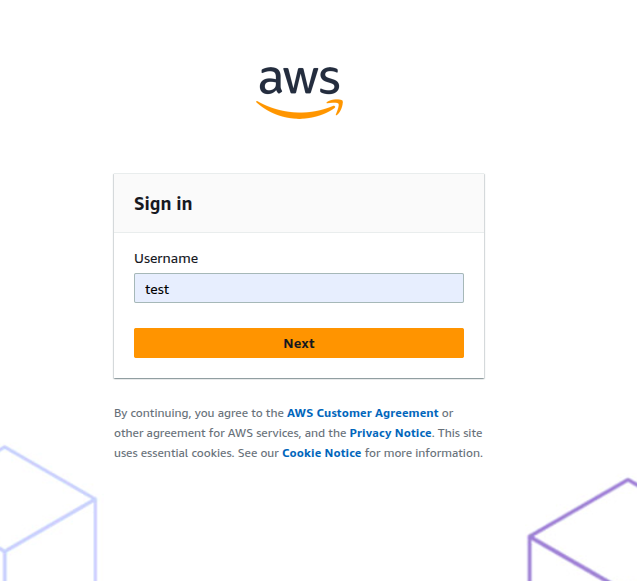
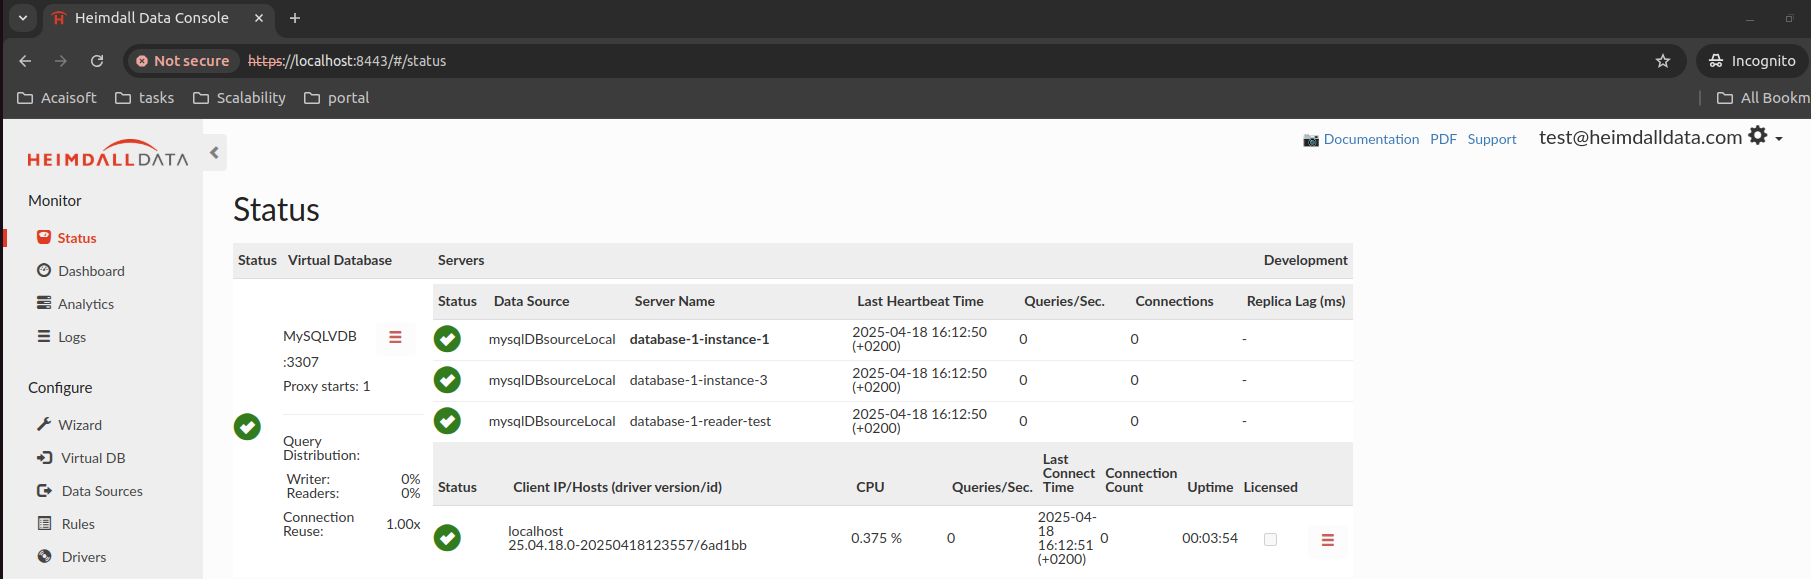
Upon successful authentication, the user will be automatically redirected to the Heimdall application as an authenticated user. For successful SAML2 authentication via AWS, the username used must exactly match a pre-existing username within the Heimdall user directory. User can hover on the (i) icon near the username to see extracted groups.
🔒 Important Notes:
- Logging out of Heimdall does not automatically log the user out of AWS IAM Identity Center.
- All SAML-authenticated users must be explicitly assigned to the application within AWS Identity Center under the Assigned users and groups tab.
- Mixing HTTP and HTTPS flow is not allowed! AWS configurations using HTTPS require a consistent HTTPS authentication flow. Users accessing the Heimdall login page must do so via HTTPS (e.g. https://
<heimdall_host>:8443/#/login). Inconsistent use of HTTP within an HTTPS configured environment may lead to authentication failures and prevent successful login. - If you change group names in AWS IAM Identity Center, be sure to click the Commit button in the SAML configuration. This clears the group mapping cache. If you skip this step, the old group information may persist for up to an hour.
- If the user cannot log in with SAML and you are using a group extraction mechanism, ensure that each of the users has at least one group assigned; otherwise the auth will fail on the AWS side.
- If you encounter issues during login, try using your browser's Incognito/Private Mode. This helps eliminate the chance of lingering sessions or cached credentials interfering with the SAML login flow.
Setting Up SAML with Okta
Heimdall Central Manager and Portal Integration with Okta
This guide explains how to configure SAML authentication with Okta using SAML 2.0 to enable Single Sign-On (SSO).
Create a New Application in Okta
- Create or log in to your Okta (developer) account.
- Navigate to Applications → Create App Integration.
- Select SAML 2.0 and click Next.
- Name your application and click Next.
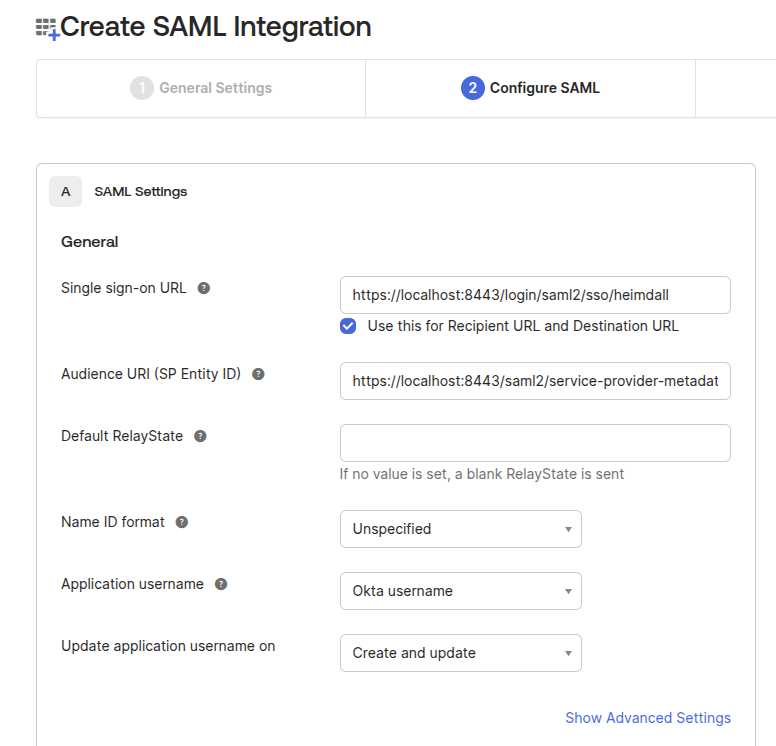
Configure SAML Settings
Use the following configuration (Use either HTTP or HTTPS consistently across the entire setup and future logins) :
Single sign on URL:
- http://<heimdall_hostname>:8087/login/saml2/sso/heimdall
- https://<heimdall_hostname>:8443/login/saml2/sso/heimdall
Audience URI:
- http://<heimdall_hostname>:8087/saml2/service-provider-metadata/heimdall
- https://<heimdall_hostname>:8443/saml2/service-provider-metadata/heimdall
- Check [x] Use this for Recipient URL and Destination URL (default)
To allow group extraction, add the following filter with the "Matches Regex" option, which will allow all groups retrival with regex such as ".*"

Finalize App Setup
Click Next, then select: - I’m an Okta customer adding an internal app - This is an internal app that we have created
Click Finish.
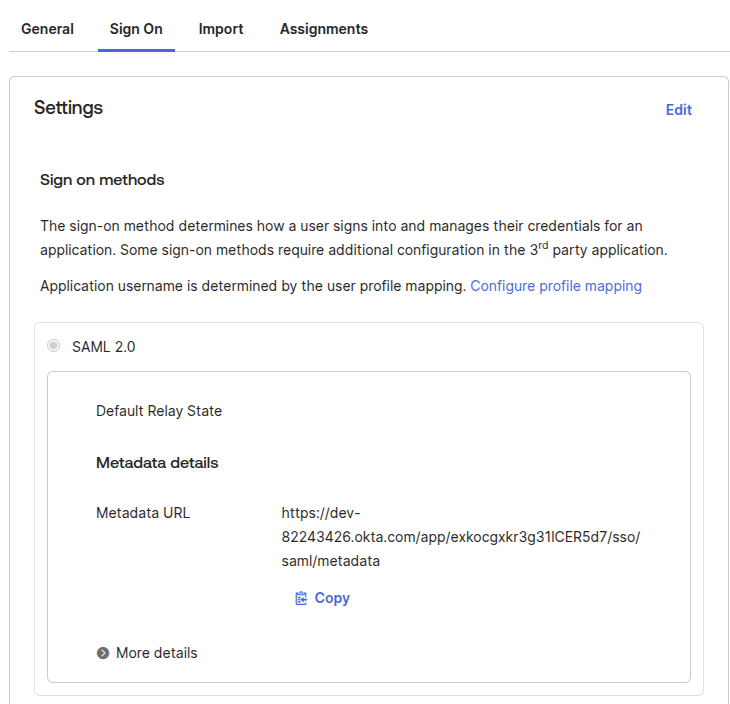
Retrieve Metadata URL
On the Sign On tab, copy the Metadata URL, e.g.:
https://dev-82243426.okta.com/app/<random-characters>/sso/saml/metadata
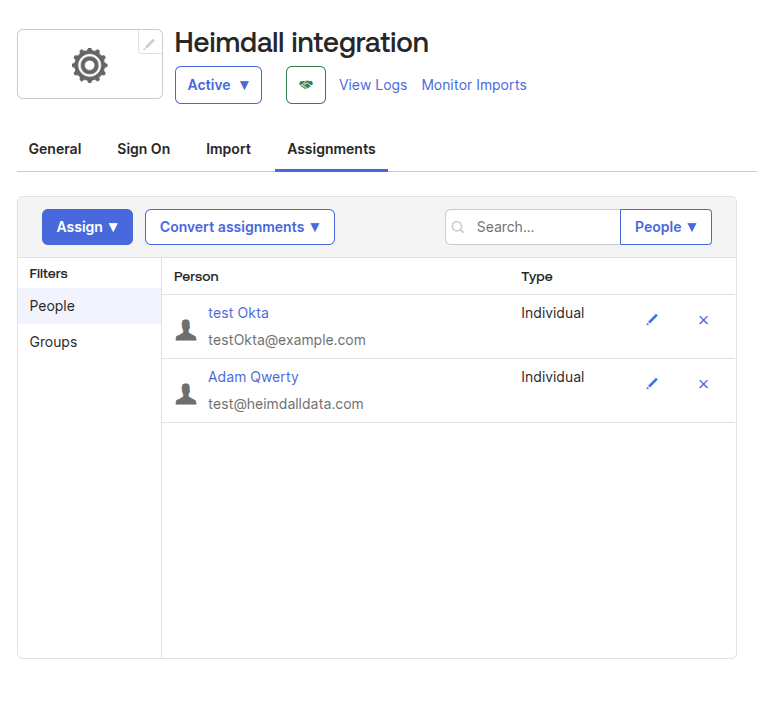
Assign Users or Groups
Go to the Assignments tab in your Okta app and assign access to users or groups.
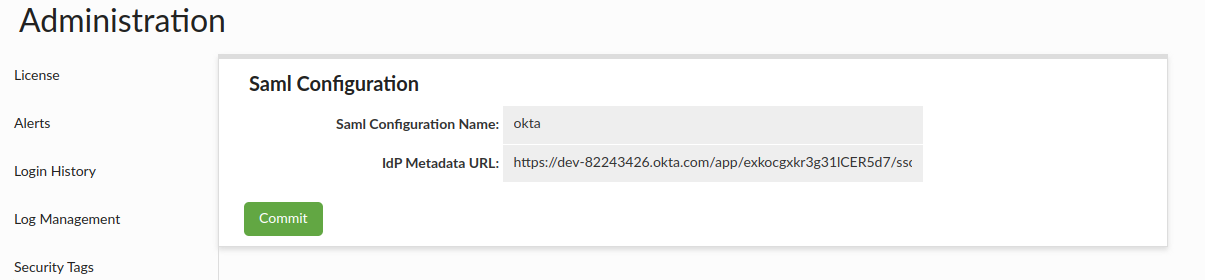
Configure SAML in Heimdall
- Log in to Heimdall Central Manager with admin privileges.
- Navigate to:
Admin → SAML Configuration - Fill in the following:
- Auth provider as Okta
- IdP Metadata URL, e.g.:
https://dev-82243426.okta.com/app/<random_string>/sso/saml/metadata - Click Commit
- Restart Heimdall Central Manager
Enable SAML Authentication for Heimdall Users
- Go to the Users tab in Heimdall.
- Click Create New User
- For Okta users, enter the user's email address instead of a username (as Heimdall will authenticate based on the data returned by Okta —i.e., email).
- Check from the box: SAML
- Click Save
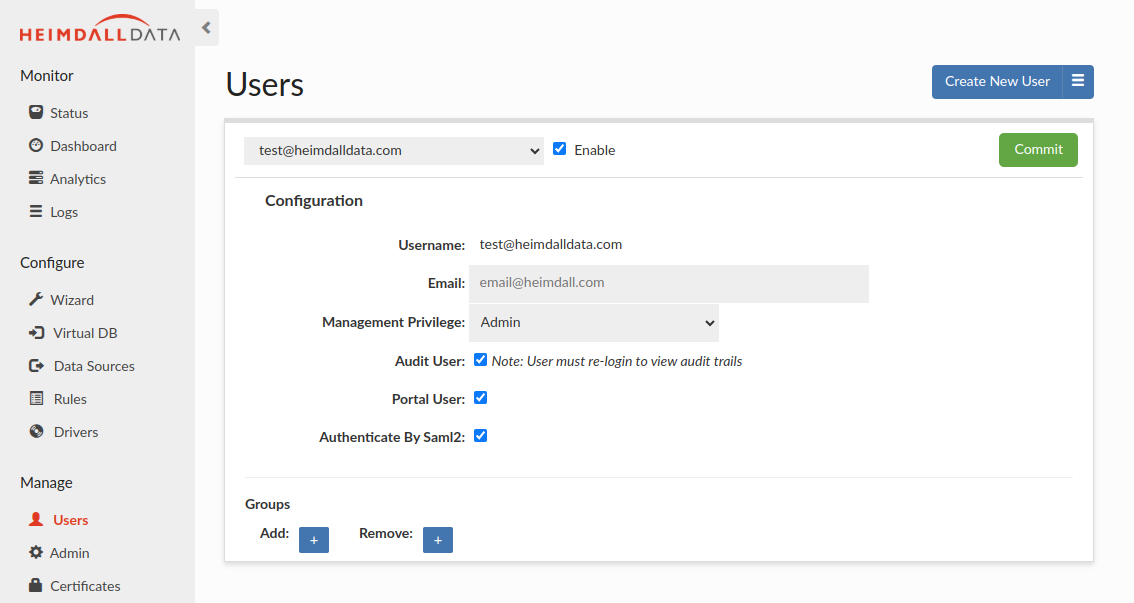
In the Users tab, administrators can manually assign groups to a user for portal use cases.
Logging In via SAML (Okta)
Once configured:
- Users can click Login with SAML on the Heimdall login page (!use proper protocol of HTTP/HTTPS as configured on Okta).
- They will be redirected to Okta for authentication.
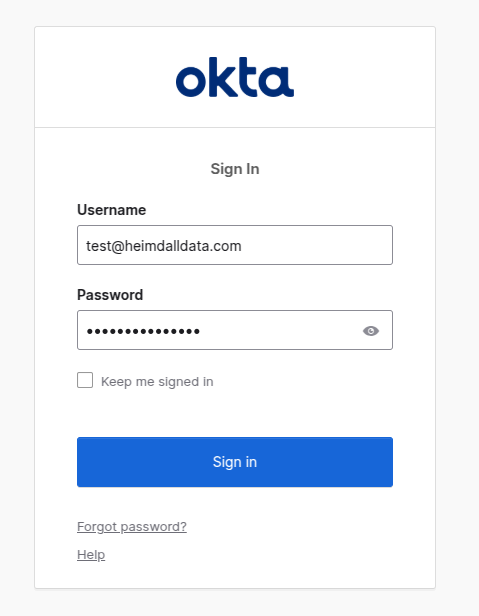
- Upon successful login, they will be returned to Heimdall as authenticated users. User can hover on the icon near the username to see extracted groups.
🔒 Important Notes:
- Logging out of Heimdall does not automatically log the user out of Okta.
- All SAML-authenticated users must be explicitly assigned to the application within Okta under the Assignments tab.
- Mixing HTTP and HTTPS flow is not allowed! Okta configurations using HTTPS require a consistent HTTPS authentication flow. Users accessing the Heimdall login page must do so via HTTPS (e.g. https://
<heimdall_host>:8443/#/login). Inconsistent use of HTTP within an HTTPS configured environment may lead to authentication failures and prevent successful login. - If you encounter issues during login, try using your browser's Incognito/Private Mode. This helps eliminate the chance of lingering sessions or cached credentials interfering with the SAML login flow.
TCP Port Availability
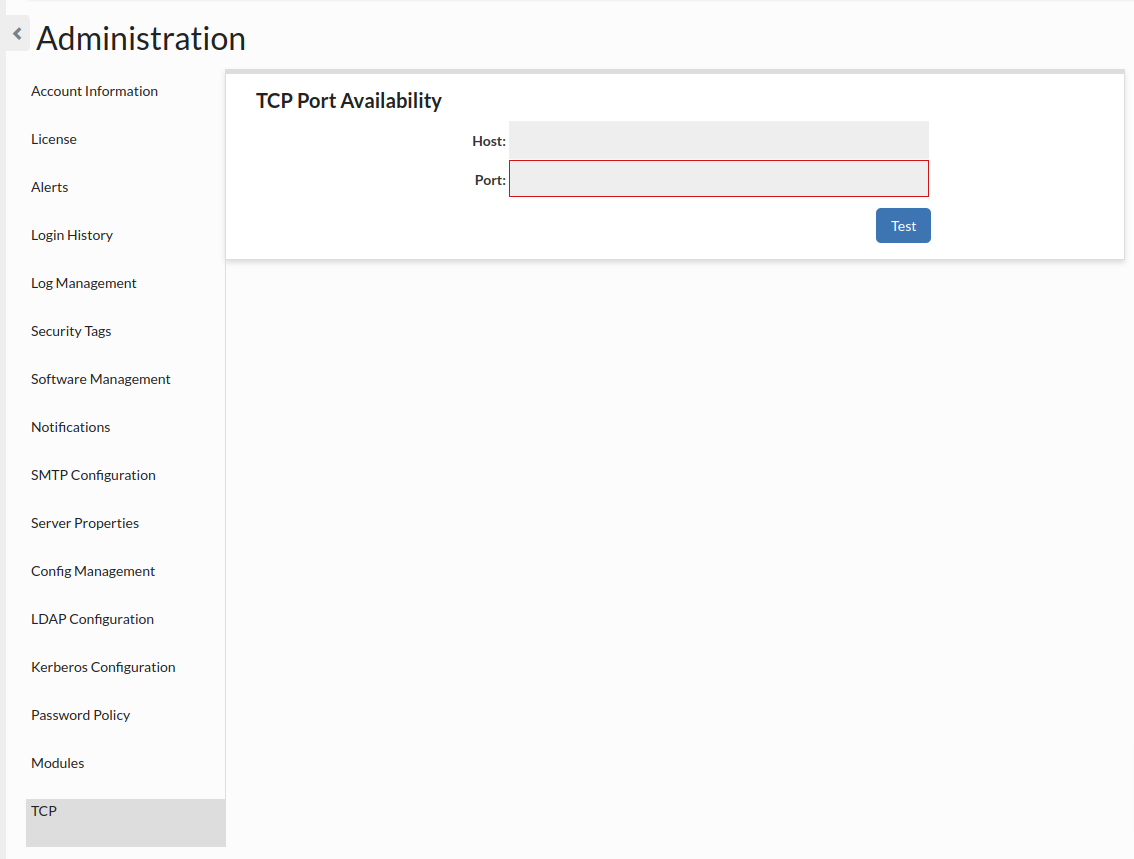
This allows checking if given port is available. Host is optional, if it isn't provided, it is set to "localhost".