Portal Introduction
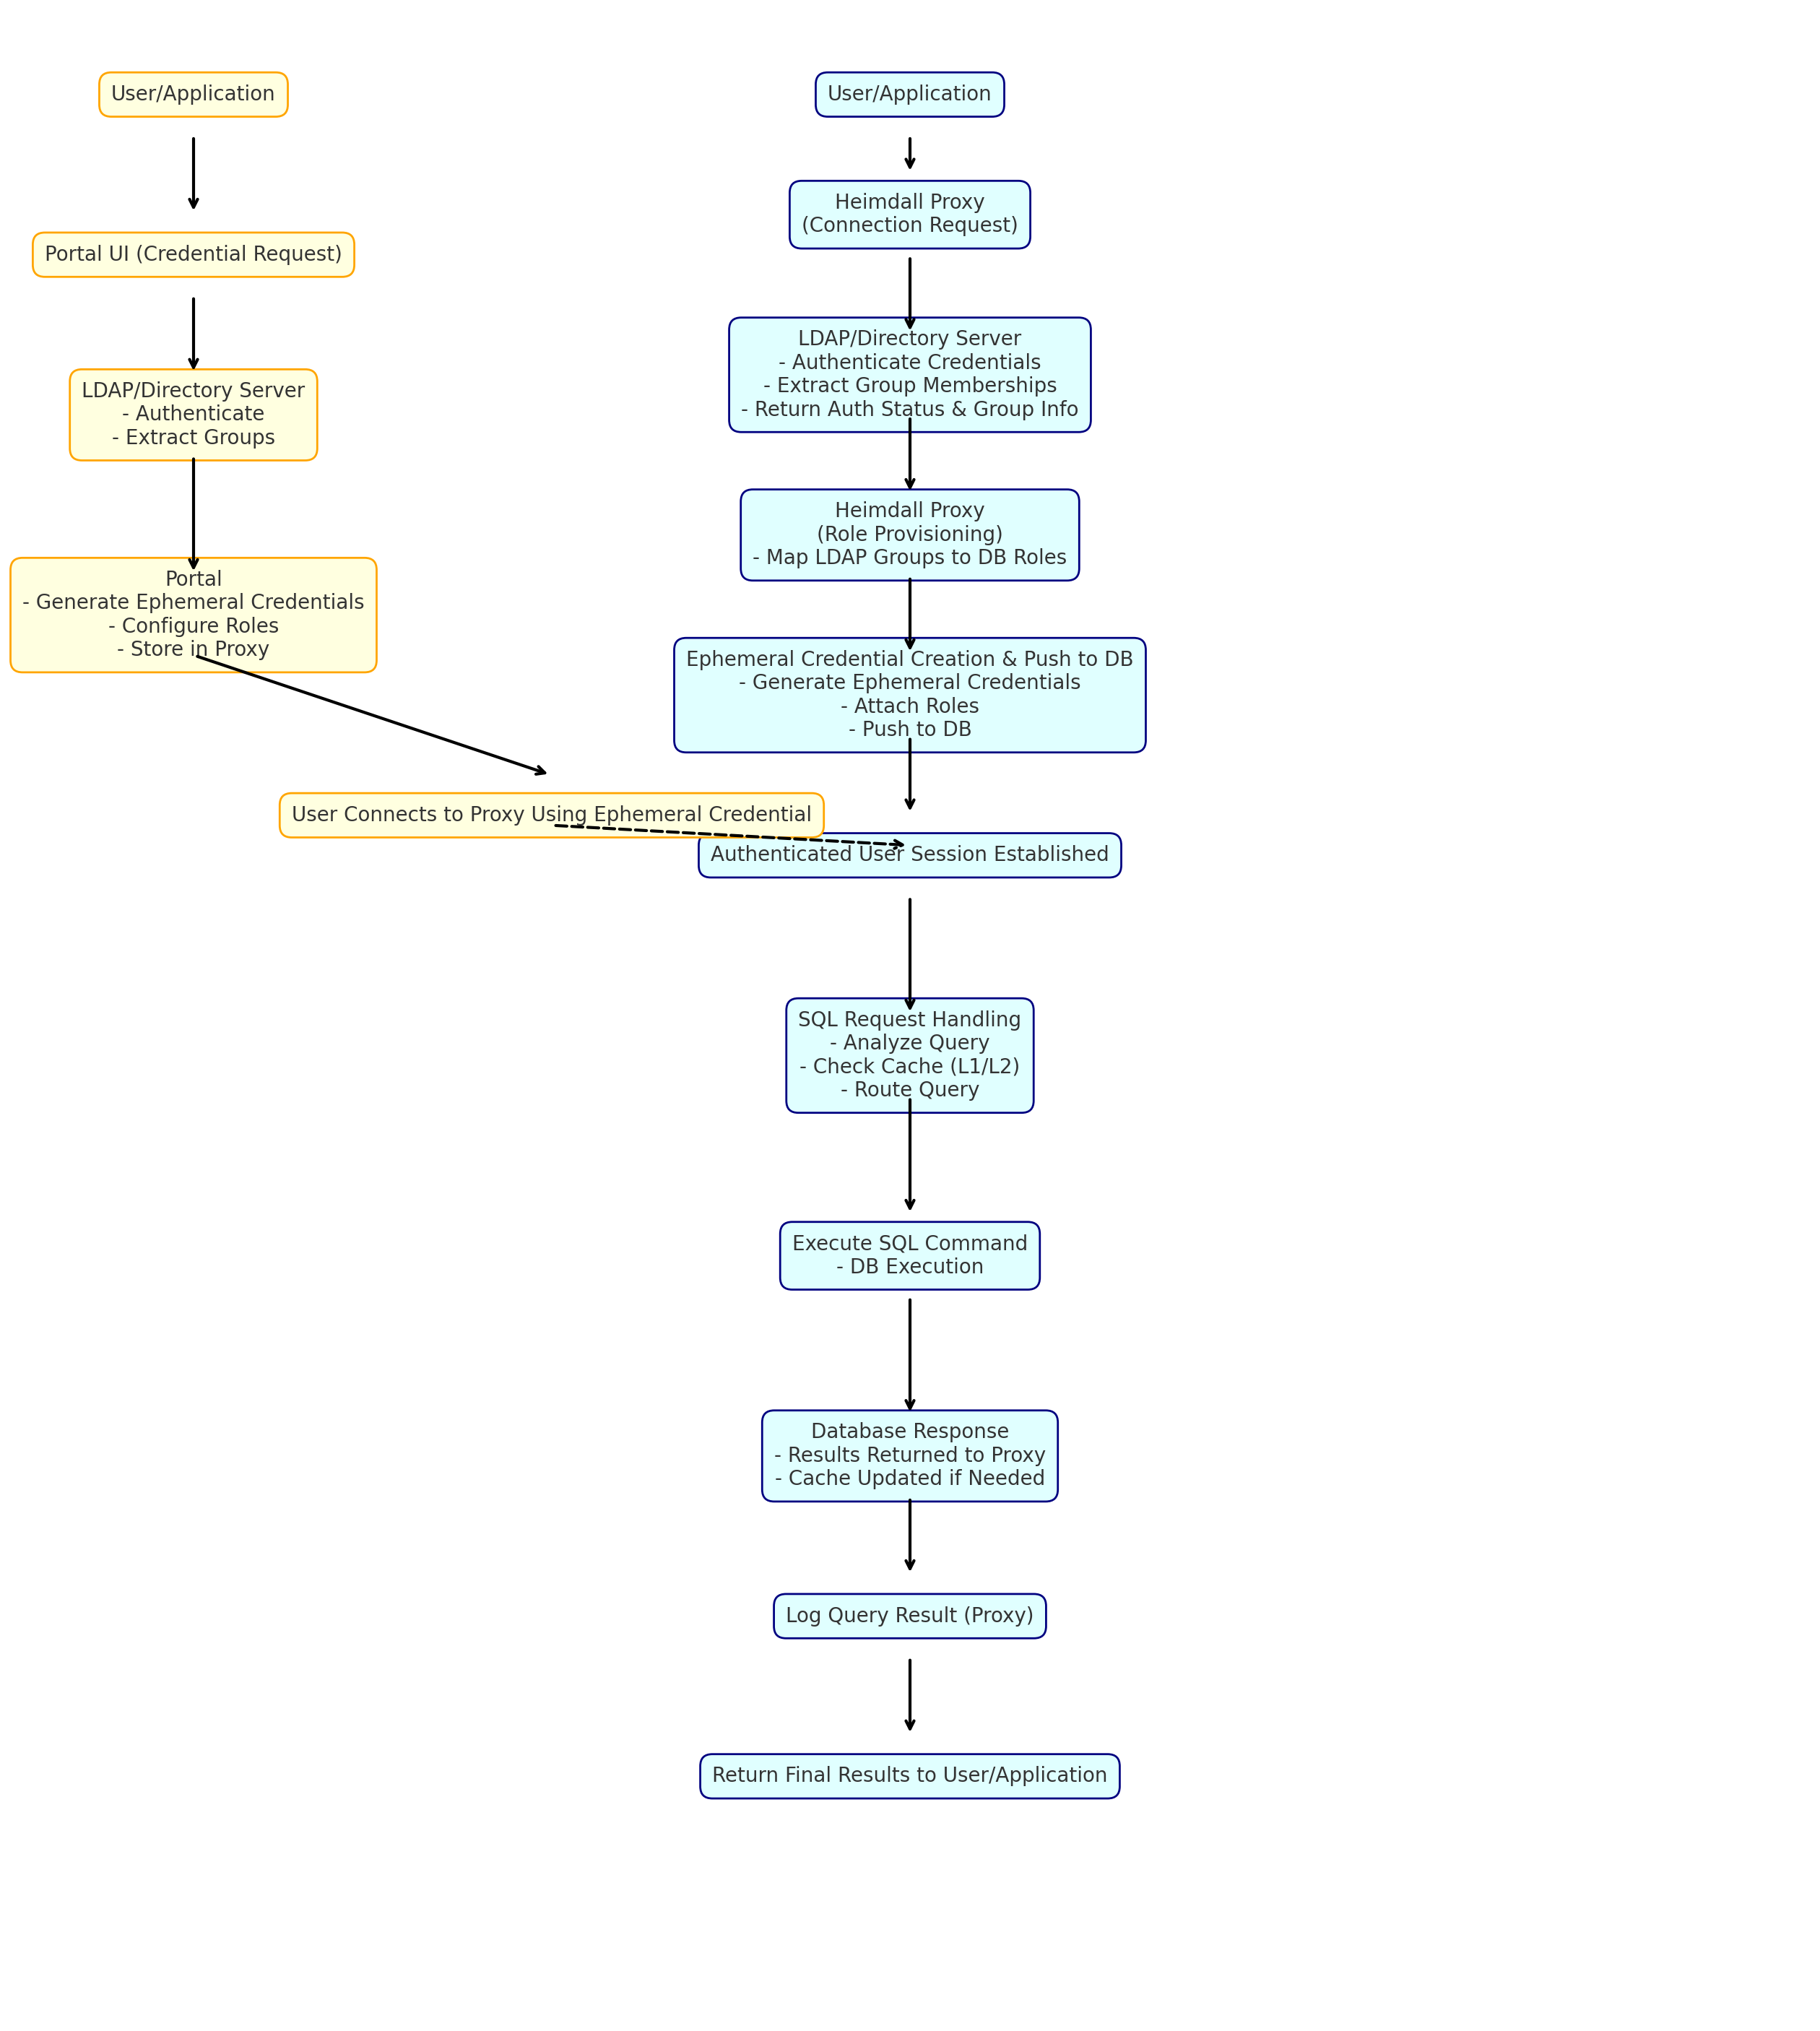
The Heimdall portal is a set of functionality that provides PSM (Privileged Session Management) and PAM (Privilege Access Management) functionality, sometimes joined as PASM. On the management side, Heimdall can be configured to query group membership from a user directory, such as Active Directory, FreeIPA, OpenLDAP, Jumpcloud or Octa. From there, the group membership can be mapped into a data source to indicate role entitlement. This entitlement can be either conditional based on one or more approvals, or unconditional.
Users are then able to login to the user portal, and request access to a particular role for a particular amount of time. For conditional roles, once the request is made, the approvers are notified of the request, and they are then able to approve the request or deny it.
Once approved, users are able to login during the requested time period using ephemeral credentials. When connected through the proxy layer in this setup, all queries can be logged for the user for audit trail purposes. Once the user is done with their task or the session expires, the ephemeral credentials are removed from the database to minimize the attack surface.
As an alternative session creation mechanism, the user could simply request a connection through the proxy, and the unconditional roles associated with the user will be mapped in and a session created, providing for seamless integration with the database and the directory, while avoiding extra steps for users.
As part of this functionality, Heimdall also provides a role and user access report generator in the data source tab, which allows the users and roles to be audited, and the data that each role grants to be tracked. This helps ensure that the roles that a user can or are granted only provide the functionality needed for that role, preventing over-provisioning. This report functionality includes the ability to map out nested role permissions under a user, allowing an administrator to identify why a user may have access to a resource that is unexpected. Other tools often only provide direct role permissions, or may be incomplete in permission mapping due to legacy permission schemes. An example of this is with Amazon Redshift, it has both group and roles, both of which can provide privileges at the same time.
For portal configuration, a variety of tasks need to be completed:
- Setup an LDAP configuration to pull group memberships from;
- Setup a notification system to allow notices to go out, typically SMTP;
- Setup request requirements, such as if requests need to include a justification , and if so, what the justification requirements are (such as a ticket ID format);
- A data source to store session information;
- Group to role mappings for each data source access is to be provided to;
- Role approver configuration, which is tied to notification configuration;
- User configuration for the portal (which can be learned at runtime from the directory based on group membership).
This guide will walk you through all the required steps up to a practical example. We will start with the basic setup and move on to managing roles and groups.
Prerequisites
We'll start by setting up the SMTP configuration, which is used for sending emails. The portal's notification system relies on SMTP, meaning that all future notifications—such as session state changes, approvals, and portal session requests—will be sent from the email address configured here.
Fill in all the required fields, commit the changes, and verify the setup by sending a test email to a specified address. Click the Test button to confirm that everything is working correctly.
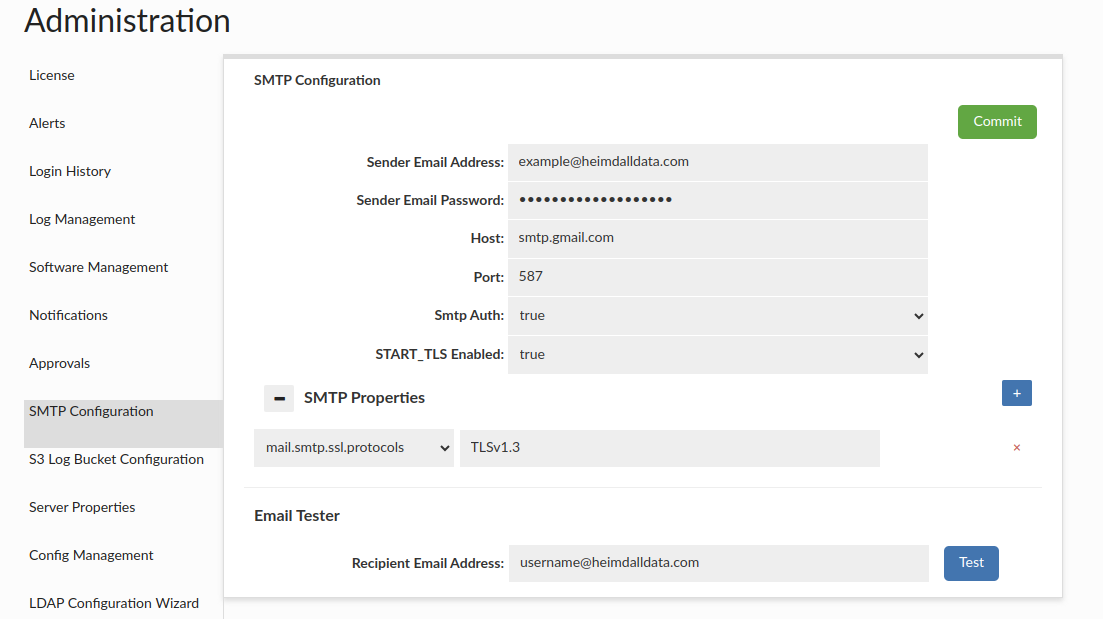 (For more details on this section, see: SMTP Configuration)
With the SMTP configuration in place, the next required step is setting up the LDAP configuration. A comprehensive guide and additional details can be found in: LDAP Configuration, or you can use the: LDAP Configuration Wizard. LDAP serves as the primary mechanism for determining a user's assigned groups within the portal. These groups define which roles a user is authorized to request sessions for, as explained later in this tutorial.
As an alternative (recommended for testing purposes only) you can manually assign groups to existing GUI users in the Users tab. More details can be found here: Users.
Remember to enable the "Portal User" option when manually creating portal users in the Users tab and keep in mind that any changes to GUI user role permissions require the user to relog for the new authorities to be fully applied.
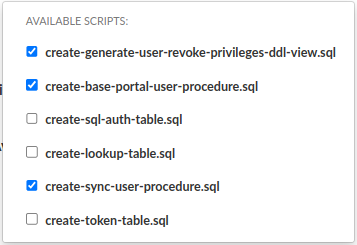
Before accessing the portal, also ensure that the appropriate Data Source(s) are created in the Data Source tab. If they don't exist, create them. However, if the Data Sources are already created, a key step is to create procedures responsible for creating portal session users with the correct roles and base portal user (The base portal user is a non-login user that helps maintain privilege consistency and takes ownership of objects created by ephemeral portal users before their removal). You can do this on the specified data source as shown below by clicking the Execute Scripts button.

For a Redshift data source, it's also necessary to include the script responsible for creating the view used to generate queries for revoking object privileges — in case an ephemeral portal user has created or inherited any during previous sessions.
Portal Configuration
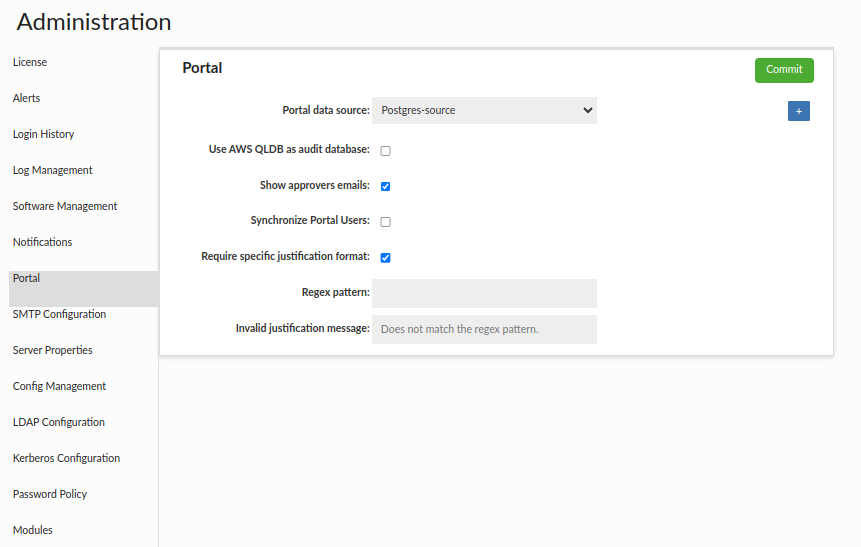
Having completed all the above steps, we can now proceed with setting up the portal. In the Admin tab -> Portal section -> Portal Basic subsection, you’ll need to specify key settings, including:
The LDAP Configuration to be used by the portal.
The Data Source, where the portal database will be stored.
The Host for the Central Manager (optional), which runs the portal and will be included in notification emails, allowing users to quickly access the specified link. This is especially useful when having multiple Central Managers.
The Synchronize Portal Users option, which, when enabled, allows LDAP users to log in to the Central Manager and automatically creates a corresponding GUI user on the fly, enabling them to request sessions for the appropriate roles.
 (For more details on this section, see: Portal)
In the next subsection, Notifications, you need to create configurations that define the notification protocol (SMTP, LDAP, SNS or SIMPLE), a Notification Alias, and the target recipient or group(s) of recipients.
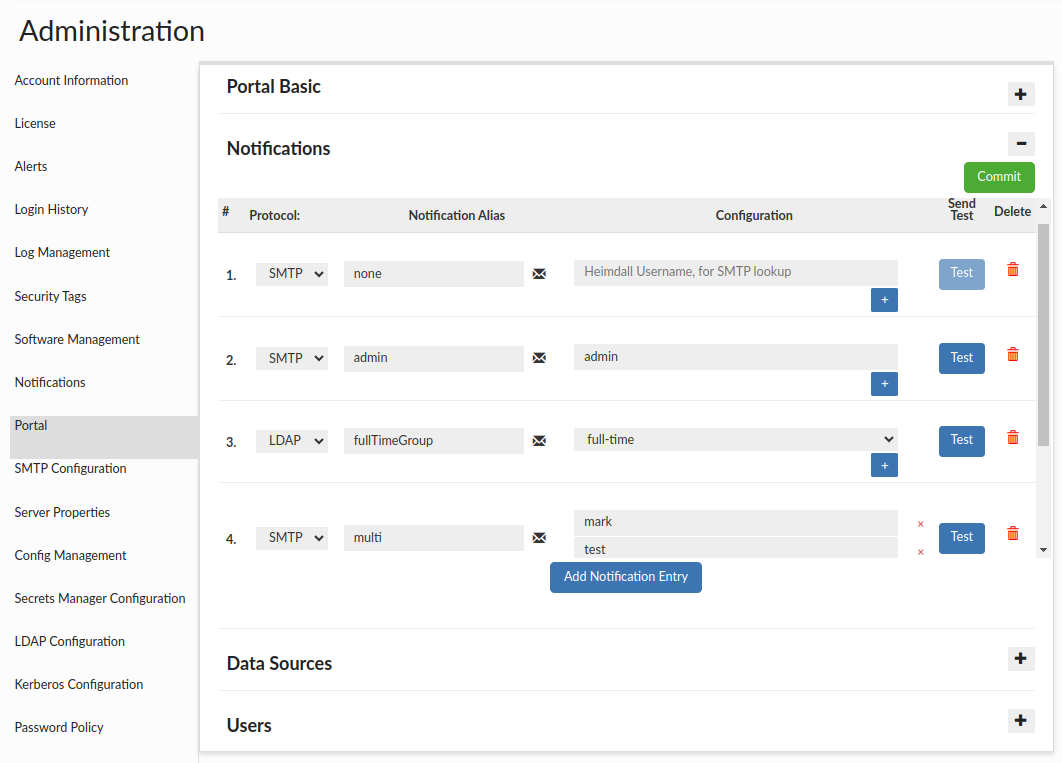 For SMTP notifications, add GUI users (ensure they have a defined email in the Users tab). For LDAP, specify the groups. For SNS, provide the Topic ARN. For SQL, provide the query to fetch emails from the database for the given data source. For SIMPLE, provide ready-made email addresses.
Notifications will be required in the next step to define the list of approvers for requested roles. In other words, within the portal, a single notification entry defines which user or group of users can approve or deny a given role. It also determines who will receive notifications when a session is requested for that role.
For SMTP notifications, add GUI users (ensure they have a defined email in the Users tab). For LDAP, specify the groups. For SNS, provide the Topic ARN. For SQL, provide the query to fetch emails from the database for the given data source. For SIMPLE, provide ready-made email addresses.
Notifications will be required in the next step to define the list of approvers for requested roles. In other words, within the portal, a single notification entry defines which user or group of users can approve or deny a given role. It also determines who will receive notifications when a session is requested for that role.
The next subsection, Data Source, is fundamental to the portal’s operation, specifically its two key parts: Group Mapping and Roles Management.
- Group Mapping (optional) allows mapping user groups (retrieved from LDAP or manually assigned in the Users tab) to specific roles in the database. Users with mapped groups can request sessions for the corresponding roles.

Example: The mapping above defines that any user logging in with the "test-users" group assigned will be able to request sessions for the "test-role", provided a configuration for that role is created below. In the absence of a mapping, a user in the "test-users" group could request sessions for a role with the same name, assuming that a Role Configuration in Roles Management for the "test-users" role has been created.
-
Roles Management consists of two main parts:
- Database-Native Session Cleanup - This option helps to clear sessions, when Central Manager goes offline. More information here
- Require justification pattern: - This part enforces a pattern that all session request justifications must match for the given data source.
-
Filter system roles: - If selected, predefined system roles for databases will not be displayed on the roles names list.
-
Below part is used to configure roles available for session requests within the portal.
- You have to select a role.
- Assign a notification alias, defining the user or group responsible for approving/denying session requests for that role.
- Set the Default and Maximum session duration.
- Set Approvals Needed field, which defines how many approvers must approve a given role before a session can be granted.
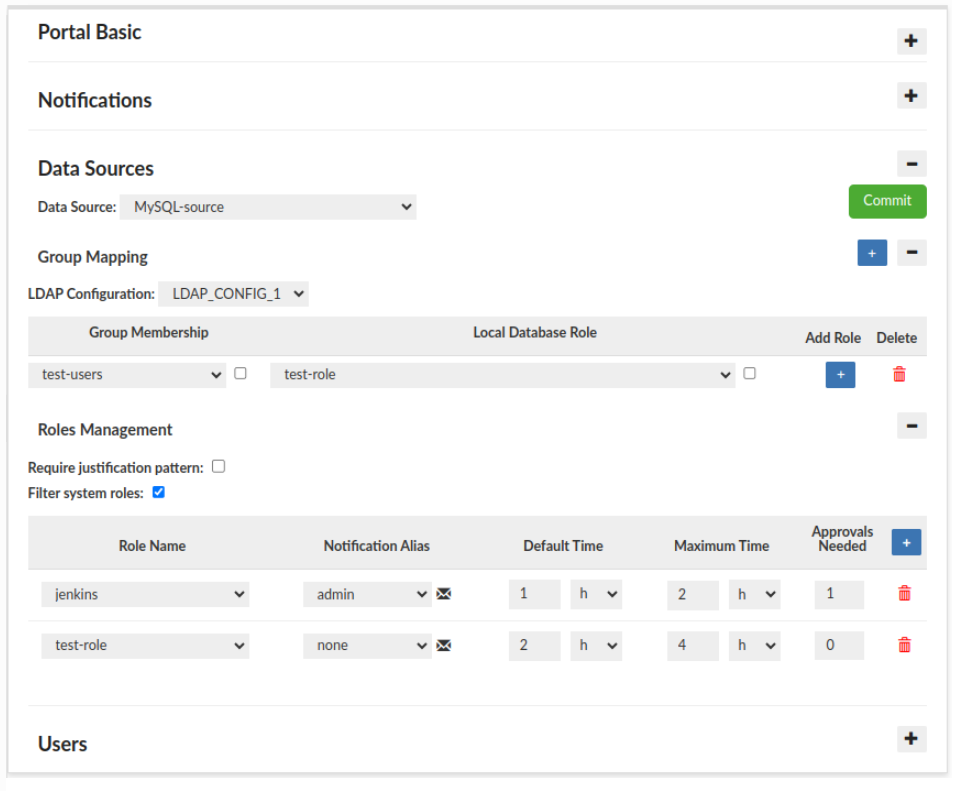
Example: The screenshot above shows two configured roles:
-
jenkins – The approver for this role is assigned to the "admin" notification alias, meaning the designated users will receive notifications and be responsible for approving or denying session requests. The default session duration is 1 hour, and the maximum requestable duration is 2 hours.
-
role-test – Assigned the "none" notification alias, indicating a default empty notification with no specified users or groups. As a result, sessions for this role are auto-approved upon request. The default session duration is 2 hours, and the maximum requestable duration is 4 hours.
Portal Flow
With the configuration complete, we will now walk through a sample portal flow, demonstrating the process from requesting a session to the creation of a portal session user.
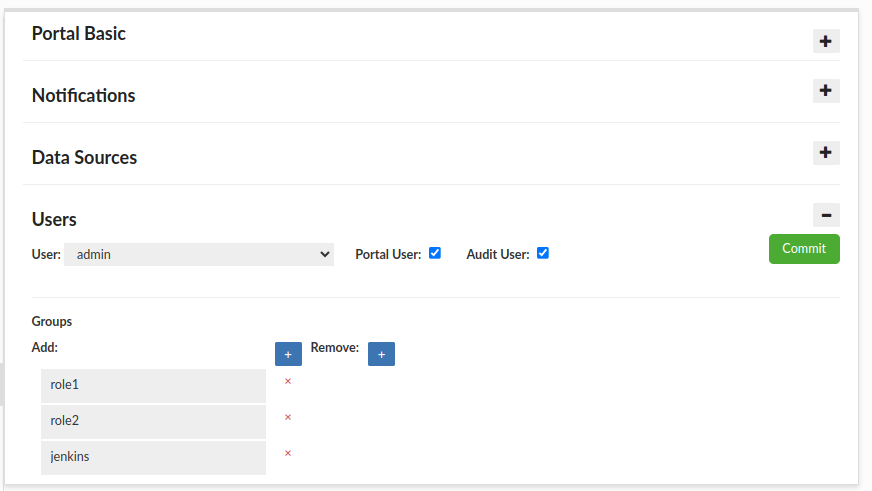
In this example, the requester will be "mark". Since this user is not an LDAP user, we manually assign him to the "test-users", "jenkins" and "random-group" groups. If you need to create a new user, use the Users tab.

Next, user mark logs in, navigates to the Request Access tab, selects the data source for which he wants to request a session, specifies the role(s) he needs, sets the requested session duration, and provides a justification.
Note: In the list of available roles for request, a user will only see roles that have been configured in Roles Management and align with their assigned groups. This includes groups assigned directly to the user and those mapped via Group Mapping, if applied.
Even though we previously assigned the user "mark" to the "random-group" group, he cannot request a session for the role with that name—even if it exists in the database—because it is not configured in Roles Management and is not mapped to another role in Group Mapping.
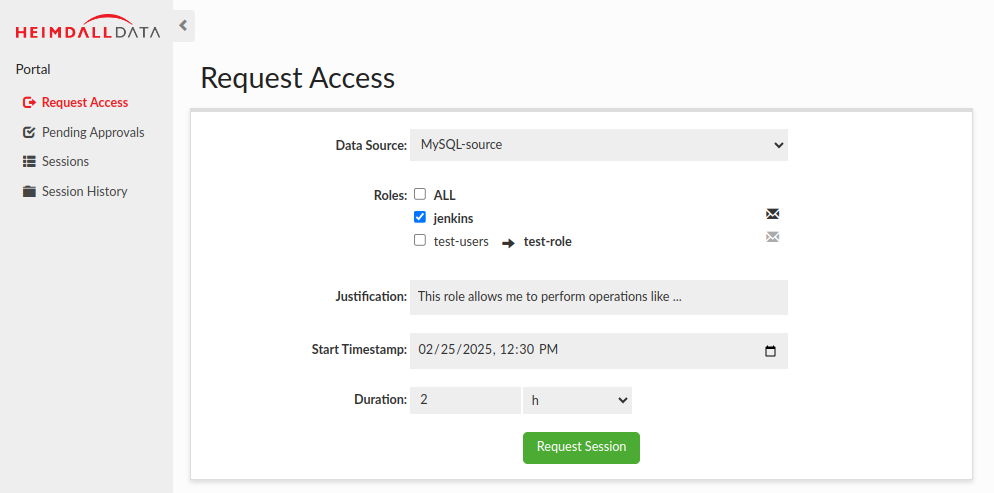
In this example, mark requests a session for the jenkins and test-role roles with a duration of 2 hours. Additionally, we can see that the test-users group is mapped to the test-role, and that role is automatically selected, meaning it doesn't require any approvals and will be granted automatically. Selecting the Preserve Objects option ensures that the objects created by the ephemeral user during the session will not be deleted once the session ends.
After successfully submitting the request, he will see a success alert on the screen, and the approvers assigned to this role will receive notifications with the session details.

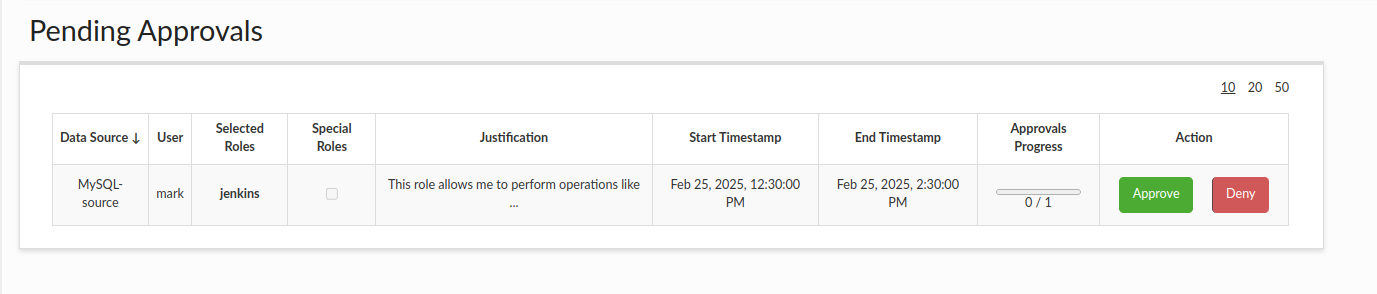
Next, the approver(s) log into Heimdall and navigate to the Pending Approvals tab, where they can approve or deny session requests. In this example, the admin user logs in, since the jenkins role is assigned the "admin" notification alias. In the Notifications Configuration, the admin alias is connected to the admin user (look above). Moreover, we can see that the test-role is highlighted in green, which indicates that it has already been approved (in this case, automatically).
Based on the previous configuration, where we specified that the jenkins role requires only one approval, admin can approve the session requested by mark:
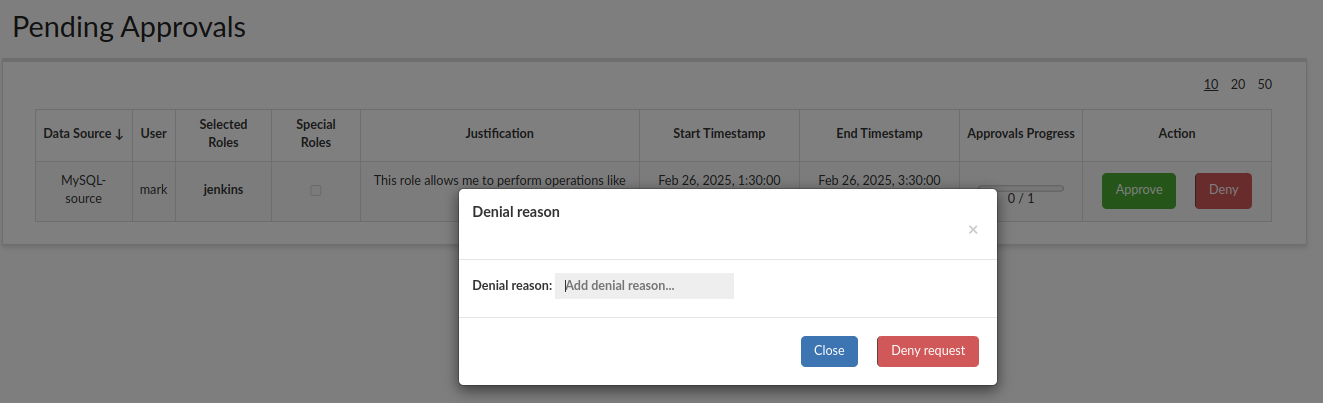
If an approver decides to deny a session, they will have the option to provide a denial reason explaining their decision. This is optional, and if provided, it will be included in the email notification sent to the requester.
If admin approved the session, it means that the requested session has gathered all the required approvals (1 in this case) and is now marked as APPROVED. Additionally, the requester (mark) receives an email notification confirming that their session has been approved:

If this happens during the requested session timeframe, a portal session user will be generated with the approved roles.
The requester (mark) can then navigate to the Sessions tab to view his session details, check its status, and access the credentials needed for login:

If the session has received all required approvals but its start time has not yet arrived, the portal session user (along with credentials) will only be generated when the session begins. At that point, the user will be able to log in. Once the session duration expires, the portal session user is automatically deleted, and any active database connections are terminated. The requester can also cancel their session at any time, which will have the same effect. Additionally, admin users have the ability to terminate sessions.
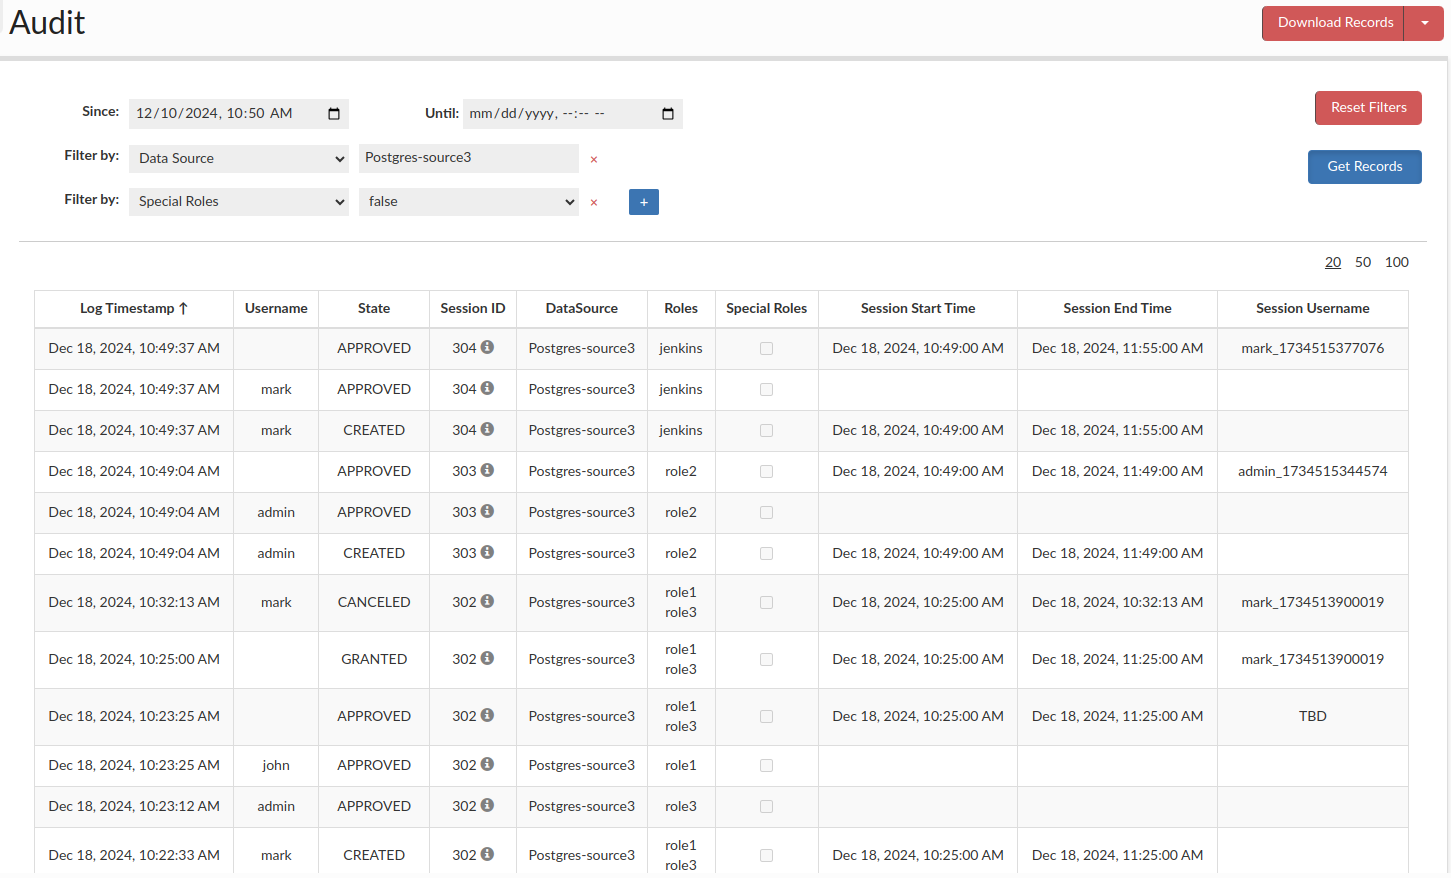
Audit User
To monitor the portal and all existing sessions, there is a role called "Audit User", which can be assigned to GUI users.
Once assigned, the user gains access to the Audit tab, where they can browse all session and roles state changes, filter records as needed, and view details such as who performed an action and how it changes session/role state. There is also an option to download the selected records based on applied filters or to download all records.