HAProxy for Heimdall Proxy Load Balancing
Introduction
HAProxy is a reliable and high-performance TCP/HTTP load balancer that can be used to distribute traffic across multiple backend servers like Heimdall Proxy. This guide provides a step-by-step approach to installing and configuring HAProxy on an Ubuntu system for Heimdall Proxies load balancing.
Prerequisites
- A system running Linux distribution.
- Heimdall Proxy installed on the backend servers.
Step 1: Install HAProxy
First, update the package list and install HAProxy using the following command:
sudo apt update && sudo apt upgrade -y
sudo apt install haproxy -y
Verify the installation:
haproxy -v
Enable HAProxy to start on system boot:
sudo systemctl enable haproxy
Step 2: Configure HAProxy for Heimdall Load Balancing
Edit HAProxy Configuration File
Open the HAProxy configuration file:
sudo nano /etc/haproxy/haproxy.cfg
Replace the existing content or append the following configuration (adjusting for hosts and IP addresses):
defaults
    mode    tcp

frontend ft_postgres
    bind *:5432
    default_backend bk_postgres

frontend stats
    mode http
    bind *:8404
    stats enable
    stats uri /stats
    stats refresh 10s

backend bk_postgres
    balance roundrobin
    option httpchk GET /status
    http-check expect status 200
    server pg-proxy1 192.168.90.4:5432 check port 80
    server pg-proxy2 192.168.90.5:5432 check port 80

global
    stats socket /var/run/haproxy.sock mode 600 level admin
Explanation:
mode tcpensures HAProxy works in TCP mode, required for PostgreSQL connections.bind *:5432instructs HAProxy to listen on port 5432.balance roundrobinenables equal distribution of connections across backend servers.option httpchk GET /statusset the HTTP healthcheck URLcheck port <port>enables health checks to monitor backend server availability using the http health check on the specified port (as configured in the vdb advanced settings).
Save the file (CTRL + X, then Y and Enter).
Step 3: Restart and Verify HAProxy
Restart HAProxy to apply the new configuration:
sudo systemctl restart haproxy
Check HAProxy’s status:
sudo systemctl status haproxy
Ensure HAProxy is listening on port 5432:
ss -tulnp | grep haproxy
Step 4: Test Heimdall Proxy Connection via HAProxy
To verify the setup, try connecting to Heimdall Proxy through HAProxy:
psql -h <haproxy_server_ip> -p 5432 -U <db_user> -d <database_name>
Replace <haproxy_server_ip> with the HAProxy host IP.
Replace <db_user> and <database_name> accordingly.
Optional configuration
With current code, Heimdall can serve DNS records from the manager that point to the proxy nodes attached. This allows HA Proxy to auto discover the proxy nodes and LB them. Here is an example configuration with this in place.
-
In the server properties, set the "DNS Port" to a value, but HA proxy will allow different ports to be used for this purpose, and others will allow normal DNS listeners to work without issue, such as with systemd-resolve on Ubuntu. As such, a value of 54 may be good. Make sure the auto-scaling mode is enabled, LB criteria of random or load, and proxy redirect name should be proxy private ip.
-
In the HA proxy configuration, add in a resolvers section, say for example:
resolvers postgres-vdb
   nameserver ns1 192.168.90.3:54
   accepted_payload_size 8192
For the backend section, swap the server line with a server-template line. Example
server-template pg-proxy 5 postgres-vdb.lab.heimdalldata.com:5432 check port 80 resolvers postgres-vdb init-add none
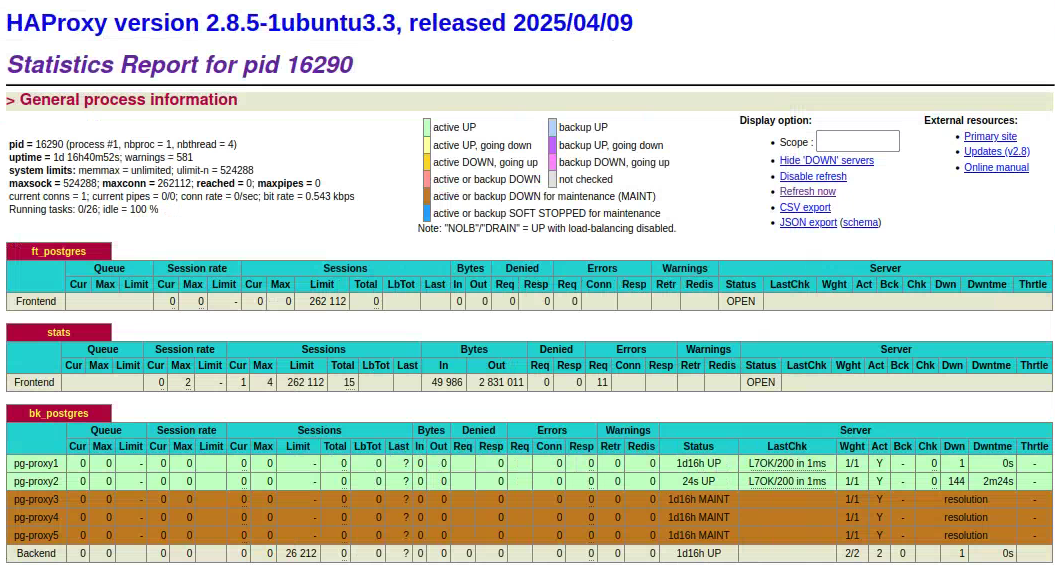
This will allow DNS Round Robin to return up to 2 servers, by querying the name "postgres-vdb.lab.heimdalldata.com" from the nameserver(s) listed in the resolvers section named postgres-vdb. From here, if you have created a stats section for ha proxy, you should be able to retrieve the current backend configuration and review the currently active nodes and their health. Example:
This configuration can be used in combination with Kubernetes or similar autoscaling function to automatically resize the cluster, and the haproxy and manager configurations will adapt automatically.
Here is a complete configuration block for a basic HA proxy with dynamic RR DNS discovery:
defaults
    mode    tcp

frontend ft_postgres
    bind *:5432
    default_backend bk_postgres

frontend stats
    mode http
    bind *:8404
    stats enable
    stats uri /stats
    stats refresh 10s

resolvers postgres-vdb
    nameserver ns1 192.168.90.3:54
    accepted_payload_size 8192

backend bk_postgres
    balance roundrobin
    option httpchk GET /status
    http-check expect status 200
    server-template pg-proxy 5 postgres-vdb.lab.heimdalldata.com:5432 check port 80 resolvers postgres-vdb init-addr none
#    server pg-proxy 192.168.90.4:5432 check port 80 resolvers postgres-vdb

global
    stats socket /var/run/haproxy.sock mode 600 level admin
When the central manger is in debug mode (via the admin->server properties tab), and DNS queries are being resolved, you can see the answers being logged:

Here, we can see that two IP addresses are being returned when HA proxy queries for them.
Note:
Heimdall Proxy instances running on 192.168.88.121 and 192.168.88.120, ensuring high availability.
Conclusion
This guide provides the essential steps to install and configure HAProxy for PostgreSQL load balancing with Heimdall Proxy. By following these steps, you can ensure high availability, efficient load distribution, and failover support for your PostgreSQL database cluster.